White Reveals, Black Conceals: Masking Your Way to Better Photography
by Lisa and Tom Cuchara (CT)
Masking is extremely simple; this one mantra “white reveals, black hides” will work for almost all of your Photoshop editing. From exposure to contrast, dodging and burning, blurring the background, selective coloring, selective focus, etc., Lisa and Tom will demonstrate “non-destructive” editing in Photoshop.
They will show you how to use layers and masks to enhance your images. Adjustment layers and filters can be applied to an entire image, but sometimes you just want to tweak part of an image, which is where masks come in. The advantage of using layer masks is that you can refine both the effect and the area being changed at any point, even after you save and re-open an image. White reveals, black hides and shades of gray provide a variety of opacities – this one simple concept is essential for anyone using the digital darkroom to enhance their images.
OUR NOTES
These notes are protected by the U.S. copyright Law. No reproduction of notes are permitted unless granted by the author. Please email us if you would like to use these notes.
“White Reveals, Black Conceals: Masking Your Way to a Better Photograph”
by Lisa and Tom Cuchara
Introduction
Masking is extremely simple; this one mantra “white reveals, black conceals” will work for almost all of your Photoshop editing. From exposure to contrast, dodging & burning, blurring the background, selective coloring, selective focus (even creating a Lensbaby effect in Photoshop), etc. “Non-destructive” editing in Photoshop is a critical component to the digital darkroom; this includes the use of layers and masks to enhance your images. Adjustment layers and filters can be applied to an entire image, but sometimes you just want to tweak part of an image, which is where masks come in. The advantage of using layer masks is that you can refine both the effect and the area being changed at any point, even after you save and re-open an image. White reveals, black conceals and shades of gray provide a variety of opacities -- this one simple concept is essential for anyone using the digital darkroom to enhance their images!
Layers, Adjustment layers, Masks – these are simpler then they sound. You may have even used masks and didn’t know it. If you have ever selected part of an image and then performed Levels (or any other adjustment) you actually created a mask without even attempting to do so. Adjustment layers are superior to working on the “background layer” which is often equated to the “negative”. Adjustment layers are more powerful because you can go back and change then at any time – masks too! They are not “permanent” in the sense that you can change them or even delete them at any time.
What are layers?
Layers allow you to work on parts of your photo without affecting other areas. Think of layers as a stack of transparencies, where each sheet is a different layer and the layers can appear in different orders with varying opacities. Plus using layers means that you can edit or adjust each sheet individually. You can edit a particular feature of your photograph (saturation, levels, etc.) using Adjustment layers. All of these are examples of non-destructive editing.
Worthwhile Shortcuts -- there are lots of references about Photoshop shortcuts (and you can even create your own for commonly used tasks)
http://www.creativetechs.com/iq/photoshop_cs3_shortcuts_cheatsheet.html
http://morris-photographics.com/photoshop/shortcuts/
http://digital-photography-school.com/blog/photoshop-shortcut-commands/
http://digital-photography-school.com/blog/28-more-exceptionally-useful-photoshop-shortcuts/
For MAC users please note that the equivalent modifier keys: the Option Key is the Mac equivalent to the PC (Alt) key and the Command Key (also called the Apple key; with its either cloverleaf symbol, the Apple symbol or both). is, more or less, the equivalent of the PC user's Control Key. Cmd = Ctrl and Opt = Alt.
Ctrl Z = UNDO (a VERY good shortcut to learn)
Ctrl 0 (zero) --> maximize the photo
Ctrl J à -->Create a new layer
Ctrl Shift R -->Add layer mask: Reveal all (White)
Ctrl Shift H -->Add layer mask: Hide all (Black)
M --> Marquee
W --> Magic Wand
Ctrl + Alt + Shift + E --> Stamp Visible
One of our favorites. First, create a new empty layer (Ctrl Shift N) on the top layer. Then select that new layer and use this command (Ctrl + Alt + Shift + E); we use this for editing that can’t be done non-destructively (USM, etc). We actually have an action that does this for us in one step because we use it so often.
Ctrl D --> deselectAlt [ --> move down a layer
Alt , (comma) --> move to bottom layer
Alt . (period) --> move to top layer
The use of Layers and MasksThe “eyeball” is used to turn on/off the visibility of any layer in the stack (you may have lots of layers).

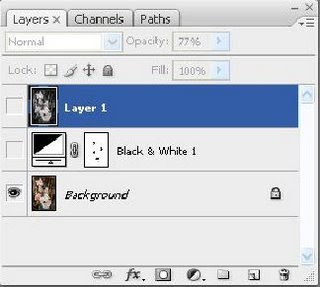
Fig. 1 Confirm that the layers palette is visible (If not, Windows --> layers)
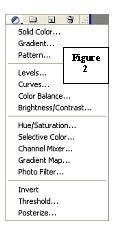
The CS3 screenshot (fig 2) shows the types of adjustment layers that you can create.
One of the advantages of adjustment layers is that you can re-open and re-adjust them at any time. They help assure that you are performing non-destructive editing of your photographs.

Figure 2
As soon as you open an image maximize it (Ctrl ZERO) and then make a copy of the layer (Ctrl J). Some editing will be performed on Adjustment layers. Adjustment layers do the same thing as normal color & exposure adjustments except that they are “non-destructive” in that they do not alter the original image information and they can be edited at any time. Some editing, like levels, saturation, etc. can be performed via adjustment layers (Fig 2) while other editing (like watercolor filters, etc.) need to be performed on copy layers (created by Ctrl J or by Ctrl N followed by Ctrl + Alt + Shift + E --> Stamp Visible).
http://photoshoptips.net/2005/09/16/adjustment-layers/ explains layers and adjustment layers and their transparent nature very well.

Create an adjustment layer click on the half white/half black circle at the bottom of the layers palette (Fig. 3). Adjustment layers automatically are created with a mask in place (a white, reveal all, mask, See Fig 1 middle layer).
Therefore selective coloring is EASY, just paint back in your color with a Black brush. In contrast, “copy layers” need to have a mask created/applied. You decide to apply a white OR a black mask depending upon if you have a lot to reveal (use a white mask and paint with black) OR a lot to conceal (use a black mask and paint with white).Ctrl Shift R --> Add layer mask: Reveal all (White)Ctrl Shift H --> Add layer mask: Hide all (Black)After your editing/effect has been created (either on an adjustment later or on a copy layer with a mask applied) then you can start to paint in (reveal) or paint out (conceal) you editing. You can also change the opacity of the brush (white or black) to “choose a shade of gray” to give you a semi-transparent adjustment layer.
The keyboard numbers affect the opacity of the brush (to get shades of gray) i.e. 5 = 50% opacity.
Remember white reveals, Black concealsB --> selects the Brush tool (this is what you will paint with)
D --> sets the color palette back to Black and White
X --> switches between Black and White
Numbers on the keyboard --> affects the opacity of the brush (to get shades of gray) i.e. 5 = 50% opacity
The "[" left square-bracket key will decrease brush size
The "]" right square-bracket key will increase brush size
Holding down the shift key while pressing on these same keys will soften and harden the brush edges.The brush tool is the main tool used to “paint” with white, black and shades of gray (via changing the opacity of the Black and white, easily via the keyboard numbers) as you go along).
Like Adjustment layers, masks never actually affect your image. The simple beauty of using layer masks is that you are in effect “painting” with whatever filter/edit/affect that you want to use. You can also change the opacity of the layer itself when you are done editing the layer to further refine the effect. If you make a mistake or color “outside the lines” you can easily fix it by painting back over with the opposite color. This is part of the power of masks, unlike editing after you have made a selection where you cannot undo and redo.Non-destructive Dodging and
Burning:
Create a new layer (Shift Ctrl N), name it dodge&burn and change the mode of the new layer to Overlay (make sure that Fill with Overlay-neutral color is checked). In overlay mode 50% gray has no effect. Set your foreground color to black, use a soft-edged brush (opacity in the 5-50% range) and paint to burn the areas that need darkening (don’t forget the edges, lots of photographers vignette or burn the edges to keep your eye on your subject). Press X to change the foreground color to white and paint to dodge the areas of the image that need to be dodged (lightened). There is a lot of control when dodging/burning this way and it is completely re-editable too!
Smart Objects:
Masks also work very well with smart filters and with opening an image in CS3 using two different RAW settings. For example, you want to optimize the sky in ACR (Adobe Camera RAW) but when you do the foreground suffers and vice versa.
Open your image in ACR, optimize the sky and hold Shift when you click open, opening it (as a smart object) in such a way that ACR is still accessible. Now copy that layer (right click “new smart object via copy”), now double click on that new layer smart object and re-adjust your image in ACR. Apply a layer mask to that newly edited layer [Ctrl Shift R à Add layer mask: Reveal all (White)]. Paint with Black to reveal the sky underneath. You now have a perfect exposed image optimized in ACR for the sky (highlights) and for the foreground.
Where to Find more information:
- Layers & Masks by Tim Grey http://www.naturescapes.net/022008/tg0208.htm
- The Creative Digital Darkroom by Katrin Eismann & Sean Duggan ISBN-13: 978-0596100476
- Adobe Photoshop Restoration & Retouching by Eismann & Palmer ISBN-13: 978-0321316271
- Photoshop Masking & Compositing by Katrin Eismann ISBN-13: 978-0735712799Podcast Listen to author Katrin Eismann discuss the thinking behind "The Creative Digital Darkroom"
- Creating Borders with Masks/Filters http://www.photoshopessentials.com/photo-effects/photo-borders/
- Using Adjustment Layers and Masking http://nyfalls.com/article-photoshop-adjustment-layers.html
- Photoshop CS3 - Black and White Adjustment Layer http://www.youtube.com/watch?v=i33SnI2RwP4
- Photoshop's adjustment layers http://findarticles.com/p/articles/mi_m1306/is_n8_v64/ai_21064105
- Adjustment Layers by Greer http://mgreerphoto.blogspot.com/2006/11/standard-photoshop-layers.html
- Layer Masks by Greer http://mgreerphoto.blogspot.com/2006/12/photoshop-layer-masks-tutorial.html
- PhotoShop Masks http://www.etsu.edu/oit/ats/workshops/handouts/DM%20230.pdf
No comments:
Post a Comment