Monday, June 30, 2008

This Week's Must-Have Item: Quik Pods

From Calumet

This Week's Must-Have Item: Quik Pods

Whether it's for a microphone, wireless flash or your camera itself, a little extra reach can go a long way on impromptu photo and video shoots. Extending up to 53" and collapsing to just 18, the Quik Pod DSLR can navigate tricky angles and be carried along with your everyday gear. This portable boom also doubles as a compact monopod with a rubberized tip to give good base traction; it also features a quick release plate to make use even simpler. The Quik Pod Pro+ is a smaller version (extends from 7.5" to 18") that provides the perfect reach for taking self-portraits with compact cameras.

Extend Your Reach with Quik Pods »

http://www.quikpod.com/dslr.asp

SPECIFICATIONS

  • High quality polycarbonate and aluminum components for strength, durability and portability
  • Works with digital SLR cameras, camcorders and portable lights
  • Built-in mirror for overhead shots and self-positioning
  • Retracted size - 18 inches (45cm)
  • Extended size - 53 inches (135cm)
  • Weight - 9oz (250 grams)
  • Quick Release Camera Mount
  • Tripod mount - Universal 1/4-20 screw
  • Includes Quik Pod® DSLR, machined aluminum end cap, wrist strap, gel pad for body brace comfort, hiking clip, carry bag, hiking clip and rubberized monopod adapter tip.
  • Maximum suggested weight of camera/camcorder/lighting is 5 lbs. (2.3 kgs.) when used handheld
  • Maximum suggested weight of camera/camcorder/lighting is 6 lbs. (3.6 kgs.)

Sunday, June 29, 2008

Jowling - Photography Fun For a Rainy Day


Note: File this one under ‘bizarre’, ’silly’ or ‘things to do on a boring rainy day…

Looking to take a portraits with a quirky twist?

Try ‘jowling‘ (also sometimes known as slap n’ flap).

How do you do it?

Get your subject to relax their facial muscles completely (to the point that they have no facial expression)…. open their eyes and mouth (try to keep them open)… then to shake their head from side to side as fast as they can. Start snapping (use a flash and fast shutter speed to freeze the ‘action’)!

Here’s what jowling looks like:
Here are two more examples

PORTLAND, MAINE: Art Morris Seminar

If you like BIRDS would highly suggest subscribing to the newsletter from Art Morris "Birds As Art". Subscription information and back issues of all BAA Bulletins can be found in the Bulletin Archives which may be accessed from the home page at http://www.birdsasart.com/.

Art is presenting “The Art of Nature Photography; It Ain’t Just Birds” in our neck of this woods this Fall.


PORTLAND, MAINE: “The Art of Nature Photography; It Ain’t Just Birds” Weekend How-To Seminar

“The Art of Nature Photography; It Ain’t Just Birds” Weekend How-To Seminar in Portland, Maine October 11-12, 2008
Eastland Park Hotel, 157 High Street, Portland, ME

This seminar is for all nature photographers who want to learn how to make better photographs. On Saturday I will describe the methods and techniques that I have used and developed since 1983. My comments on lenses and digital camera bodies, AF, light, and on composition and image design will be highly informative and educational. And my tips on getting close to free and wild subjects and creating pleasing blurs will help you become a better photographer. Everyone with a telephoto lens who wishes to dramatically improve the quality of their images will benefit from attending.

Since going all-digital in November 2002, I have—with the help of many wonderful friends—become a Photoshop expert. My approach to optimizing images is to create master files of excellent quality in the shortest possible time. I will share our workflow and numerous Digital and Photoshop tips on Sunday. As more and more folks are using Digital Capture, I am finding on our IPTs that many good to excellent photographers have no clue as to how to use Photoshop to make their images look better. In fact, many of them make their best images look worse! I can and will teach you to do just that at this seminar.

Do consider taking advantage of the opportunity to spend two days learning from one of the premier nature photography educators on the planet by joining me for this great weekend. The October 11-12 dates were carefully chosen to coincide roughly with the average peak of fall color in southern Maine. The likelihood is that if you are coming from out of town and would like to photograph the fall color the best bet (taking global warming and the trends in recent years) would be to schedule your photography in the days following the seminar. Every year, however, is different, and this is nature photography so there are no guarantees, but chances are, whether you photograph just before or just after the seminar you should have many chances to create some great images. Best bet: come a few days early and stay on for a few days… (Hint: hope for a pre-dawn rainstorm followed by the sun breaking through in the east while grayish-black storm clouds fill the western sky…)

The seminar will be held at the Eastland Park Hotel. Folks staying at least two nights in the hotel will receive a free Lens Pen Combo Kit at the seminar. As fall color time is peak season in southern Maine, hotel rates are high anywhere in the region. We were able to negotiate a rate of $159 for folks registering early. Once the block of rooms is gone, higher rates will apply. The doors will open on both days at 8 am and the programs will begin at 9 am sharp. There will be tons of great door prizes (including Delkin e-film Pro compact flash cards and some great stuff from Lowepro and Wimberley). I hope that you will be able to join me for what will be an incredibly educational and fun-filled weekend. (If anyone would like to help us set up or to hang out, be there at 7:00am.)

The cost of the weekend seminar will be $169. The cost of either single day will be $99. Members of qualifying camera clubs are invited to apply a $10 discount. (If you are a member of a camera club or other photography organization please e-mail us before registering to learn how your group can become a qualifying club). Register with a friend or a spouse and take $10 off each registration. Register in groups of four or more and take $20 off of each registration. Register in a group of ten or more and take $30 off each registration. It is highly recommend that folks purchase the buffet luncheon option ($15/day includes tip and tax). Those purchasing the lunch option will receive their lunch coupon when they check in each morning.) The cost of the weekend seminar plus the two lunches is $199.

There are three ways to register:

1- Send a check for the full amount made out to "Arthur Morris" to PO Box 7245, Indian Lake Estates, FL 33855.
2- Call us with a credit card at 863-692-0906.
3- Send us a Paypal (using either any link on our site or your Paypal account) to us at birdsasart@att.net.)

In all cases, we will need your e-mail address, your mailing address, and your daytime and evening phone numbers.

Saturday, June 28, 2008

From Carl Heilman (Fort Ticonderoga & digital weekend workshops)

From Carl Heilman

Hi,

I thought I'd write a quick note here at the onset of the summer rush. I just got back from a wonderful photo trip to the Maine Coast for my upcoming book. We did a puffin trip, and also traveled out to some locations I've wanted to see for some time - like Isle au Haut and Monhegan Island. It was a misty, foggy trip along the coast much of the time - which made for some great 'mood' photos you can't get in other conditions. Early summer wildflowers including lupines and dame's rocket were in full bloom so there were endless possibilites for photos.

For those interested in regional history, Fort Ticonderoga will be commemorating the 250th anniversary fo the French and Indian War this summer. Activities begin this weekend, June 28, 29 with the Grand Encampment of the Seven Years' War. There are re-enactments both Sat. and Sun. More info is on the web at http://www.fort-ticonderoga.org/ .

Back home again, I'm catching up in the office and just had a couple of folks sign up for the digital weekend workshops. Thought I'd mention that there are still openings in all of the summer and fall workshops - but the early bird price for the digital weekends ends on July 1st.

Acadia National Park Wildflowers Nature Photography WorkshopFive Day Workshop ($745. before 3/15/09 - $845. after)(Easy / Moderate)June 26 - 30, 2009 - (12 out of 12 spaces left)

Adirondack Digital Photography and Photoshop Weekend WorkshopTwo Day Workshop ($400 before 7/1/08, $450. after) (Easy)August 2 - 3, 2008 (3 out of 6 spaces left)October 11 - 12, 2008 (3 out of 6 spaces left)

Adirondack Fall Landscapes Photo WorkshopOne Day Workshops ($160. before 9/1/08, $175. after) (Easy)Septenber 28, 2008 (6 out of 6 spaces left)October 4, 2008 (5 out of 6 spaces left)October 5, 2008 (6 out of 6 spaces left)

I hope everyone has a safe and enjoyable summer!

Best wishes,
Carl

http://www.carlheilman.com/
http://www.naturepanoramas.com/
Phone (518)-494-3072
Mon - Fri 9 - 5 Eastern Time

Friday, June 27, 2008

Electronic A slideshow

At the CT-PPA meeting last night we learned about animoto, a website that allows you to create cool videos. I uploaded our end of year images from electronic A and a few minutes later this was emailed to me! EASY!!

Enjoy!


Want to check out Animoto -- click here to open your own account. You can create 30 second videos for FREE of longer downloadable videos for $25/year.


Here are the images from the Jane Sibley Nature competition

New printer -- the Epson Stylus Photo R2880

From Calumet

For years, the Epson Stylus Photo R2400 has been an overwhelming favorite for a tremendous range of photographers. Producing vibrant color photos and sophisticated neutral black-and-whites, this 13" printer provides considerable punch in its relatively small size. Needless to say, it's a tough act to follow. The newly arrived R2880 delivers both new technology and the features that have made its predecessor popular among so many photographers.

With recently developed Vivid Magenta ink, the R2880 is capable of producing blues, purples and reds previously unachievable. To make sure you get the most out of its extended range, the R2880 utilizes Epson's sophisticated Radiance technology. Radiance produces smoother color transitions than older technology, making prints more realistic than ever before. Along with reduced grain and smooth gradation, Radiance gives you prints whose colors appear consistent whether viewed in a sunlit home or under a gallery's tungsten lamps. The R2880 also improves reliability over its predecessor, adding automatic nozzle checks and a mist collection system to keep ink flow smooth and accurate.

Like the R2400 before it, the R2880 gives precision output on exhibition quality materials (up to 13" wide with support for rolls) that is up to the standards of full-scale professional print labs and enthusiasts alike.

Print with the Epson Stylus Photo R2880 »

http://www.epson.com/cgi-bin/Store/consumer/consDetail.jsp?oid=63075040&ref=r0302EJb3X&gclid=CLTlqpmsjpQCFQEnGgodEE69gg

diChello Landscape/Seascape Award

Thursday, June 26, 2008

Red Eye repair for GREEN eyes (animals)

Digital Darkroom Questions (DDQ)
June 26, 2008
by Tim Grey
www.timgrey.com
tim@timgrey.com

Books: www.timgrey.com/books/index.htm
Blog: www.timgrey.com/blog

Question:
The red-eye repair tool in PS works great, but many animals have green eyes when photographed with flash. The red-eye tool doesn't seem to work on those. Is there an equally quick fix for those?

Answer:

Perhaps not equally fix as it generally involves two stages, but there is a quick fix.

The first step is to neutralize the unwanted color (green in this case, though this would work for red eyes or any other color for that matter). Start by holding the Alt/Option key and clicking the Create a New Layer button (the blank sheet of paper icon) at the bottom of the Layers palette. In the New Layer dialog box enter a meaningful name for this layer in the Name field (perhaps "Eye Color Fix") and set the Mode to Color, then click OK. Select the Brush tool (you can simply press B to activate it), and on the Options bar click the dropdown for the Brush and set the Hardness to 0%. Put your mouse over the eye area that needs to be fixed (zoom in as needed) and use the [ and ] keys to reduce or increase the size or the brush. Make sure black is set as the foreground color (press D for the defaults of black and white, and then X if needed to swap foreground and background colors to set black as the foreground color). Paint in the area you need to neutralize (the green area of the pupil in this case).

At this point you've resolved the color issue, but the eyes probably look to bright. We'll solve this in a very similar way, but on a different layer. So, hold the Alt/Option key and click the Create a New Layer button again. Give this one another name (such as "Darken Eyes") and set the Mode to Overlay, then click OK. Reduce the Opacity on the Options bar (still using the Brush tool) to about 20%. Paint over the pupils to darken them. You may need to paint multiple times to adequately darken the pupils, but I suggest zooming out after each application of painting to get a better sense of the effect. Then, if needed, zoom in again and paint more to darken. Be sure to paint the entire pupil area completely with each painting application, so you'll ensure an even covering of the area.

With these two methods combined you can remove the color of the eyes and then darken to the extent necessary. The same process will work to neutralize any color cast affecting the eyes of any subject.

##########

Support the DDQ E-mail Service

Contributions from readers like you are the only compensation for the time and effort that goes into producing this email service. You can help support this effort by becoming a contributor. Besides helping to ensure this service remains viable, you'll gain access to a searchable archive of all prior questions and have the opportunity to have your own questions considered for inclusion in the DDQ email. Details can be found here:
www.timgrey.com/ddq/

The Fine Print

Please feel free to forward this e-mail message to any friends that may be interested, and recommend that they subscribe to the free service. All I ask is that you forward the message in its entirety.

Details on adding or removing an e-mail address can be found here:
www.timgrey.com/ddq/

Contents of this e-mail are copyright by Tim Grey. All Rights Reserved.

Rescue of photos from CF cards, etc.

Yesterday I blogged about the updated photo receovery software. I received a few questions about this software and about data loss itself. I thought that I would comment here for all to see.

Please note that ANY storage is subject to a problem. For your hard drive the general consensus is not IF your hard drive will fail, but WHEN it will fail. Yes, memory cards can also fail.

I have had a couple of cards fail and I have also formatted over photographs that were not yet downloaded to my computer.

When we were on our honeymoon we somehow reformatted a CF card that had not been downloaded. Argh! But all was not lost. I was prepared for this!

How?

Well, I had practiced this scenario, at home, under no stress. I HIGHLY recommend that you run through the recovery process under non vasodilating conditions because when it happens your adrenaline will be running and it will be much easier to stay calm knowing that you know how to rescue.

So, if you reformat a card, or if a card fails -- stop. Do not take any more photos. Use the rescue software. I have tried three programs -- they are free and you buy them if they work for you (trial to see that they did indeed rescue your images). Sometimes one program works better than another. Try the one that is for your card type (Sandisk, Lexar, etc.) first (some come with your software for free).

Also note that CF cards also have a lifetime guarantee on them. I have used this twice, once for a Sandisk 512K card about 6 years ago and once this week for a 4 GB Sandisk card. Sandisk replaced the card both times free, including no shipping charges.

Photography Acronyms


Photography Acronyms

Have you ever been reading a photography forum or article online and seen some acronym you didn't understand?

Is CoC practically a four-letter word?

Does GIF remind you of peanut butter?

Are PJ's something you wear to bed at night?

If so, you're in the right place to learn some photo lingo!

http://www.wonderfulphotos.com/articles/cameras/acronyms/

Wednesday, June 25, 2008

DataRescue updates PhotoRescue photo recovery application

Compact Flash Memory Card is a small removable storage device that is designed with flash technology (a non-volatile storage solution that does not require a battery to retain data indefinitely). They are generally available in capacities from about 512 MB to about 64 GB. Compact Flash Cards are cheaper, easily available and work in almost all types of digital cameras. The major benefit of using a Compact Flash Card in a digital camera is that it has a controller chip in the card facilitates higher transfer rates.

The most important performance characteristic of a Compact Flash Card is the speed at which it can read and write data. Usually the write speed is the more important since it determines the maximum speed at which a digital camera can shoot under some conditions (especially moving objects). Due to this high speed Higher level Digital SLR (DSLR) cameras adapt Compact Flash Cards as the standard memory cards. Kingston, Ritek Ridata, SanDisk, Transcend, Apacer, Viking, Lexar are some of the trusted brands for Compact Flash Cards.

Causes for Compact Flash Card failure/corruption
Compact Flash cards fail or get corrupt due to many reasons like component failure, user errors/mishandling and software corruption. But, the most common cause for data loss from a Compact Flash card are user errors like:

  • Turning off the camera before the image is completely written to the CF Card.
  • Taking photographs when the camera battery is at the end of its life.
  • Ejecting the Compact Flash Card while the camera is still writing to it.
  • Attempting to take a second picture before the camera has finished processing the previous one.

If you have experienced any of the above situations while using your digital camera or Compact Flash Card, don’t panic!

All your lost photos/videos are easily recoverable.

Further, if you have received an error message like “card not formatted”, “card not found” or “no images found” it means that your CF card is corrupt or damaged. In most cases, the photographs, videos are still recoverable using Data Recovery Software.

Here are some simple tips to be followed in case of data loss from a Compact Flash Card:

“DO NOT FORMAT THE CF CARD” (Formatting a Compact Flash Card erases all of the pictures, borders, templates and other information on the card).

Turn off your camera and wait for the access light to stop blinking and then remove the Compact Flash Card and store it in a safe location.

DON’T keep attempting to read the pictures on your Compact Flash Card. Every time you are trying to do this you are applying electrical power to the Card. This electrical power can further damage your pictures, making it impossible to recover them.

Data Recovery Software such as Digital Media Recovery will help in recovering almost all the data lost from the Compact Flash Card. Download demo version of Digital Media Recovery software and scan your Compact Flash Card. You will able to see the data which can be recovered. Digital Media Recovery Software provides complete recovery for lost, deleted, corrupted or formatted digital photos and audio files from Compact Flash Cards and other removable media.

PhotoRescue: data-recovery for the digital photographer

If you are a digital photographer you should be aware of this product

DataRescue updates PhotoRescue photo recovery application

Monday, June 16, 2008 by Rob Galbraith

DataRescue has released PhotoRescue v3.1.5.11030 for Windows and Mac. The new version adds resizeable thumbnails in the file selection window, improves the recovery of certain movie types and fixes bugs. The update of the venerable photo recovery application is free to those who purchased the application in the last year, or US$29 for a new license.The trial version automatically transforms into a licensed version when loaded onto a machine that has an earlier licensed copy installed.

PhotoRescue is an advanced data-recovery solution for digital photography media. Whether you have erased your pictures or formatted your card by mistake, or you have experienced a crash, PhotoRescue may help.

Works with all the types of media used in digital camera (SD Cards, CF Cards, Memeory Sticks, etc... etc...

Cutting edge QT based user interface: common cross-platform interface. No learning curve or differences between versions.

Native Intel Support on Mac OS X: several times faster than version 2.x in native mode.

Up-to-Date RAW file recovery support: supports latest cameras such as the Canon 400D and many more...

Improved Movie recovery: we keep increasing the maximum movie recovery size.

One year of free updates: keep abreast of technology changes, new file formats and technologies.

Unlimited recoveries: use our program as many times as you need to use it.

No media size limits. No recovery limits. Non expiring license: the program is yours to keep and use.

No copy protection: no unfriendly copy protection scheme or intrusive activation mechanism.

Free demo with guaranteed previews: unlike some of our competitors who use the small embedded thumbnail as a preview of the recovery, we generate our preview on the fly, from actual card data.

DOWNLOAD OUR FREE DEMO VERSION NOW (updated to 3.1.5.11030 on June 16, 2008)

PhotoRescue 3.0 and 3.1 testimony, courtesy of noted author Peter K. Burian.
Jason Dunn has blogged about PhotoRescue. Thanks for letting us know!
Printed Matter Press has blogged about PhotoRescue. Thanks for letting us know!
O'Reilly Media's "Inside Aperture" mentions PhotoRescue.
Microsoft's take on PhotoRescue
Netzwelt recommends PhotoRescue (July 11, 2007).

Tuesday, June 24, 2008

Reinventing Instant Photography for the Digital Age

This appeared on the http://www.pixelatedimage.com/blog/

June 24th, 2008

The new pocket-sized Polaroid mobile printer dubbed “PoGo” is about to hit the market. The Polaroid website says PoGo hits Best Buy stores (probably in USA only) on July 06, 2008, and in Target on July 20, 2008. Estimated price will be $149.

Reinventing Instant Photography for the Digital Age

Polaroid has reinvented instant photography for the digital age with the Polaroid PoGo™ Instant Mobile Printer. Sleek, stylish, and easy to use, the Polaroid PoGo™ Instant Mobile Printer lets you share photos whether you are on vacation or just hanging out with your friends. Bring Polaroid magic from your camera cell phone or digital camera with ZINK™ Zero Ink™ Printing Technology from ZINK Imaging. Mobile and easy-to-use, the Polaroid PoGo™ Instant Mobile Printer provides a new, innovative way to share digital photos directly from your camera cell phone or digital camera, instantly. The Polaroid Way.

No computer connections needed. Print directly from your camera's cell phone or digital camera. A new way to share -- Print and share. 2x3" borderless color images in under a minute. As mobile as you are. Pocket-size, sleek, stylish design
Instant magic. Prints without ink using ZINK™ Zero Ink™ Printing Technology from ZINK Imaging.

Camera Phone
The Polaroid PoGo™ Digital Instant Mobile Photo Printer is the easiest way to print photos from a camera phone. Wirelessly transfer images from a Bluetooth-enabled camera phone to the Mobile Printer and print instantly. Using the built-in OBEX (object exchange profile) Bluetooth in the phone and the printer, connecting and printing becomes instant.

Digital Camera
Instantly printing images from a digital camera is as easy as connecting the USB cable to the PictBridge-enabled camera and printer. Once connected, follow the PictBridge screen on the camera display. Simply select what image to send to the printer and within 60 seconds, the print is ready to be shared.

This is the review form David duChemin

I will do a review as soon as I can. In the mean time think about how many times you’ve wished you could give a subject a copy of their photograph, think about how much easier it is to give a copy then and there, rather than waiting until you get home and hoping you remember. Think how useful this might be in getting that model release signed or getting a reluctant model to spend a few moments with you. In the places I work these small photographs would be kept as priceless family heirlooms - not bad for a thirty-cent piece of paper.

It will weigh 8 oz. (without battery) and measures about 1″ by 3″ by 4.5″. Each 2×3 print takes 60 seconds to make. Downsides? 15 prints per battery charge, but extra batteries are available. There’s no inks to replace and the paper pricing looks like it won’t kill us either.
Here’s the website.

What You Get
• 2” x 3” borderless, sticky-back prints
• Bluetooth, PictBridge compatible
• Smudge-proof, water-resistant, tear-proof photos
• Fade-resistant, long-lasting images
• No waste – no ink cartridges
• Prints in about 60 seconds
• Rechargeable lithium-ion battery

see the full specs here: http://www.polaroid.com/pogo/us/specs.html

Curious about how they do this without ink???

ZINK™ stands for Zero Ink™ - a new and simpler approach to printing where high quality, colorful, durable and affordable prints are magically created – all without a drop of ink. The ZINK Technology, invented by ZINK Imaging, encompasses both the ZINK Paper™ and the intelligence embedded in every ZINK-enabled device. Over 100 patents and patents pending were generated in the development of this breakthrough technology.

The heart of this new "ZINK" category of printing is the ZINK Paper™. The patented ZINK Paper is an advanced composite material with embedded yellow, magenta and cyan dye crystals, activated with 200 million heat pulses, in 30 seconds, in a single pass. With 100 billion crystals in a 2x3" print, the paper is 100% inkless. A ZINK-enabled printer uses heat to activate and colorize these crystals. Because there is no ink, every ZINK-enabled device has the unique benefits of being small, simple, elegant, and eco-friendly.

How ZINK™ Works -- It's as simple as "just add paper" http://www.zink.com/videos/?cat=Discover&title=How%20ZINK%20Works&file=how_zink_works&Download=true

See ZINK™ Crystals in Action

How to avoid “The Shake”

From the Digital Photography School

We all know that we should ALWAYS use a tripod, but sometimes you find yourself without one or in a place where you cannot use one.

This article is about how to avoid “The Shake” (the author named him that because he’s like an evil monster who comes in and ruins otherwise perfectly delicious images).

In this post photographer Natalie Norton explores 6 ways you can hand hold lenses at low apertures and low shutter speeds and still avoid blurry images caused by camera shake.

As often as possible I opt for lenses with VR (Vibration Reduction) or IS (Image Stabilization). You pay a pretty penny for this feature. For me, it’s worth the extra cost, and for the point I’m at in my photography it’s a reasonable expense. But that wasn’t always the case, and what about uber slow shutter speeds with no tripod. No IS or VR can hold up under pressure like that. . .no matter how magical they may be. . . and magical they are, trust you me.

6 Techniques to Reduce Camera Shake

Here are 6 options for avoiding camera shake and achieving crisp, delicious images no matter the length of the lens, no matter the shutter speed.


Read the rest of the article here:
http://digital-photography-school.com/blog/how-to-avoid-camera-shake/

Optical Media (CD/DVD) Data Loss

Tim will be at NECCC. http://www.neccc.org/
I thought that today's question/answer would be of interest to everyone...

Digital Darkroom Questions (DDQ)
June 24, 2008
by Tim Greywww.timgrey.comtim@timgrey.com
Books: www.timgrey.com/books/index.htm
Blog: www.timgrey.com/blog

Question: I have thousands of high resolution photos archived in CD's and DVD's (in addition to archiving in external hard drives). Of more than 300 CD's and DVD's I have found that there are about 10-15 in which the files have been damaged or corrupted (in spite of the fact that I store them in a proper environment).

I have two questions: 1) can you suggest software that I could use to try to recover these files, and, most important; 2) in your opinion, what is the best media (CD and DVD) that is currently out there for archival purposes? I remember when CD and DVD media started coming out that it was said that it would last for a hundred years, well, we have learned that is not the case. So, what is currently the best in terms of long life archival characteristics?

==========
Answer:


As I've said many times, when comparing the longevity ratings of various optical media (CDs and DVDs) I really thought of the ratings as only providing a relative indication of the quality of the discs, not of the longevity you should actually expect from the discs. I've seen a great many optical discs fail (both CD and DVD) to the point that I simply don't trust them for archival storage.

There are certainly issues with hard drive storage, but in my mind maintaining a library on redundant hard drives is far more reliable than the use of optical media. So, while I might recommend media such as the Verbatim DataLifePlus line of products, I really recommend avoiding optical media for long-term archival storage.

As for recovering data from your optical media, there's a good chance you'll be able to recover a significant portion of the data stored on a given disc. Often a single error results in the entire disc being considered unreadable by your operating system, when it is still possible to salvage data.

There are a variety of tools available for recovering data from your optical media, but one I've had some success with is BadCopy Pro from Jufsoft. You can get more details and download a free trial version here:
http://www.jufsoft.com/badcopy/

Support the DDQ E-mail Service

Contributions from readers like you are the only compensation for the time and effort that goes into producing this email service. You can help support this effort by becoming a contributor. Besides helping to ensure this service remains viable, you'll gain access to a searchable archive of all prior questions and have the opportunity to have your own questions considered for inclusion in the DDQ email. Details can be found here:www.timgrey.com/ddq/

The Fine Print
Please feel free to forward this e-mail message to any friends that may be interested, and recommend that they subscribe to the free service. All I ask is that you forward the message in its entirety.

Details on adding or removing an e-mail address can be found here:www.timgrey.com/ddq/

Contents of this e-mail are copyright by Tim Grey. All Rights Reserved.

Monday, June 23, 2008

'End of the Year' competition images POSTED

All of the electronic 'End of the Year' competition images have been posted on our website (class A, class B, plus both honor awards) http://www.newhavencameraclub.org/images.htm

15th Annual Popular Photography Photo Contest

The 15th Annual Popular Photography Photo Contest gives photographers the opportunity to have their work recognized in the January 2009 issue of Popular Photography, the largest photo magazine in the world, as well as on PopPhoto.com.

The winning photographers will also win prizes from Panasonic, Tourism Ireland, Circuit City, SmugMug and fotocommunity.com.


DEADLINE: September 12th, 2008ENTRY FEE: $10 per image
Categories include:
The Grand Prize winner will receive a 50" Panasonic HDTV, HD Camcorder, Blu-Ray DVD Player, Lumix Digital Camera, and an all expense paid trip to Ireland for two. The Panasonic Prize package will be set up or installed by firedog, Circuit City's highly trained professionals. The winner will also receive a SmugMug Lifetime Pro account with full customization, $500 of free prints/gifts from the SmugMug website, entry to exclusive 2009 SmugMug Workshop, a 3 year world membership from fotocommunity.com, as well as a X-Rite ColorMunki Photo.

The winners of each category will receive a new Panasonic Lumix Digital Camera, a SmugMug Liftetime free Pro Account, as well as a 2 year world membership from fotocommunity.com.

Sunday, June 22, 2008

Painting with Light

This issue of National Geographic had some awesome images of Stonehenge. The photographer describes the trials and tribulations of getting there images. More images can be found here: http://ngm.nationalgeographic.com/2008/06/stonehenge/geiger-photography


http://ngm.typepad.com/digital_photography/2008/05/shooting-stoneh.html


Ken Geiger is the senior editor for technology at National Geographic magazine. He joined the staff of National Geographic in 2004 after 24 years of newspaper journalism, most recently as the director of photography for the Dallas Morning News. Geiger now serves as one of the many photo editors for the magazine, helping to shape its editorial content and is also in charge of the magazine's conversion to digital photography.


Last year about this time David Griffin, National Geographic’s director of photography, and Elizabeth Krist, a senior photo editor, walked into my office and asked if I had any ideas on how we could photograph Stonehenge in a way that would be new and different. It was a natural question. David was already thinking about high-dynamic-range photography, and I’m the digital-tech guy at the magazine. I had an idea, but it came with a catch—I wanted to be the photographer, anything to get out of the office and into the field.


I thought I had a good idea, but the cosmic forces of serendipity didn’t want to cooperate. Not to mention that I wasn’t trying to concentrate just on making one good photograph of Stonehenge. I was trying to shoot a cover—ON MY FIRST NATIONAL GEOGRAPHIC ASSIGNMENT! Talk about turning up the heat in the pressure cooker!


Forty-two hours of all-night shooting time, and I had to leave with one triptych that wasn’t good enough to run in the magazine. I was bummed out.


Yet between the exposures with the Gilde camera I’d done a lot of experimenting with my 35mm equipment. I learned that the best angles of Stonehenge are shot from six inches off the ground, to minimize the security fence and the two highways that run adjacent to the site. I also discovered that light painting with one light didn’t give consistent results, and that trying to light-paint Stonehenge in less than a minute was nearly impossible.


Here is the final formula for the cover shot:

Hasselblad Flexbody with 15mm of drop dialed in to a Phase One P45 back, ISO was set at 100, the lens was a Hasselblad Distagon 40mm set at f11, there were 12 SureFire lights aimed at the stones which were on for about 12 seconds during the 15 minute total exposure.

Dressed in black, I then walked through the scene painting additional light on the stones to create some of edge highlights.


Ominous beneath a haunting moon, the age-old monument has spawned fanciful theories and dark imaginings. Victorians dubbed one fallen slab of rock the Slaughter Stone—a supposed place of human sacrifice. But there is no evidence that ritual killings ever took place at Stonehenge.


This scene (above) was composed of multiple digital images—a short exposure to render a dark night sky, and a long exposure (up to 30 seconds) to allow photographer Ken Geiger to move through the monument, "painting" it with light from his flashlight.


Update 2: The image (above) that’s used as the double gatefold in the magazine was shot at 11:19PM, using a little different technique than described for the cover. Instead of multiple lights, I locked the camera shutter open and then walked into the scene with a single hand-held flashlight. Hiding behind one of the stones, I then turned on the light and carefully painted a portion of a nearby stone in need of a highlight. With the full moon illuminating the site it was easy to walk amongst the stones. I repeated this process in about 25 different locations—all in one 15-minute exposure. I’m sure it was quite a sight; I defiantly kept the security guards amused.


If the Stones Could Speak --Searching for the Meaning of Stonehenge
By Caroline Alexander (National Geographic Contributing Writer)
Photograph by Ken Geiger (National Geographic Staff)


http://ngm.nationalgeographic.com/2008/06/stonehenge/alexander-text

If you’re interested in learning more about light painting, take a look at Dave Black’s web site. He’s a master of the technique and teaches at several workshops around the country.

Photoshop CS3: Underexposure S.O.S.

This is from Layers Magazine (there are even files to download to try this lesson on your own)


http://www.layersmagazine.com/photoshop-cs3-underexposure-sos-part-1.html

By Sean Duggan June 19, 2008

"Let’s face it, even though you should always try to get the best exposure in the camera so you don’t have to spend a lot of time fixing it in Photoshop, every once in a while you end up with a badly underexposed image.

In this tutorial, we’ll focus on ways to improve a severely underexposed RAW file using both the controls in Adobe Camera Raw and Photoshop. "

[If you’d like to download the image used in this tutorial to practice the technique, click here. This file is for practice purposes only.]

Saturday, June 21, 2008

Free Fonts

From David Ziser http://digitalprotalk.blogspot.com/2008/06/more-cool-photoshop-goodies-for-all.html

Back in May, I posted a link to over 7800 Fonts - here is that link again.

I know you're thinking I may still need more - no problem. Check out this link to FontsForPeas right here.

OK, now here is the best part. As of today, Kevin and Amanda - they run the sight - will be happy to turn your own handwriting into a font too - pretty cool. Follow their instructions to the letter and you can get your own personalized font!

Oops! (Even the Pros Do It)

Scott Kelby wrote a candid post about forgetting to put a memory card into the camera.

Here comes the light! I could see we were literally just minutes from that great light, and RC was still circling for a parking spot. So, I thought I’d crank off a few shots to kind of dial in the basic exposure and composition before the “magic light” hit because I’d only have a few minutes (and I was hoping RC would even get to see it). I went to push the shutter button and it wouldn’t fire. I looked at my LCD info window on the top of my camera and it said, “E” (no memory card). I had taken it out in my hotel room and forgot to put it back in for this shoot.

Now, this type of thing happens to me in more instances than I’d care to admit, but luckily Matt was five feet from with with a backpack full of gear, so I asked Matt if I could borrow a memory card. Matt had that frozen look on his face, and he said, “Oh no—-I don’t have an empty card. In fact, I only have the card in the camera, and it’s full of shots of my niece’s confirmation from this morning, and I haven’t backed them up yet, so I can’t shoot either.” So, there we were, Matt trying to free up a few empty shots by deleting and editing in the camera, and me looking on without a card altogether.

Matt and I were standing there futzing with all of this as we watched the magic light come and go without even firing a single frame. RC came up a few minutes later, and in true RC fashion—he had two empty cards for Matt and I, and within a few minutes there we were; three guys, shooting one of the world’s most recognizable skylines, with totally average “whatever” light, and we came away with the same average “whatever” shots that the tourists standing beside us probably got.

From the Pixelated Image Blog http://www.pixelatedimage.com/blog/

Ever been in a situation where you’ve accidentally left your digital film at home? Ever run out in the middle of a shoot that went longer than planned? If you’re a Canon shooter, the battery pack for all the recent DLSRs has a secret hiding place. Until now you’ve needed to know the secret handshake and had to join a club, but those days are no longer.

If you’re comfortable putting the spare door somewhere else, this spot on the Canon battery grips is an ideal place for an extra CF card.

Friday, June 20, 2008

END OF YEAR COMPETITION – 2008

I just received the names of the End of Year Competition winning images (and their makers). For those of you that missed the banquet you missed seeing some awesome photographs! The food was good and the company even better! There were sooo many great images and I always love this end of year exhibition because we get to see all those great images side by side.

NEW HAVEN CAMERA CLUB -- END OF YEAR COMPETITION – 2008

PRINTS

1st Place – Print of the Year Barbara Vietzke Monday Morning Wash Day

2nd Place Lisa Cuchara Osprey Male With Flounder Dinner

3rd Place Lisa Cuchara Heron and Sunrise


COLOR SLIDES

1st Place – Slide of the Year Ken Kwan Ruby Beach Evening

2nd Place Ken Kwan Cape Bon Ami

3rd Place Andrey Antov Sardinian Sunset


ELECTRONIC IMAGES – CLASS A

1st Place Richard Asarisi Annas

2nd Place Gary Prestash Cedar Waxwing With Crabapple

3rd Place Andrey Antov Diana’s Baths 2


ELECTRONIC IMAGES – CLASS B

1st Place Bob Parisi Bass Harbor Lighthouse
Electronic Image of the Year

2nd Place Susan Naumann Keeping Watch

3rd Place Joan Balen New Day Dawning


JOSEPH DI CHELLO MEMORIAL AWARD – BEST LANDSCAPE OR SEASCAPE

Bob Parisi Bass Harbor Lighthouse


JANE SIBLEY AWARD – BEST NATURE IMAGE

Vic Krasenics Green Heron With Moth #1


Here are the winners from our entire year. We compete 16 images but the scores from the lowest four are dropped and then the 'Best of 12' is used to determine the winner of the Highest Cumulative Score Award in each category/class.

Highest Cumlative Scores (Best of 12)

Electronic A -- Gary Prestash 321 points (Best of 12 AVG = 26.75)

Electronic B -- Joan Balen 302 points (Best of 12 AVG = 25.17)

Prints A -- Barbara Vietzke 312 points (Best of 12 AVG = 26.00)

Prints B -- Fred Rosenthal 280 points (Best of 12 AVG = 23.33)

Slides -- Linda Thomas 305 points (Best of 12 AVG = 25.42)

Electronic S (Assigned Subject) Barbara Vietzke 14 points

Congratulations to all the winners!!

Thursday, June 19, 2008

Tripod Alert -- Are photographers really a threat?


At the NHCC "End of the Year" banquet I had a discussion with Fred about photographers being harassed. He was photographing in Times Square and was stopped and asked to show his PERMIT!!!

I have also had this conversation with several of you via email and we know that it is real! I would love to hear your experiences and comments, I know that you have stories to tell.

If you follow any professional photographers Blogs, etc. then you know that they have the same problems that we have.


The Photographer’s Right -- A Downloadable Flyer Explaining Your Rights When Stopped or Confronted for Photography http://www.krages.com/phoright.htm

The Photographer’s Right is a downloadable guide that is loosely based on the Bust Card and the Know Your Rights pamphlet that used to be available on the ACLU website. It may be downloaded and printed out using Adobe Acrobat Reader. You may make copies and carry them your wallet, pocket, or camera bag to give you quick access to your rights and obligations concerning confrontations over photography. You may distribute the guide to others, provided that such distribution is not done for commercial gain and credit is given to the author.


Are photographers really a threat?
Bruce Schneier The Guardian, Thursday June 5 2008

What is it with photographers these days? Are they really all terrorists, or does everyone just think they are?

Since 9/11, there has been an increasing war on photography. Photographers have been harrassed, questioned, detained, arrested or worse, and declared to be unwelcome. We've been repeatedly told to watch out for photographers, especially suspicious ones. Clearly any terrorist is going to first photograph his target, so vigilance is required.

Except that it's nonsense. The 9/11 terrorists didn't photograph anything. Nor did the London transport bombers, the Madrid bombers, or the liquid bombers arrested in 2006. Timothy McVeigh didn't photograph the Oklahoma City Federal Building. The Unabomber didn't photograph anything; neither did shoe-bomber Richard Reid. Photographs aren't being found amongst the papers of Palestinian suicide bombers. The IRA wasn't known for its photography. Even those manufactured terrorist plots that the US government likes to talk about -- the Ft. Dix terrorists, the JFK airport bombers, the Miami 7, the Lackawanna 6 -- no photography.

Given that real terrorists, and even wannabe terrorists, don't seem to photograph anything, why is it such pervasive conventional wisdom that terrorists photograph their targets? Why are our fears so great that we have no choice but to be suspicious of any photographer?

Because it's a movie-plot threat.

A movie-plot threat is a specific threat, vivid in our minds like the plot of a movie. You remember them from the months after the 9/11 attacks: anthrax spread from crop dusters, a contaminated milk supply, terrorist scuba divers armed with almanacs. Our imaginations run wild with detailed and specific threats, from the news, and from actual movies and television shows. These movie plots resonate in our minds and in the minds of others we talk to. And many of us get scared.
Terrorists taking pictures is a quintessential detail in any good movie. Of course it makes sense that terrorists will take pictures of their targets. They have to do reconnaissance, don't they? We need 45 minutes of television action before the actual terrorist attack -- 90 minutes if it's a movie -- and a photography scene is just perfect. It's our movie-plot terrorists that are photographers, even if the real-world ones are not.

The problem with movie-plot security is it only works if we guess the plot correctly. If we spend a zillion dollars defending Wimbledon and terrorists blow up a different sporting event, that's money wasted. If we post guards all over the Underground and terrorists bomb a crowded shopping area, that's also a waste. If we teach everyone to be alert for photographers, and terrorists don't take photographs, we've wasted money and effort, and taught people to fear something they shouldn't.

And even if terrorists did photograph their targets, the math doesn't make sense. Billions of photographs are taken by honest people every year, 50 billion by amateurs alone in the US And the national monuments you imagine terrorists taking photographs of are the same ones tourists like to take pictures of. If you see someone taking one of those photographs, the odds are infinitesimal that he's a terrorist.

Of course, it's far easier to explain the problem than it is to fix it. Because we're a species of storytellers, we find movie-plot threats uniquely compelling. A single vivid scenario will do more to convince people that photographers might be terrorists than all the data I can muster to demonstrate that they're not.
Fear aside, there aren't many legal restrictions on what you can photograph from a public place that's already in public view. If you're harassed, it's almost certainly a law enforcement official, public or private, acting way beyond his authority. There's nothing in any post-9/11 law that restricts your right to photograph.

This is worth fighting. Search "photographer rights" on Google and download one of the several wallet documents that can help you if you get harassed; I found one for the UK, US, and Australia.

Don't cede your right to photograph in public. Don't propagate the terrorist photographer story. Remind them that prohibiting photography was something we used to ridicule about the USSR. Eventually sanity will be restored, but it may take a while.


A Stand for Photographer’s Rights http://www.krages.com/phoright.htm

The right to take photographs in the United States is being challenged more than ever. People are being stopped, harassed, and even intimidated into handing over their personal property simply because they were taking photographs of subjects that made other people uncomfortable. Recent examples have included photographing industrial plants, bridges, buildings, trains, and bus stations. For the most part, attempts to restrict photography are based on misguided fears about the supposed dangers that unrestricted photography presents to society.

Ironically, unrestricted photography by private citizens has played an integral role in protecting the freedom, security, and well-being of all Americans. Photography in the United States has an established history of contributing to improvements in civil rights, curbing abusive child labor practices, and providing important information to crime investigators. Photography has not contributed to a decline in public safety or economic vitality in the United States. When people think back on the acts of domestic terrorism that have occurred over the last twenty years, none have depended on or even involved photography. Restrictions on photography would not have prevented any of these acts. Furthermore, the increase in people carrying small digital and cell phone cameras has resulted in the prevention of crimes and the apprehension of criminals.

As the flyer states, there are not very many legal restrictions on what can be photographed when in public view. Most attempts at restricting photography are done by lower-level security and law enforcement officials acting way beyond their authority. Note that neither the Patriot Act nor the Homeland Security Act have any provisions that restrict photography. Similarly, some businesses have a history of abusing the rights of photographers under the guise of protecting their trade secrets. These claims are almost always meritless because entities are required to keep trade secrets from public view if they want to protect them.


Who needs a permit?
Again, there is no hard and fast rule about who needs a permit, but generally if you’re shooting in a city, from the sidewalk, with a handheld camera (even a professional DSLR), you don’t need a permit.

However, the moment you decide to unfold a tripod, in most big cities, it instantly becomes “permit time,” because now this has just gone from a tourist with a nice camera, to a commercial photo shoot.
But here’s the catch:Let’s say you’re not using a tripod at all; you’re just hand-holding a DSLR, and you’re on a public sidewalk talking photos as you walk around the city–that’s not a problem, right? Well, it depends on what you’re shooting. If you’re on the sidewalk, but shooting a commercial building you can almost bet a security guard from that company is going to come out and ask you to stop. I’ve even heard them demand that you erase the shots you’ve taken of “their building.”

Now, this opens that whole, “Does he have the right to stop me from shooting a building out in public view while I’m on a public sidewalk?” debate. Well, of course not (perhaps), but that won’t stop them from trying. In fact, try this sometime; stand outside a downtown building in Chicago, Detroit, LA or New York and start taking photos and take a look at your watch to see how long it takes for a security guard to come and tell you, “You can’t shoot there!” So lets say you pitch a fit, tell him he has no right to stop you, and demand that he call the cops (which probably won’t take much convincing by the way), and then the police arrive at the scene.
Will the policeman know what the local guidelines are for shooting private buildings? Are there even local guidelines for this at all? So, at the end of the day; it’s going to be up to this police officer who answers the call to decide whether you continue or not.
More from Scott Kelby -- when he tried to photograph inside Grand Central Station (with a premit)


Bert P. Krages is an attorney and an amateur photographer who specializes in areas of intellectual property and wrote a book on photographers’ legal rights:
http://www.amazon.com/Legal-Handbook-Photographers-Rights-Liabilities/dp/158428059X.

Wednesday, June 18, 2008

High Dynamic Range (HDR)

High Dynamic Range Imaging is a method to digitally capture and edit all light in a scene.

Those of you that attended the Mark Bowie seminar were introduced to HDR and its huge potential. Since that time I have kept my eye out for articles relating to HDR and one recently appeared on DPS. I like this article because it does show some before and after and side by side comparisons of different ways to achieve this.

From http://digital-photography-school.com/blog/an-introduction-to-high-dynamic-range-imaging-hdr/ check out the full article for before and after and side by side photos and for more information.

Today I’m pleased to present an introduction to High Dynamic Range Imaging (or HDR PHotography) that has kindly been written by Jason from Pixelens.com NOTE: Clicking on the images in this post will open them larger in a new window.

HDR, or
High Dynamic Range Imaging seems to be all the rage these days.

HDRI is described as: In image processing, computer graphics and photography, high dynamic range imaging (HDRI) is a set of techniques that allows a greater dynamic range of exposures (the range of values between light and dark areas) than normal digital imaging techniques. The intention of HDRI is to accurately represent the wide range of intensity levels found in real scenes ranging from direct sunlight to shadows. More accurately however, the images that are commonly seen and referred to as HDR or HDRI images are tone-mapped.

Tone mapping is a technique used in image processing and computer graphics to map a set of colours to another; often to approximate the appearance of high dynamic range images in media with a more limited dynamic range. Print-outs, CRT or LCD monitors, and projectors all have a limited dynamic range which is inadequate to reproduce the full range of light intensities present in natural scenes. Essentially, tone mapping addresses the problem of strong contrast reduction from the scene values (radiance) to the displayable range while preserving the image details and color appearance important to appreciate the original scene content.

Definitions and technicalities aside, I decided to look into HDR and tone mapping a bit closer to see if there really was a difference between different processes. I was curious to see if there was noticeable differences between generating HDR/tone-mapped shots from a single RAW, multiple RAWs, multiple JPGs from the camera, and multiple JPGs generated from a single RAW. For the purposes of the rest of this post, I will be referring to my final images as HDR images (even though we all now know that’s not exactly correct). Here is the original, straight out of the camera image shot with my Canon Digital Rebel XT/350D.

Honestly, not a bad image for SOOC! Anyways, the recommended way to produce HDR is to take multiple exposures using your camera’s Auto Exposure Bracketting (AEB) setting. I’m not going to get into the details on this, I’m merely posting my comparison results here.
ReDynaMix


In the past, I’ve used the
ReDynaMix Photoshop plugin to generate my HDR images from a single RAW file. It really can’t be beat for the $16 price tag. It worked pretty decently, but I’d heard that Photomatix was a much better program to use. Below is the image above run through the ReDynaMix plugin.

Photomatix
Photomatix is a much more robust, and more expensive ($99), program to use but allows for blending of multiple exposures into a single HDR file, as is recommended. I’m going to be up front here. I don’t walk around with my tripod in my back pocket, so taking multiple exposures without getting movement is very difficult. I tried Photomatix ages ago, but for some reason I guess I just wasn’t steady enough. Fortunately, this set of multiple exposures turned out and aligned nicely when I imported them into Photomatix. The three shots were taken at an exposure value of 2, meaning I had a shot that was properly exposed, one that was underexposed by 2 steps and one that was overexposed by 2 steps. Because the Canon Digital Rebel series only allows for 3 photos in AEB mode, that is all I am going to use. Using the .CR2 (RAW) files out of the camera I created the HDR image you see below (note, clicking this image takes you to the Flickr page). I processed it as I normally would process for HDR, tracked the settings and made some final curves and unsharpen mask adjustments in Photoshop.

http://www.hdrlabs.com/book/ = A book that claims to have "Everything you need to know about HDRI."


High Dynamic Range Imaging is a method to digitally capture and edit all light in a scene.

It represents a quantum leap in imaging technology, as revolutionary as the leap from Black & White to Color imaging. If you are serious about photography, you will find that HDRI is the final step that places digital ahead of analog. The old problem of over- and underexposure in analog photography, which was never fully solved, is elegantly bypassed here. A huge variety of subjects can now be photographed for the first time ever.

Done reading the HDRI Handbook? Can't get enough of HDR? Lucky you, because there happen to be two new HDR books out, both written by photographers for photographers.

Preface: Am I right guy to write reviews for competing books?

Well, I'm certainly biased, and you should keep this in mind. Proceed with caution. But I also know the subject in and out, so I can evaluate the information given in these books with confidence. After all, I see these books as complementary readings, rather than competition.

Here's a list of topics covered in neither one of them, thus exclusive to the HDRI Handbook:
32-bit image editing
manually tonemapping in Photoshop
shooting and stitching fully spherical HDR panos
lighting in 3d applications

The reference sections on file formats and HDR-capable software are much more comprehensive, and it also includes a DVD filled with example material. Yes, it might be twice as expensive, but it also has twice as many pages. OK, now this is out of the way, and I will avoid mentioning my own book from now on. Instead, I will try to give you the most objective reviews possible. In fact, when you want to dive deeper into tonemapping, I do recommend getting one of these new books!But which one to get?

Michael Freeman: Mastering HDR Photography


Freeman is a seasoned writer, with plenty of beautiful books on travel photography under his belt. His style is straight forward and to the point, never boring or repetitive. He can put complicated matters in simple words that actually make sense; this man is a professional with words. His photography is just as professional, he's listed in agencies all over the world.Layout, print quality and binding are all great - 160 pages of excellence. Most topics are presented as double-page essays, that are clearly headlined. This enables quick browsing for a topic of interest, and invites for non-linear reading sessions.

The book starts with explaining the limitations of 8-bit LDR imagery, scene contrast and human perception. I love the way Freeman describes our perception of images (which is more of an acquired skill) and how he links in Gestalt theory. There are several severe implications that apply to our judgement of tonemapping results, which he responds to by creating some categories for HDR scenes to be treated differently. For example, a continuous gradient (like a foggy landscape) need a different treatment than scattered bright lights (i.e. nightshot). This chapter is a great training for your photographer's eye, and worth the admission alone.

Capturing and creating HDRIs is very comprehensively described in almost every HDR-capable software, highlighting some specific advantages of each. In boxes you'll learn about some special Photoshop tricks like stacking and pre-alignment, even manual ghostbusting techniques. I love the special case he makes for the quality gain you can get from Photosphere's unique flare removal, as well as the page on color management.

More than half of the book is dedicated to tonemapping (about 100 pages). Tool-centric mini-manuals come first, explaining the parameters of Photomatix, Photoshop, FDRTools, QTpfsGUI, and EasyHDR. Freeman then goes into problem solving mode, and elaborates on halo control and naturalness. Personally, I do share his views about overprocessing, but after all this might be a matter of taste. Freeman briefly taps into panorama stitching with Realviz Stitcher (now Autodesk Stitcher), which is in my opinion the weakest part of the book. The rest is filled with a great variety of workflow case studies. Each case study explores something new - like selectively blending multiple tonemapping results in Photoshop, using HDR for portrait shots or maximizing image quality by pre-processing the source images. When Freeman finally suggests tonemapping strategies for the HDR scene categories, as established in the first chapter, he closes this book with an elegant story arc.

Conclusion: This book is all about image quality. Freeman uses HDRI primarily to overcome sensor limitations, his focus is on naturalness and brilliant photography in the traditional sense. I called this tonemapping style "the invisible art of true-tone mapping"; I practice it myself, and I know that it is in fact is very hard to withstand the temptation of tonemapping too hard and keep it subtle yet effective. It requires skill and a sharp eye. If you're a professional photographer, maybe in real estate or commercials, this book will teach you both.

Ferrell McCollough: Complete Guide to HDR Digital Photography


McCollough does know about naturalness as well, but he doesn't limit himself to it. For him it's all about the impact of a photograph. His book taps into all kinds of creative tonemapping techniques, exploring exaggerated looks and eye catching imagery. With many full-page prints and 5 portfolio galleries of excellent photographers from the flickr community, this book has also coffee-table qualities. The longer you browse, the more you will see you own level of acceptance shift. On first look some images might appear overdone, but on closer examination they turn into powerful pieces of art. In this way, McCollough's entire book is training tool for your creative eye.

The book starts with a brief introduction about sensor limitations and examples of scene dynamic range. I love the fact that he uses EV spans throughout the book, it makes the subject so much more approachable. A very short skid on file formats and image encoding is immediately followed by a closer look at RAW formats. He concludes, that you can get the same quality in your HDR image by shooting in JPEGs, which I absolutely agree with. Nevertheless, he does explain later on how to create HDRs from RAW files, what you can tweak in pre-processing and what you shouldn't touch. There is also some advice on using point-and-shoot cameras, so he really takes care of making HDR accessible to everyone. This entire introduction chapter is very hands-on, and stripped down to the essentials.

Tonemapping takes up the rest of the book (about 120 pages). Tools of the trade are Photomatix, FDR Tools, Dynamic Photo HDR, Artizen and Photoshop (preference given in that order). Most images throughout the book are accompanied by a box with the tonemapping settings - just simple listings, but they turn out to be an awesome reference. Where Freeman classifies types of HDR scenes, McCollough classifies the typical problems of tonemapping: Halos, noisy shadows, grainy skies. My favorite is tone reversal: when local contrast enhancements are driven so far, that regions we would normally perceive as brighter turn out darker than the rest of the image. Super-dramatic skies that appear darker than the ground are one good example, a phenomenon you see all over flickr. Tone reversal finally defines this hard-to grasp quality, that is right on the dividing line between true-tone mapping and creative expressionism.

When McCollough highlights the architectural applications, it becomes clear that he is very capable of creating a natural look. A rather interesting idea is explored in flash merging: multiple exposures are blended together, each one with the flash from different directions. Technically, this is more of an exposure blending technique than HDR, but nevertheless very cool and effective. Panoramic HDR photography is kept on a conceptual level. Instead, McCollough experiments with tonemapping single RAW images (with surprisingly great success), graduated ND filters, macro- and black-and-white photography. The book closes with some quick tips on specific subjects, like portraits, night shots and snow.

Conclusion: This book is for the creative type of photographers. If you consider your photographic captures as mere material for creating a piece of art in digital postprocessing, you will find a lot of inspiration here. By the way - McCollough also publishes several great tutorials on HDR in his blog.

Closing thoughts: The current state of HDR photographyI can still remember pitching my first book to several publishers in 2004. The response has always been discouraging: "There is no market for this kind of fancy stuff." Today it's a different story. HDR has become big, and although I was fortunate enough to get the first consumer-level book on HDRI out, I see no reason for it to stand alone. The demand for more teaching material only underlines the point, that HDRI is now a well-established field of photography. More books on this topic can only benefit the industry as a whole. Maybe camera makers will finally listen and respond with better bracketing options or maybe even HDR-capable sensors. That's why you need to keep the ball rolling: nurture this new market of HDR material, show them that this is a topic you care about - order at least one of these new HDR books!

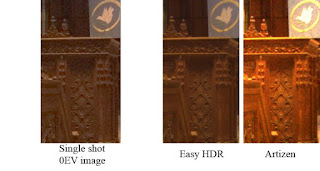
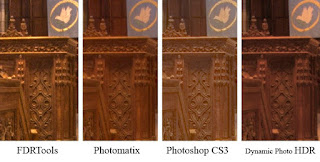
The chapter on Software Comparison Page 74, shows the 0EV image and 5 images processed by the various programs: Photomatix Pro, FDRTools, Adobe Photoshop CS3, Dynamic PhotoHDR, Artizen HDR. Here is the 100% crop of each image and a short comment that didn’t make it to print.

Single 0EV Image – When comparing the single shot 0EV image with the HDR images as a whole, there are two salient points. First, the single 0EV image has greater global contrast and second, it has greater noise. Having greater global contrast is not a bad feature but the noise is bad as it destroys the finer details of the image. Those details are never recoverable. Notice the noise in the darker areas of the image.

EASY HDR - the “Mask” Operator (default) has done a good job of rendering the scene and it’s hard to find any area to criticize. The wood design and dove on the flag are well rendered with low noise and good details. With the default settings, the image appears slightly flat but this is only a matter of fine tuning the black and white points in Levels.

Artizen – Lock06 (default) suffers from a loss of detail due to noise, most likely being taken from the –2EV exposure. The flag is not well reproduced; the white dove has a loss of detail and is near over saturation ie. blown pixels. Additionally, it appears the 0EV image has more details and less noise.

FDRTools - Compressor (default) has done an exceptional job rendering the details of the scene. The image has low noise with excellent local detail enhancements. Local tonal variations (contrast) bring out the texture and 3-D feel of the wood. The white dove is accurately rendered with good detail in the wings. The FDRTools image is better than the single 0EV image in color, noise-free detail and dynamic range.

Photomatix – the 100% crop shows that Photomatix handles noise well with no apparent increase over FDRtools or PS. The dove is well rendered with details inside although it has a slight magenta/red cast. The Photomatix image is slightly softer than the 0EV image but it has noise-free detail and displays a higher dynamic range.

Photoshop CS3 - Local Adaptation has also done an excellent job capturing the detail in the wood in CS3. Take a moment and examine the wood figures - notice the waistline, arms etc. in each image. In my opinion, Photoshop CS3 is the best. The overall color is accurately captured giving the image a realistic look. [The book goes into more detail on the weaknesses of CS3 when the dynamic range of the scene is high. This example is a medium contrast scene and is not a problem for CS3.] Click here to launch a slideshow of editing HDR images in Adobe Photoshop CS3.

Dynamic Photo HDR - I used the “Eye Catching” tone mapping operator and as you can see the 100% crop shows good detail and local contrast. There is color shift similar to Photomatix.


Order Michael Freeman: Mastering HDR Photography(recommended for pro shooters, emphasize on image quality and natural tonemapping)

Order Ferrell McCollough: Complete Guide to HDR Photography(recommended for creative minds, looking for inspiration and hands-on guidance)

The Future of Digital Imaging - High Dynamic Range Photography
http://www.cybergrain.com/tech/hdr/

Here's the problem in a nutshell:
Real-world scenes contain light ranges that exceed a 50,000:1 dynamic range.
For over a thousand years, media has been limited to around a 300:1 dynamic range.
So you have a mapping issue: how do you represent light values in a scene using a much more limited set of light values for a particular media?
For example, have you ever taken a photo of a room inside when the window in the room is completely blown out (too white with no details) and the parts of the room are too shadowed?

W. Eugene Smith spent five days in the darkroom until he came up with a print of Albert Schweitzer that he was happy with. For more on this, see Fredo Durand's lecture slides on The Art and Science of Depiction.

Perhaps the greatest master of dynamic range in photography was Ansel Adams. He was the first to systematically measure the sensitivity range of all of the equipment he used. His "zone system" let him predict precisely what details he could capture on film and paper, so he could make decisions before pressing the shutter.

May you capture the full range life has to offer!