Those of you that attended the Mark Bowie seminar were introduced to HDR and its huge potential. Since that time I have kept my eye out for articles relating to HDR and one recently appeared on DPS. I like this article because it does show some before and after and side by side comparisons of different ways to achieve this.
From http://digital-photography-school.com/blog/an-introduction-to-high-dynamic-range-imaging-hdr/ check out the full article for before and after and side by side photos and for more information.
Today I’m pleased to present an introduction to High Dynamic Range Imaging (or HDR PHotography) that has kindly been written by Jason from Pixelens.com NOTE: Clicking on the images in this post will open them larger in a new window.
HDR, or High Dynamic Range Imaging seems to be all the rage these days.
HDRI is described as: In image processing, computer graphics and photography, high dynamic range imaging (HDRI) is a set of techniques that allows a greater dynamic range of exposures (the range of values between light and dark areas) than normal digital imaging techniques. The intention of HDRI is to accurately represent the wide range of intensity levels found in real scenes ranging from direct sunlight to shadows. More accurately however, the images that are commonly seen and referred to as HDR or HDRI images are tone-mapped.
Tone mapping is a technique used in image processing and computer graphics to map a set of colours to another; often to approximate the appearance of high dynamic range images in media with a more limited dynamic range. Print-outs, CRT or LCD monitors, and projectors all have a limited dynamic range which is inadequate to reproduce the full range of light intensities present in natural scenes. Essentially, tone mapping addresses the problem of strong contrast reduction from the scene values (radiance) to the displayable range while preserving the image details and color appearance important to appreciate the original scene content.
Definitions and technicalities aside, I decided to look into HDR and tone mapping a bit closer to see if there really was a difference between different processes. I was curious to see if there was noticeable differences between generating HDR/tone-mapped shots from a single RAW, multiple RAWs, multiple JPGs from the camera, and multiple JPGs generated from a single RAW. For the purposes of the rest of this post, I will be referring to my final images as HDR images (even though we all now know that’s not exactly correct). Here is the original, straight out of the camera image shot with my Canon Digital Rebel XT/350D.
Honestly, not a bad image for SOOC! Anyways, the recommended way to produce HDR is to take multiple exposures using your camera’s Auto Exposure Bracketting (AEB) setting. I’m not going to get into the details on this, I’m merely posting my comparison results here.
ReDynaMix
In the past, I’ve used the ReDynaMix Photoshop plugin to generate my HDR images from a single RAW file. It really can’t be beat for the $16 price tag. It worked pretty decently, but I’d heard that Photomatix was a much better program to use. Below is the image above run through the ReDynaMix plugin.
Photomatix
Photomatix is a much more robust, and more expensive ($99), program to use but allows for blending of multiple exposures into a single HDR file, as is recommended. I’m going to be up front here. I don’t walk around with my tripod in my back pocket, so taking multiple exposures without getting movement is very difficult. I tried Photomatix ages ago, but for some reason I guess I just wasn’t steady enough. Fortunately, this set of multiple exposures turned out and aligned nicely when I imported them into Photomatix. The three shots were taken at an exposure value of 2, meaning I had a shot that was properly exposed, one that was underexposed by 2 steps and one that was overexposed by 2 steps. Because the Canon Digital Rebel series only allows for 3 photos in AEB mode, that is all I am going to use. Using the .CR2 (RAW) files out of the camera I created the HDR image you see below (note, clicking this image takes you to the Flickr page). I processed it as I normally would process for HDR, tracked the settings and made some final curves and unsharpen mask adjustments in Photoshop.
http://www.hdrlabs.com/book/ = A book that claims to have "Everything you need to know about HDRI."
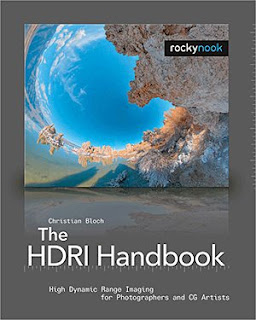
High Dynamic Range Imaging is a method to digitally capture and edit all light in a scene.
It represents a quantum leap in imaging technology, as revolutionary as the leap from Black & White to Color imaging. If you are serious about photography, you will find that HDRI is the final step that places digital ahead of analog. The old problem of over- and underexposure in analog photography, which was never fully solved, is elegantly bypassed here. A huge variety of subjects can now be photographed for the first time ever.
Done reading the HDRI Handbook? Can't get enough of HDR? Lucky you, because there happen to be two new HDR books out, both written by photographers for photographers.
Preface: Am I right guy to write reviews for competing books?
Well, I'm certainly biased, and you should keep this in mind. Proceed with caution. But I also know the subject in and out, so I can evaluate the information given in these books with confidence. After all, I see these books as complementary readings, rather than competition.
Here's a list of topics covered in neither one of them, thus exclusive to the HDRI Handbook:
32-bit image editing
manually tonemapping in Photoshop
shooting and stitching fully spherical HDR panos
lighting in 3d applications
The reference sections on file formats and HDR-capable software are much more comprehensive, and it also includes a DVD filled with example material. Yes, it might be twice as expensive, but it also has twice as many pages. OK, now this is out of the way, and I will avoid mentioning my own book from now on. Instead, I will try to give you the most objective reviews possible. In fact, when you want to dive deeper into tonemapping, I do recommend getting one of these new books!But which one to get?
Michael Freeman: Mastering HDR Photography
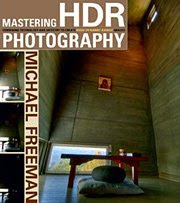
Freeman is a seasoned writer, with plenty of beautiful books on travel photography under his belt. His style is straight forward and to the point, never boring or repetitive. He can put complicated matters in simple words that actually make sense; this man is a professional with words. His photography is just as professional, he's listed in agencies all over the world.Layout, print quality and binding are all great - 160 pages of excellence. Most topics are presented as double-page essays, that are clearly headlined. This enables quick browsing for a topic of interest, and invites for non-linear reading sessions.
The book starts with explaining the limitations of 8-bit LDR imagery, scene contrast and human perception. I love the way Freeman describes our perception of images (which is more of an acquired skill) and how he links in Gestalt theory. There are several severe implications that apply to our judgement of tonemapping results, which he responds to by creating some categories for HDR scenes to be treated differently. For example, a continuous gradient (like a foggy landscape) need a different treatment than scattered bright lights (i.e. nightshot). This chapter is a great training for your photographer's eye, and worth the admission alone.
Capturing and creating HDRIs is very comprehensively described in almost every HDR-capable software, highlighting some specific advantages of each. In boxes you'll learn about some special Photoshop tricks like stacking and pre-alignment, even manual ghostbusting techniques. I love the special case he makes for the quality gain you can get from Photosphere's unique flare removal, as well as the page on color management.
More than half of the book is dedicated to tonemapping (about 100 pages). Tool-centric mini-manuals come first, explaining the parameters of Photomatix, Photoshop, FDRTools, QTpfsGUI, and EasyHDR. Freeman then goes into problem solving mode, and elaborates on halo control and naturalness. Personally, I do share his views about overprocessing, but after all this might be a matter of taste. Freeman briefly taps into panorama stitching with Realviz Stitcher (now Autodesk Stitcher), which is in my opinion the weakest part of the book. The rest is filled with a great variety of workflow case studies. Each case study explores something new - like selectively blending multiple tonemapping results in Photoshop, using HDR for portrait shots or maximizing image quality by pre-processing the source images. When Freeman finally suggests tonemapping strategies for the HDR scene categories, as established in the first chapter, he closes this book with an elegant story arc.
Conclusion: This book is all about image quality. Freeman uses HDRI primarily to overcome sensor limitations, his focus is on naturalness and brilliant photography in the traditional sense. I called this tonemapping style "the invisible art of true-tone mapping"; I practice it myself, and I know that it is in fact is very hard to withstand the temptation of tonemapping too hard and keep it subtle yet effective. It requires skill and a sharp eye. If you're a professional photographer, maybe in real estate or commercials, this book will teach you both.
Ferrell McCollough: Complete Guide to HDR Digital Photography
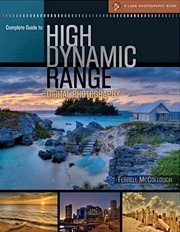
McCollough does know about naturalness as well, but he doesn't limit himself to it. For him it's all about the impact of a photograph. His book taps into all kinds of creative tonemapping techniques, exploring exaggerated looks and eye catching imagery. With many full-page prints and 5 portfolio galleries of excellent photographers from the flickr community, this book has also coffee-table qualities. The longer you browse, the more you will see you own level of acceptance shift. On first look some images might appear overdone, but on closer examination they turn into powerful pieces of art. In this way, McCollough's entire book is training tool for your creative eye.
The book starts with a brief introduction about sensor limitations and examples of scene dynamic range. I love the fact that he uses EV spans throughout the book, it makes the subject so much more approachable. A very short skid on file formats and image encoding is immediately followed by a closer look at RAW formats. He concludes, that you can get the same quality in your HDR image by shooting in JPEGs, which I absolutely agree with. Nevertheless, he does explain later on how to create HDRs from RAW files, what you can tweak in pre-processing and what you shouldn't touch. There is also some advice on using point-and-shoot cameras, so he really takes care of making HDR accessible to everyone. This entire introduction chapter is very hands-on, and stripped down to the essentials.
Tonemapping takes up the rest of the book (about 120 pages). Tools of the trade are Photomatix, FDR Tools, Dynamic Photo HDR, Artizen and Photoshop (preference given in that order). Most images throughout the book are accompanied by a box with the tonemapping settings - just simple listings, but they turn out to be an awesome reference. Where Freeman classifies types of HDR scenes, McCollough classifies the typical problems of tonemapping: Halos, noisy shadows, grainy skies. My favorite is tone reversal: when local contrast enhancements are driven so far, that regions we would normally perceive as brighter turn out darker than the rest of the image. Super-dramatic skies that appear darker than the ground are one good example, a phenomenon you see all over flickr. Tone reversal finally defines this hard-to grasp quality, that is right on the dividing line between true-tone mapping and creative expressionism.
When McCollough highlights the architectural applications, it becomes clear that he is very capable of creating a natural look. A rather interesting idea is explored in flash merging: multiple exposures are blended together, each one with the flash from different directions. Technically, this is more of an exposure blending technique than HDR, but nevertheless very cool and effective. Panoramic HDR photography is kept on a conceptual level. Instead, McCollough experiments with tonemapping single RAW images (with surprisingly great success), graduated ND filters, macro- and black-and-white photography. The book closes with some quick tips on specific subjects, like portraits, night shots and snow.
Conclusion: This book is for the creative type of photographers. If you consider your photographic captures as mere material for creating a piece of art in digital postprocessing, you will find a lot of inspiration here. By the way - McCollough also publishes several great tutorials on HDR in his blog.
Closing thoughts: The current state of HDR photographyI can still remember pitching my first book to several publishers in 2004. The response has always been discouraging: "There is no market for this kind of fancy stuff." Today it's a different story. HDR has become big, and although I was fortunate enough to get the first consumer-level book on HDRI out, I see no reason for it to stand alone. The demand for more teaching material only underlines the point, that HDRI is now a well-established field of photography. More books on this topic can only benefit the industry as a whole. Maybe camera makers will finally listen and respond with better bracketing options or maybe even HDR-capable sensors. That's why you need to keep the ball rolling: nurture this new market of HDR material, show them that this is a topic you care about - order at least one of these new HDR books!
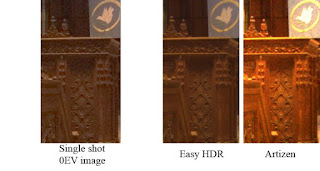
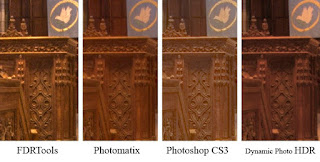
The chapter on Software Comparison Page 74, shows the 0EV image and 5 images processed by the various programs: Photomatix Pro, FDRTools, Adobe Photoshop CS3, Dynamic PhotoHDR, Artizen HDR. Here is the 100% crop of each image and a short comment that didn’t make it to print.
Single 0EV Image – When comparing the single shot 0EV image with the HDR images as a whole, there are two salient points. First, the single 0EV image has greater global contrast and second, it has greater noise. Having greater global contrast is not a bad feature but the noise is bad as it destroys the finer details of the image. Those details are never recoverable. Notice the noise in the darker areas of the image.
EASY HDR - the “Mask” Operator (default) has done a good job of rendering the scene and it’s hard to find any area to criticize. The wood design and dove on the flag are well rendered with low noise and good details. With the default settings, the image appears slightly flat but this is only a matter of fine tuning the black and white points in Levels.
Artizen – Lock06 (default) suffers from a loss of detail due to noise, most likely being taken from the –2EV exposure. The flag is not well reproduced; the white dove has a loss of detail and is near over saturation ie. blown pixels. Additionally, it appears the 0EV image has more details and less noise.
FDRTools - Compressor (default) has done an exceptional job rendering the details of the scene. The image has low noise with excellent local detail enhancements. Local tonal variations (contrast) bring out the texture and 3-D feel of the wood. The white dove is accurately rendered with good detail in the wings. The FDRTools image is better than the single 0EV image in color, noise-free detail and dynamic range.
Photomatix – the 100% crop shows that Photomatix handles noise well with no apparent increase over FDRtools or PS. The dove is well rendered with details inside although it has a slight magenta/red cast. The Photomatix image is slightly softer than the 0EV image but it has noise-free detail and displays a higher dynamic range.
Photoshop CS3 - Local Adaptation has also done an excellent job capturing the detail in the wood in CS3. Take a moment and examine the wood figures - notice the waistline, arms etc. in each image. In my opinion, Photoshop CS3 is the best. The overall color is accurately captured giving the image a realistic look. [The book goes into more detail on the weaknesses of CS3 when the dynamic range of the scene is high. This example is a medium contrast scene and is not a problem for CS3.] Click here to launch a slideshow of editing HDR images in Adobe Photoshop CS3.
Dynamic Photo HDR - I used the “Eye Catching” tone mapping operator and as you can see the 100% crop shows good detail and local contrast. There is color shift similar to Photomatix.
Order Michael Freeman: Mastering HDR Photography(recommended for pro shooters, emphasize on image quality and natural tonemapping)
Order Ferrell McCollough: Complete Guide to HDR Photography(recommended for creative minds, looking for inspiration and hands-on guidance)
The Future of Digital Imaging - High Dynamic Range Photography
http://www.cybergrain.com/tech/hdr/
Here's the problem in a nutshell:
Real-world scenes contain light ranges that exceed a 50,000:1 dynamic range.
For over a thousand years, media has been limited to around a 300:1 dynamic range.
So you have a mapping issue: how do you represent light values in a scene using a much more limited set of light values for a particular media?
For example, have you ever taken a photo of a room inside when the window in the room is completely blown out (too white with no details) and the parts of the room are too shadowed?
W. Eugene Smith spent five days in the darkroom until he came up with a print of Albert Schweitzer that he was happy with. For more on this, see Fredo Durand's lecture slides on The Art and Science of Depiction.
Perhaps the greatest master of dynamic range in photography was Ansel Adams. He was the first to systematically measure the sensitivity range of all of the equipment he used. His "zone system" let him predict precisely what details he could capture on film and paper, so he could make decisions before pressing the shutter.
May you capture the full range life has to offer!
No comments:
Post a Comment