Monday, September 21, 2009

Photography Composition Articles

Photography Composition Articles
"There are no rules for good photographs, there are only good photographs." - Ansel Adams

The Master Guide for Wildlife Photographers: Wildlife CompositionsExcellent chapter from the book by Bill Silliker. Again, Amherst Media allowed us to publish it in our library. Check out really good examples.

Beginner's Guide to Nature Photography: CompositionExcerpt from the book by Cub Kahn. Amherst Media kindly allowed to publish it in our library.

Guidelines for Better Photographic CompositionPerfect examples for beginners, and intermetiate photographers. Composition rules: Simplicity, The Rule of Thirds, Lines, Balance, Framing, Avoiding Mergers.

Depth Of Field Calculator by Don FlemingReally good calculator with more than 400 cameras available.

Landscape Composition Rules by Johannes Vloothuis - What?! Article about painting, again? Yes. And I could say a good article! Almost all tips you may apply to photography. Really good examples!

Photography Tutorial: Composition by Geoff Lawrence - Composition advices, cropping techniques, viewpoint selection.

Learning to Photograph the Landscape by Guy Tal - First part of the article about all the desirable elements of a good landscape composition.

Learning to Photograph the Landscape by Guy Tal - Guidelines, Rules and Techniques: rule of thirds, leading lines, point of gravity, simplicity, equipment.

The Magic Of Selective Vision: Photo Composition by Arnold John Kaplan - Description of all the basic elements of the composition: balance, golden mean, lines, curves, colors.

An Eye for Composition by Gary Stanley - Rules, advices and inspirating examples.

Introduction To Photography Composition by Gao Mu - Several examples of composition rules.

Composition and the Elements of Visual Design by Robert Berdan - A lot of information: Lines, Shapes, Color, Texture, Image Balance, Proportion Rules, etc. Perfect examples.

Five Stops From The Edge by Bob Radcliff - Almost a "Zone System" in a color.

Colour Theory as Applied to Landscape Photography by Michael Reichmann - Good description of first and second order colors, complementary and harmonizing colours, intensity of light. Really nice photos as examples.

Basic Photographic Techniques (U.S. Navy training manual) - Don't be fooled by old B/W examples in this book. This is a perfect guide to better photography, and it contains really good examples.

Geometry in composition by Petteri Sulonen - Leading line, spatial divider, framing element, diagonal, triangle, arc and s-curve described.

Photo Composition by AGFA - Really good lesson. Take a subject and try to make all the composition variations. Nice examples.

Foreground and Lines by Kris Butler - Leading lines and their role in the human physiology.

The Art of Composition by Lee Frost - Good article about common rules and breaking them. Framing, rule of thirds, lines.

Composition (Part I) by Wendy Folse - Theme, Emphasis, Simplicity, and Rule of Thirds described.

Composition (Part II) by Wendy Folse - Horizontal or vertical format? Advantages and disadvantages.

Composition (Part III) by Wendy Folse - How to use perspective, what is the focal point, examples of in-camera cropping.

Composition (Part IV): Isolating the subject by Wendy Folse - Framing, selective focus, depth of field, distracting elements.

Framing Your Shots by Kris Butler - Guide from ACD Newsletters Editor.

Photographic Composition by Pony Express Photo School - Examples only, but good examples.

Composition: Understanding it - Using it by Larry Seiler - This atrticle was written for painters, but the image balance rules are perfect for photography.

Composition: Breaking all the Rules by Gloria Hopkins - WYSIWYG - breaking the composition rules!

Basic Photography Techniques by Klaus Schroiff - The golden mean, rule of thirds, framing, cross-lines described.

Photography Techniques: Perspective by Klaus Schroiff - Depth of field, focus, focal length, object isolation, separation, compression, layers.

Photography Techniques: Using Light by Klaus Schroiff - Spot light, backlit, monochrome, colors, etc.

Composition I: Getting Beyond the Snapshot by Gloria Hopkins - Composition guidelines: leading lines.

Composition II: Composition in Nature Photography and the Elements of a Photograph by Gloria Hopkins - Composition guidelines: light.

Composition III: Composition in Nature Photography and the Elements of a Photograph by Gloria Hopkins - Composition guidelines: depth and color.

Composition Basics - How to Get Good Pictures by umt.edu - Five sections from Introduction to Digital Photograpy: Composition Basics, Camera Composition, Camera Angle, Rule of Thirds, Types of Shots.

Composition with a 6x6...? Square Scotland by Wim van Velzen - How to compose your photos in medium format.

The Use of Focal Length in Landscape Photography by Wim van Velzen - Composition possibilities in different circumstances.

Tutorial on Composition Refresher by Peter Saw - Good and simple tutorial. Image balance, leading the eye, golden section, etc. This one is good for painters, but it's the same good for photographers.

Composition Refresher by Theresa Husarik - Several composition "do" and "don't" tips.

Learn Photo Composition by John Harvey - Interesting article with good examples.

Improving Your Photography: Composition. Lesson by Peter Ensenberger - Primary elements of a good composition.

Composition Basics lesson by Michael Fodor - General principles of the Rule of Thirds and the Golden Mean as well as several composition advises.

Rule of Thirds lesson by Michael Fodor - Examples of the Rule of Thirds.

The Golden Mean by Stuart Low - Natural and mathematical rules and how they have been applied in design.

Space, Figure, and Ground Lesson by Petteri Sulonen - The objective of this lesson is to introduce three fundamental elements in compositional thinking.

The Basics of Landscape Composition by Diane Johnson - This article is about painting, but it's applicable to the photography.

Photo Technique by James Gentles - Good description of golden rules.

Rule of Thirds by Edwin Leong - Photography e-Book, chapter 15. Several advices.

The Golden Ratio by Edwin Leong - Photography e-Book, chapter 16. Interesting description.

Lessons in Composition for the Amateur Photographer by Dale Cotton - This part is about "Rule of Thirds".

Proportions: Theorie and Construction by Volker Muller - Explained the mathematical rules of Golden Mean, Modulor, and Square Root of Two.

Composition by Michael Minner - Portrait photography and the Rule of Thirds.

Finding a satisfactory format for a square canvas by John Hagan - Paitings examples.

Photography, the Golden Mean, and Geeky Coolness by Laurie Nyveen - Several short examples.

Golden Section and Photography by Eugene Ilchenko - Several examples and photo-adjuster tool to help to adjust the composition.

Creativity and the Rule of Thirds by Jim Altengarten - Good article with description and examples.

The Rule of Thirds by John Longenecker - Description of the Rule of Thirds as well as a lot of related links.

About us Site news Links Feedback

Sunday, September 20, 2009

Candlewood Camera Club has a great blog

Candlewood Camera Club has a great blog -- check it out http://candlewoodcamera.blogspot.com/

There are a lot of things I like about the Blog and the Blog content. One useful tool is on the right side -- a "Photographic Opportunities" link. Go to their Blog and you can click on items in their list to find out more...

Saturday, September 19, 2009

Animoto

I love animoto -- easy to use, an awesome show in minutes. You can make 30 second videos for free or Join here and save $5 (only $25/year)

You can now add video clips to your Animoto videos! Watch a few sample videos and find out more here: http://animoto.com/video

You will not believe how good your vids are going to look. And using video clips in your Animoto videos couldn't be easier--no need for a complex video editor! Just follow these three steps:

1. Upload clips from your camera or phone (iPhone 3GS anyone??), or use some from our collection (thanks to iStockphoto and Getty Images).

2. Choose your highlights. You can choose highlights of up to 10 seconds each, though we recommend using only 3-5 seconds as that works best within the flow of an Animoto video.

3. Create the rest of your video as normal, and you're done.

To celebrate the launch of the video clip feature, we're holding a contest in which you can win an action-packed TRIP FOR TWO TO NEW YORK CITY! All you have to do is submit your best video. Sooooo easy. Here's the deal: each week for five weeks, we'll announce 2 finalists, and just for being a finalist you'll get a Flip Mino HD (awesome) or a VholdR ContourHD helmet camcorder (really awesome). Then at the end we'll announce the grand winner, which could be you!

For full contest details, head here: http://animoto.com/video/contest

So, you know when you've got tons of pics AND vids of your kids or some recent trip or party or whatever, and you scratch your head wondering how to share them? I think we all know the Right Answer now.

Join Audubon Greenwich for the 11th Annual HawkWatch Festival & Green Bazaar

Join Audubon Greenwich for the 11th Annual HawkWatch Festival & Green Bazaar
September 19 & 20, 2009, 11 am - 5 pm, Rain or Shine

Directly from their website: Come out to celebrate the annual hawk migration over Audubon Greenwich's "Quaker Ridge Hawk Watch" - an official raptor counting site. This scientific raptor count has been happening since 1970 and birders are out counting daily from August 20 to November 20. If the weather is cooperative, it is hoped that this special weekend will be the peak of the Broad-winged Hawk migration, where they can form 'kettles' of several hundreds birds, circling birds above the hawk watch site. Rain or shine, we will have a lineup of Eco-friendly Vendors on-site, environmental exhibits and loads of activities for all ages. So, save the date and come out for this exciting two-day Festival in the hills of northern Greenwich.

RAW (ACR) and Lightroom updates

September 15, 2009 adobe released some updates...

Lightroom 2.5 update

The Adobe Photoshop Lightroom® 2.5 update includes these enhancements: Additional camera support for several new camera models including the Nikon D3000 and Olympus E-P1, Includes several corrections for issues introduced by previous Lightroom 2 releases.
Windows
Macintosh

Camera Raw 5.5 update
This new version of the Camera Raw plug-in replaces the original one that was installed with Adobe® Photoshop® CS4; Adobe Photoshop Elements 7; and Adobe Premiere® Elements 7 software. Visit the Camera Raw page for a complete list of supported cameras.
Windows
Macintosh

DNG Converter 5.5 update

Friday, September 18, 2009

photos matted and framed the really right way

From Red River

Want to get your photos matted and framed the really right way? See how the Library of Congress does it here


Thursday, September 17, 2009

Flip out over "flipping!"

From http://www.ppsop.com/courses.aspx

Flip out over "flipping!"
If all you did for the next three months is concentrate on shooting one of the four following elements of design, LINE, TEXTURE, COLOR or PATTERN, your artistic vision would reach new heights-guaranteed! BUT if you really want your vision to soar then consider "flipping the many abstract images that will result from the pursuit of seeking out compositions that are limited to the strong design elements mentioned above.

PhotoShop; Image>Image Rotation, which in turn often reveals even more possibilities for strikingly graphic images.

You don't have to decide which one you like the best; in fact you can like both and saving either is a snap too since all you need to do is choose SAVE AS for each one and add a single letter or number to the file name. Once you flip an image twice, three times or, heck, six or eight times (including inversing it) consider joining all of them via the Canvas Tool into a single image and really let the fun begin!

As my many students will attest from their weekly critiques, 'flipping' an image is often an idea they had never considered, but in doing so, it actually took their shot to that much higher level that we all aspire towards.

PPSOP offers courses: From http://www.ppsop.com/courses.aspx

Read Jeff Revell's Guide to Photowalking

Photowalking is becoming a big time pastime. In rough economic times getting together with a group, having fun, and not spending money is a welcome opportunity.

Read Jeff Revell's Guide to Photowalking

Where to recycle inkjet tanks and cartridges

From Red River Blog

Where to recycle inkjet tanks and cartridges

Piles and piles of used inkjet cartridges and a trash can. Not the best solution for the environmentally minded (or those who simply cannot stand wasting resources).Epson, Canon and HP all offer ink cartridge recycling services. Pack up your legions of spent tanks and mail them off!

Links to the details are below:
Epson Ink Cartridge Recycling Program
Canon Recycling CenterHP
Locally stores like Staples and Office Depot likely take inkjet cartridges for recycling.

Wednesday, September 16, 2009

Five Secrets of the Marquee Tools in Photoshop

Post from: Digital Photography School - Photography Tips.
Read the article and see the photos here:
Five Secrets of the Marquee Tools in Photoshop

Five Secrets of the Marquee Tools in Photoshop

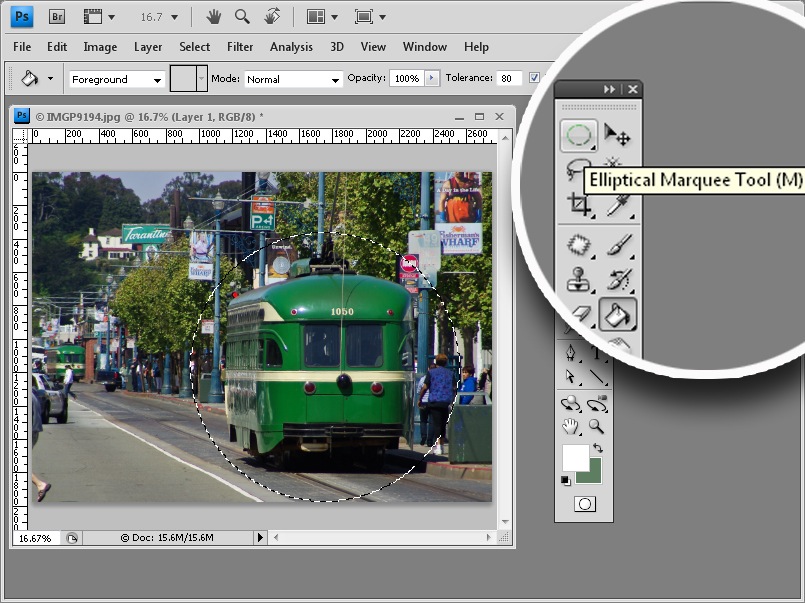
There are two key marquee selection tools in Photoshop: the rectangular and elliptical marquee tools and they share a toolbar position. Here are some things you may not know about these tools.

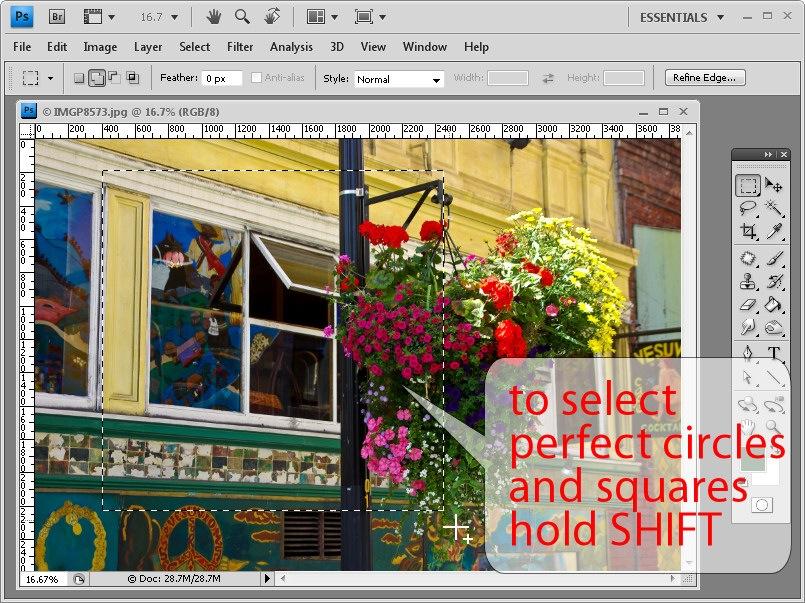
1. Squares and Circles
The rectangular and elliptical marquee tools can be used to draw perfect squares and circles. When you click and drag the marquee, hold the Shift key to constrain the shape to a circle or square.

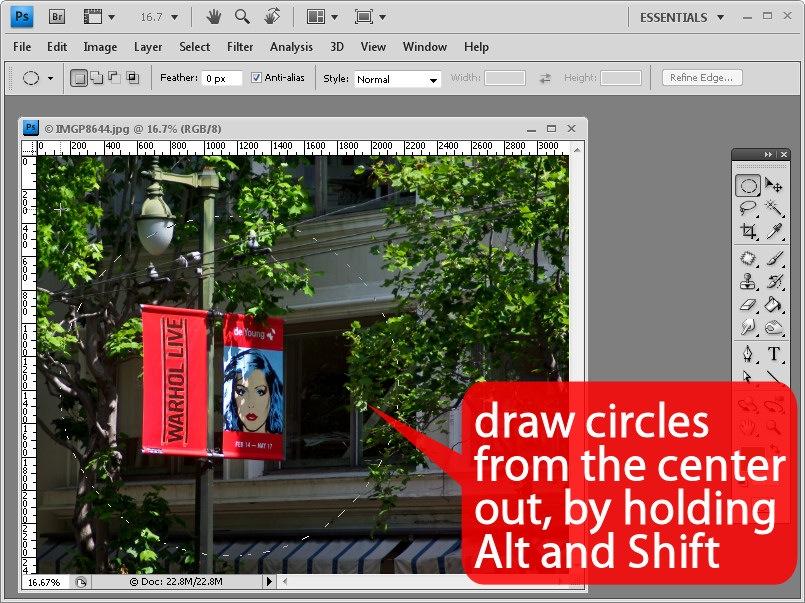
2. A Circle is a Square? No Thank You!
Try and draw a circle or ellipse in a fixed position on an image and you may be confused about just where the shape starts. A circle or ellipse is drawn as if it were placed inside a square or rectangle shape so you start drawing the shape from a corner of its square or rectangular container. All this makes it very hard to position a shape accurately. To make things easier you can draw your shapes from the center outwards by holding the Alt key (Option on the Mac), as you drag on the marquee tool. Add the Shift key to constrain the ellipsis to a circle.

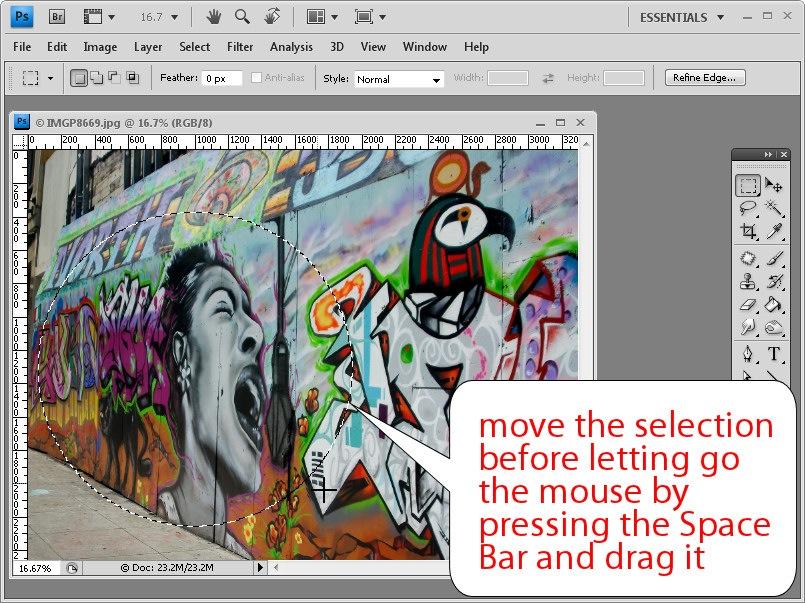
3. Right Shape, Wrong Place?
What do you do when you’ve drawn a perfect shape but in the wrong place on the image? Don’t let go the mouse! Instead, hold the Spacebar and you can now move the shape into the desired position. Let go the Spacebar and then let go the left mouse button fix the marquee in position.

4. Right Shape, wrong Rotation?
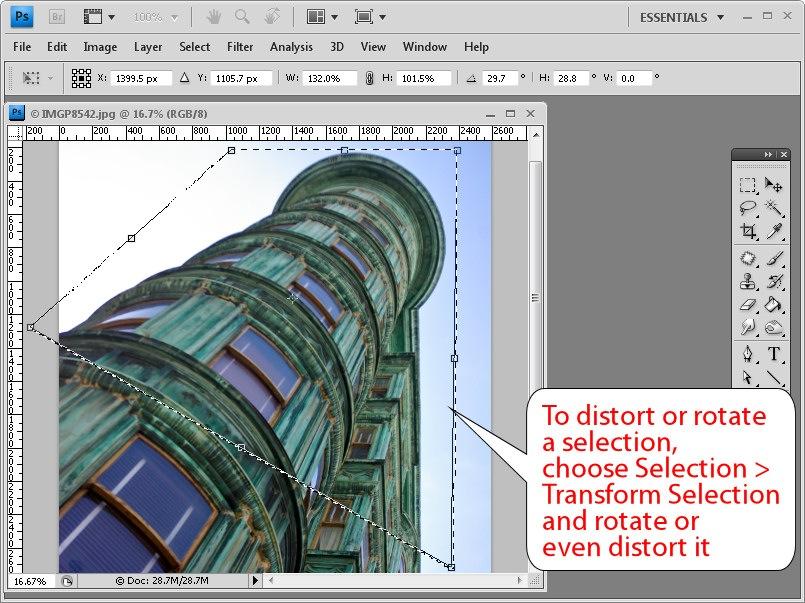
When you want to create a rotated shape such as a rectangle, square or ellipse, first create your shape using the marquee tool and ignore the rotation issue. Now let go the mouse button and choose Select > Transform Selection. The shape now shows a set of transform handles that you can use to rotate it. Hold the Ctrl key (Command on the Mac) and you can drag on a corner of the shape to distort it. Press Enter or Return to commit the transformation and remove the handles. You can now continue to work with the marquee selection.

5. Exact Size Selection
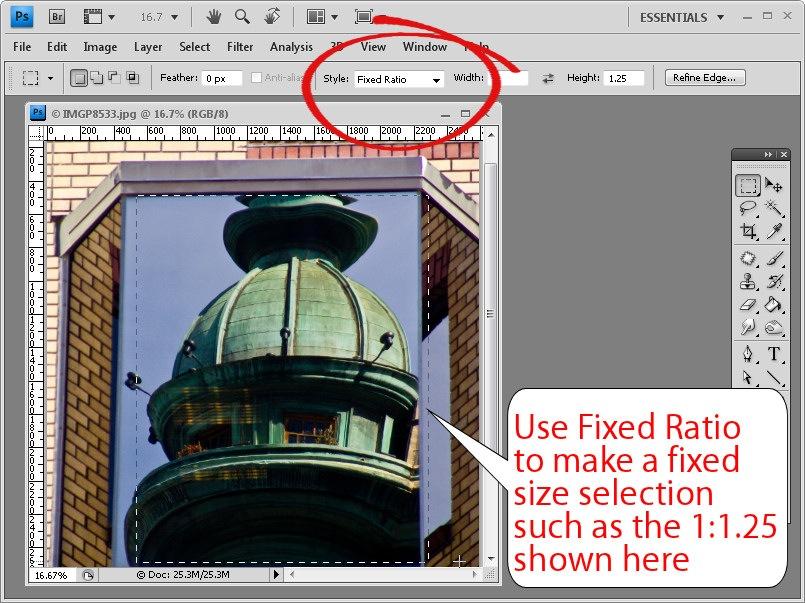
If you want to make a selection that is an exact size, from the Style dropdown list choose Fixed Size. Type the pixel width and height into the boxes and click on the image and a selection exactly the desired size will appear on it. Use Fixed Ratio to make a selection at a fixed ratio like 1:1 shown here.

Next time you need to make a selection on an image using the marquee tool remember that there’s a lot more to it than might meet the eye.

Post from: Digital Photography School - Photography Tips.
Five Secrets of the Marquee Tools in Photoshop

Tuesday, September 15, 2009

Death Valley and the Valley of Fire

Death Valley and the Valley of Fire October 20 - October 26, 2010
http://www.phototc.com/

Dedicated in 1935, Valley of Fire is Nevada's oldest State Park. It is located only fifty miles northeast of Las Vegas. We’ll spend our first full day here, enjoying the unique rock and sandstone formations of this region, before heading on to Death Valley National Park. Established in 1933, Death Valley is the largest National Park in the lower forty eight states with 3.3 million acres. It is a land of extremes, with elevations ranging from a high of over 11,000 feet at Telescope Peak to a low of 282 feet below sea level at Badwater Basin.

Our days will be filled with sunrise photography over the sand dunes and afternoons in the canyons.Travel with Ron Rosenstock to Death Valley and the Valley of Fire. Ron has been leading photographic tours since 1967. Although Ron has concentrated on international travel since that time he is amazed by the potential of photographing in the vast regions of Nevada and California. A former student of Paul Caponigro and Minor White, Ron retired in 2002 from teaching at Clark University in Worcester, Massachusetts. His work has been featured in over one hundred exhibitions since 1967, both in the U.S. and abroad, and his photographs are to be found in the permanent collections of the Fogg Art Museum at Harvard University, the Worcester Art Museum in Worcester, Mass., The Polaroid Collection in Cambridge, Mass., and the International Center of Photography in New York City. Ron specializes in the subtleties of nature photography, capturing the grandeur and uniqueness of the land. His belief is that “Everyone has a certain style. I don’t tell my students what to photograph; I just show them how to accomplish what they decide to do.” www.ronrosenstock.com

Itinerary

Sunrise on the National Mall

Sunrise on the National Mall
Next Safari: 11/22/2009 6:30 am - 9:00 am

Like to get up early? Want to learn how to photograph sunrises? This Safari gives participants the opportunity to photograph the sun as it begins to rise in the east at 6:59 am behind the illuminated US Capitol building, lighting up the face of the Washington Monument and projecting its golden light onto the sandstone walls of the National Museum of the American Indian. Cloud formations in the sky will make your pictures even more interesting and dramatic. Professional photographer Bob Blanken will be on hand to give guidance on exposure, white balance, lighting and composition.

Meet at entrance to National Museum of the American Indian on 3rd St and Independence Ave SW.
Fee: $99 per person.Photo: Bob Blanken Go to Registration

Monday, September 14, 2009

Speedlights & Speedlites: Creative Flash Photography at the Speed of Light

A new book has hit the bookshelves, "Speedlights & Speedlites: Creative Flash Photography at the Speed of Light" by Lou Jones, Bob Keenan, and Stephen Ostrowski and it's a must read.It is a book dedicated to small strobes, specifically Nikon AND Canon flashes.

The book is even color coded (Nikon - purple, Canon - green) so you can easily see if the discussion is about Nikon Speedlights or Canon Speedlites.

http://www.amazon.com/Speedlights-Speedlites-Creative-Flash-Photography/dp/0240812077

Sunday, September 13, 2009

23rd Annual Simsbury Fly-In

Simsbury, Connecticut 860.408.9288 Unicom 122.7 SimsburyAirport.com
The 23rd Annual Simsbury Fly-In is September 20, 2009 Rain Date: September 27, 2009
"The largest event of its kind in New England"

We need volunteers! Click here for an online application.
The Annual Simsbury Fly-In is the largest event of its kind in New England. Co-Sponsored by EAA Chapter 324 and the Valley Classic Wheels Car Club, the 2008 event was held on Sunday, Sept 21. The weather was clear and beautiful, with warm temperatures.

It was a wonderful event, with the largest number of spectators yet - estimated to be over 10,000. We attracted 160 airplanes of all kinds, and the car show featured hundreds of antique and classic autos. We featured two exhibitions of skydiving, a demonstration of formation flying by the Yankee Clippers RV squadron, live music by The Clams, and many vendor displays. A large number of aircraft dealers displayed new models, including some of the latest Light Sport airplanes.

Click here to see an article about our 2007 Fly-In.Click here to read story about 2007 Simsbury Fly-In in February 2008 issue of Sport Aviation magazine.Click here for photos from our 2008 event, orclick here to download the 2008 program brochure (about 2.5Megs). Click here to see an enthusiastic review of the 2007 FlyIn by our friends at the Shoreline Auto Connection.Click here for info about Valley Classic Wheels car club.

The 2009 Fly-In will be held on Sept 20th, with a rain date of Sept 29. Watch this space for detailed info as we get closer to that date.
The Fly-In is a great opportunity to market your product or service. If you wish to be a sponsor or advertiser or exhibitor, or for general info about the Fly-In, contact Event Chairman Joe Bellino at 860-408-0040 or jbellino@snet.net

Saturday, September 12, 2009

Denise Saldana, NHCC member, in August PSA magazine

way to go Denise!
My photo was published in the August issue of PSA magazine. Here is a copy.
Enjoy, Denise Saldana

Discovering the Nature of California with a Camera and Lightroom

Discovering the Nature of California with a Camera and Lightroom


Rob Sheppard -- October 26-30, 2009

Join long-time Outdoor Photography Magazine editor, Rob Sheppard, on the beautiful Central Coast of California and get his insights and techniques that he uses to create incredible landscape images.

This course will take you on an adventure of discovery of the life around us in California as well as expanding your photography skills through specific assignments and work in Lightroom.

Camera Repair Now Available Ross Imaging Center Hamden

Camera Repair Now Available

Partnership with Precision Camera

We have recently partnered with Precision Camera Repair, enabling us to process repairs for both film and digital models. From minor repairs and cleaning to lens repair and part replacements on all Canon, Fuji, JVC, Kodak, Minolta, Nikon, Olympus, Panasonic, Pentax, Polaroid, Samsung, Sony and many others! Repairing your old camera will not only save you money, but reduce pollution and negative environmental impact. Bring yours to our Hamden location for an estimate today!

We hope to see you soon!!

Ross Imaging Center 3000 Whitney AvenueHamden, CT 06518203.281.6996 www.ctprints.com

Limited Time Discount on Dfine 2.0

Dfine 2.0 Limited Time Discount on Dfine 2.0
If you've been waiting to get your hands on Nik Software's acclaimed noise reduction tool, now is the time. Ensure your images look their very best with Dfine 2.0 - now $20 off for a limited time only. Click here to purchase.

Friday, September 11, 2009

Upgrade from Elements to Photoshop CS4 for $299 August 26th, 2009

Here is your opportunity! If you have Elements and have been wishing that you could upgrade, but did not have $700 to spend, this is your chance. As long as you have a registered version of Elements, you have the next few weeks to get the FULL version of Photoshop CS4 for just $299. Here is the offer. You can buy online or call the number below and order.

What HDR Really Stands For: How to Depict Reality

What HDR Really Stands For:How to Depict Reality

How to Depict Reality, a primary question for two centuries of photography, is a meaningful question for high dynamic range photographers. Here, five reasons for photographers to try high dynamic range photography, HDR for short, are offered. HDR can expand your skills as it widens the dynamic range of your imaging. HDR images, despite heated controversy about how unreal they make scenes appear, are here to stay. HDR shots show up in magazines, advertising and everywhere online. Teaching this popular technique since 2005, I have invented acronyms for the three letters of HDR to help people visualize its assets. In the camera, you take different exposures of the same scene — but at different shutter speeds — to get an HDR image. The results - shots emerge with better whites and blacks than possible from a single image. Working with HDR software lets you handle back- and side-lighting. You get all the highlights and shadow detail you want in high contrast scenes and dimly lit places.

Read on for five key advantages of How to Depict Reality. http://www.apogeephoto.com/march2008/jaustin32008.shtml

Thursday, September 10, 2009

How to Take High Dynamic Range Photographs

How to Take High Dynamic Range Photographs:A Complete Visual, Step-by-Step Lesson for the Latest Photo Imaging Technique© Jim Austin M.A., A.C.E.

Read the article here: http://www.apogeephoto.com/dec2007/jaustin122007.shtml

Click here for: A Flickr gallery of Jim Austin’s HDR images (http://flickr.com/photos/jimaustin/sets/72157594465689774/). Austin is a digital photo consultant, teacher, writer, and Adobe Certified Expert.

lighting diagrams


Not everyone has access to their own in-house team of professional illustrators to create stunningly beautiful lighting diagrams. For those of you who have not been following the Flickr threads, Strobist reader Quoc Huy Nguyen Dinh has been developing an online lighting diagram creator, and it is ready for prime time. You can either do it on-the-fly in the browser-based version, or download a Photoshop file to get serious on your desktop.


And best of all, it's free.(Check it out here.)

Wednesday, September 9, 2009

Fall foliage

Fall foliage maps and reports start today Sept 9th...

Here is some information for New York state...

Click here for the current fall foliage report or here: http://fallgetaways.iloveny.com/foliage_report.html

FALL FOLIAGE PEAK REPORT BY REGION
  • Adirondack Mountains & Catskills: fall foliage peak last 2 weeks of September
  • Chautauqua / Allegheny: fall foliage peak last week in September and 1st week of October
  • Leatherstocking & Finger Lakes Region: fall foliage first 2 weeks in October
  • 1000 Islands, Niagara Falls & Northern Finger Lakes: fall foliage peak 2nd and 3rd weeks of October
  • Hudson Valley & Capital Region: fall foliage peak 2nd and 3rd weeks of October
  • Southern Hudson Valley: fall foliage foliage peak last 2 weeks in October
  • NYC & Long Island: fall foliage foliage peak last week in October and first week in November
Autumn Driving Tours
Set out on a driving tour of New York State’s patchwork-quilted red and gold countryside. From Long Island to Niagara Falls, every road you and your family travel will hold an autumn surprise. Download a tour below! For more scenic view information, click here.

New York City (NYC) & Long Island (LI) Tours
From skyscraper views to lighthouse lookouts, autumn's colors are on full display — along with culture, cuisine and creativity. download pdf

Hudson Valley (HV) &The Catskills (CT) Tours
A landscape of inspiration from forests to farm stands, mansions to mysteries — all wrapped in autumn's brillance. download pdf

Capital-Saratoga (CS) &Central-Leatherstocking (CL) Tours
Grandma Moses loved the scenery. The Dutch settlers loved the waterways. Current settlers love the orchards, history and endless fun. download PDF

The Adirondacks (AD) &Thousand Islands-Seaway (TI) Tours
Forty-six peaks with incredible views. Millions of acres to explore. Thousands of islands draped in magical hues. It's playtime! download PDF

Finger Lakes (FL) Tours
Idyllic settings, lush vineyards and clear lakes add to the bounty of one of the world's richest culinary regions. download PDF

Greater Niagara (GN) &Chautauqua-Allegheny (CA) Tours
It's festival season! Time to celebrate apples, grapes, antiques, prize-winning pumpkins and spooks. And all in a land of scenic wonder! download PDF

SCENIC VIEWS -- CHECK OUT THE SCENIC VISTAS BELOW FOR SOME OF THE BEST VIEWS IN NEW YORK STATE!

The Adirondacks
  • Mount Arab Fire Tower, in the hamlet of Piercefield, near Tupper Lake, offers great views of Tupper Lake and Mount Morris to the southeast, the Adirondack High Peaks to the east, The Raquette River valley to the north, Horseshoe Lake Wild Forest to the southwest, and Mt Arab Lake and Eagle Crag Lake to the west.
  • Bald Mountain (also know as Rondaxe Mountain), off Route 28 in Old Forge, features a fire tower offering great scenic vistas of the Fulton Chain of Lakes, as well as the parks of the southwestern Adirondacks.
  • The summit of Mt. Defiance in Ticonderoga features a picnic pavilion with spectacular views of the Champlain Valley and Fort Ticonderoga.
  • Whiteface Mountain near the Wilmington/Lake Placid area, has a 4,872-foot summit that can be reached via Memorial Highway. The breathtaking Gondola Sky Ride at Whiteface Mountain Ski Center offers unique views of the Adirondack High Peaks, and the Olympic Region, as it climbs to the top of Little Whiteface peak.
  • Prospect Mountain in Lake George, off Route 9, offers vistas of Lake George and a 100-mile view of five states from a 2,030-foot summit.
PROSPECT MTN. VETERAN MEMORIALHIGHWAY AND 100 MILE VIEW
From I-87 Exit 21, travel 1 mile north on Rt. 9,turn left at state highway entrance. Marvel atthe 100 mile view from 2,021 ft. summit. The5 1/2 mile highway leads to the parking lot.Along the way, you'll be able to experiencebreathtaking views of Vermont's Green Mts.,New Hampshire's White Mts. and New York'sAdirondack Mountains. From the parking lot,a "viewmobile" will take you the rest of theway to the summit. Be sure to check out theremains of the world's largest cable railroadand the fireplace of once-thriving ProspectMountain Hotel.
Open Daily: May 27 - Oct 22, 9am - 5pm
Rates: $5/car, $30/bus, driving Time: 10 minutes one way to parking lot plus stops

Capital-Saratoga
  • The scenic overlook at John Boyd Thatcher State Park, located on the Helderberg escarpment, on Hailes Cave Road in Voorheesville, offers amazing views of the Hudson-Mohawk lowlands, including the City of Albany, and the southern Adirondacks.
  • Saratoga National Historical Park, Routes 4 and 32, in Stillwater offers a variety of scenic views including one overlooking the Hudson River Valley and another that overlooks three states.
  • The 155-foot Saratoga Monument, off Route 29, in Schuylerville has 187 steps to the top and offers beautiful panoramic views of a view of Albany’s skyline, the Adirondack and Catskill mountains and three states.
  • Grafton Lakes State Park on Route 2 in Grafton provides great views along Route 2 and throughout the park along fives lakes.
  • The Empire State Plaza in Albany features an observation deck at the 42-story Corning Tower, offering spectacular views of the Helderbergs and Catskills.

    The Catskills
  • Sam’s Point Dwarf Pine Ridge Preserve, a National Landmark on Route 52 in Ellenville, showcases views of five states.
  • Point Lookout, on Route 23 in East Windham, offers scenic viewing of the Hudson Valley and five states.
  • Kaaterskill Falls, Route 23A, in Haines Falls, the highest cascading waterfalls in New York State, with scenic marked hiking trails and magnificent views of the Hudson Valley.
  • Pepacton and Cannonsville reservoirs in Delaware County offer breathtaking views of fall foliage, along with some of the best fly fishing east of the Mississippi. (Route 30 from Margaretville or Andes to Downsville along the southern edge of the Pepacton, and Route 10 from Walton to Deposit)

    Central-Leatherstocking
  • Vroman’s Nose, off Route 30 near Middleburgh, offers a short uphill hike and breathtaking views of Schoharie Valley and the northern Catskill Mountains.
  • Round Top picnic area, in Endicott, off Route 17C, offers hiking, shelters and scenic east-west overlooks.
  • A drive to the top of Torture Hill near the statue of the Lady of Fatima and the Monument of the Unborn at the Auriesville Shrine, located just off Route 5S in Auriesville, offers commanding scenic views of the confluence of the Mohawk River and the Schoharie Creek.
  • The Overlook Trail at Schoharie Crossing State Historic Site, off Route 5S,in Fort Hunter offers scenic views of the Schoharie Aqueduct with the Mohawk Valley’s fall foliage in the background and the Schoharie Creek in the foreground.
  • Chittenango Falls State Park on Route 13 in Cazenovia offers a spectacular view in the autumn of waterfalls and a colorful gorge.
Chautauqua-Allegheny
  • Luensman Overview Park on Thayer Road in Portland off Route 20, offers visitors hiking trails, picnic facilities, and a magnificent view of the flatlands and Lake Erie.
  • Allegany State Park, exit 21 off Route 86,offers a phenomenal lake view featuring spectacular fall foliage; there is also an overlook pull-off on the road into the park looking over the valley containing the City of Salamanca.
  • Rock City Park, three miles south of Olean on Route 16, offers a 20-mile vista with plentiful foliage.
  • Luensman Overlook Park on Thayer Road in Portland features a panoramic view overlooking Lake Erie and Concord Grape County.
  • Erlandson Overview Park on Oak Hill Road in Frewsburg, the second highest elevation in Chautauqua County, begins the foothills of the Alleghenies.

Tuesday, September 8, 2009

Capturing the Action:Urban Skateboarding Portrait

The magician reveals his secrets!You’ve been waiting in anticipation…Now LIVE on Web Photo School: Jay P. Morgan’s Capturing the Action:Urban Skateboarding Portrait!!!!

Learn from a master of capturing movement—and in some cases “staging” movement—Jay P. Morgan. You’ve seen the images, the ones you envy and wish you could take yourself, well now you can!
Learn the secret tricks of how to build your shot and capture inspiring images in just 20 minutes. See how creativity and spontaneity can add to the excitement of your images!

Cool Digital Photography Links from Around the Web

Post from: Digital Photography School - Photography Tips.

15 Cool Digital Photography Links from Around the Web

Monday, September 7, 2009

79% of DPS Readers Shoot In RAW (at least Sometimes)

79% of Our Readers Shoot In RAW (at least Sometimes) [POLL RESULTS]

A couple of weeks back we ran a poll here on DPS asking whether readers are shooting in RAW. The results are in and it seems that most of you are - at least some of the time.

Over 17,000 readers have voted in this poll and 79% of them shoot in RAW at least some of the time.

We asked our readers this same question just over 2 years ago and back then the Yes/No split was a lot more even (about 50/50) - so it looks like RAW continues to grow in popularity.

Further Reading on RAW: RAW vs JPEG

API WORKSHOPS (Adirondacks)

WORKSHOP -- The Nature of Possibility with John Radigan October 4-7 Inlet, New York

Nature is the ultimate testament to possibility. Digital imaging technology has tremendous ability to make new expressions possible. This workshop is about taking your photography to a higher level of expression. Participants will visit great shooting locations at a time when the area is awash in vibrant color. While in the field, John will assist participants in expanding their repertoire of expressive techniques.

The institute has received a lot of requests for a new workshop that combines traditional nature photography with an exploration into new possibilities offered by advanced techniques and technology. Well, here it is!

Sign-up now for what is sure to be an exciting new addition to our schedule!

About the Instructor
Director and founder of API, John Radigan is a freelance professional photographer specializing in intimate images of nature. His award-winning work has appeared in calendars and publications such as Adirondack Life magazine, the Adirondack Life calendar and Art Business News. He is currently working on his upcoming book, The Beat of Adirondack Hearts. In his workshops, John encourages participants to view nature without any preconceptions, utilizing all of their senses in creating images that reflect their unique inner landscape.
For more information, visit our website. To register, call 216-531-2155.

NANCY ROTENBERG! Capturing the Essence, September 17-20 Inlet, New York

Nancy's workshop is nearly sold-out! Due to a scheduling conflict we will not be offering a workshop with her in 2010. So don't miss out on this special opportunity to work with Nancy in the Adirondacks! For more information click here.

UPCOMING API EVENTS

CONTACT INFO. For more information about the Adirondack Photography Institute visit our website. To join our mailing list click here. Call us today at (216) 531-2155 to register...

Hudson River ValleyFall Color Tour

Hudson River Valley Fall Color Tour with Greg Miller October 23-25 Newburgh, New York

Location: Hilton Garden Inn, Newburgh, New York
Begins: Friday at 7:00 PM for pre-tour planning session. Saturday and Sunday participants will meet in the resort parking lot to begin the day's shooting.
Ends: Each day ends at 7:30 PM
Suggested Lodging: Hilton Garden Inn or Courtyard by Marriott (mention that you are part of the photo institute group to receive a discount).

Overview: Autumn in the Hudson Valley is filled with glorious color and mysterious morning mists. Thick stands of hardwood trees display saturated reds, yellows, and oranges while the blueberry bushes change to rustic maroons. Early mornings are crisp while mists hang low in the valleys that glow as they become backlit by the rising sun. These are the scenes that landscape photographers wait all year for. We’ll visit some of the famous locations of the Hudson Valley such as the Bear Mountain Bridge, Harriman State Park, and Kaaterskill Falls, plus some hidden treasures that are sure to please.

Schedule: Weather permitting we’ll photograph throughout the day, and especially around sunrise and sunset to take advantage of magical light.
Cost: $295 (Must be paid-in-full at time of registration.)
Meals: Not included.
Lodging: Not included.
Participants: 12 max.
Who should attend: Beginner to advanced photographers using film or digital point-and-shoot or SLR cameras. Participants should have a basic understanding of their camera’s features and operation, including shooting in both manual and automatic exposure modes.
RegistrationInfo Packet: miller_oct23.pdf

Cherry Blossoms in the Fall!

Cherry Blossoms in the Fall!
You look through your camera viewfinder and see Washington DC's Tidal Basin ringed in vibrant color: deep red, gold, pink, orange, purple, and brown. Cherry blossoms in the spring? NO!

These are Washington's famous cherry trees in the FALL! What a spectacle! Who KNEW? You can frame the Washington Monument or the Jefferson Memorial in a circle of fiery-red leaves, or you can zoom in on a huge cherry tree with its colorful branches arcing over the pathway and touching the surface of the water, what a great shot!

Here is your opportunity to AVOID the springtime crowds and enjoy Washington DC's Tidal Basin in the mild weather of early November on a photo Safari led by the man who knows were all the best shots are: architectural photographer E. David Luria, founder and director of the Washington Photo Safari, and official photographer of the annual National Cherry Blossom Festival. On this 2 and ½ hour walking excursion, Mr. Luria will first review general tips in travel photography and then lead you to the best views of fall on the Tidal Basin, assisting you with tips on exposure, composition, lighting, and making full use of all the features of your cameraOur starting point, the FDR Memorial, offers hours of photographic fun, exploring the waterfalls, the Depression-era statues, and the depictions of FDR and Eleanor. Then we make our way along the Tidal Basin path with the late afternoon sun behind us, giving us great views of the Tidal Basin in fall colors, the Washington Monument and the Jefferson Memorial all framed in multi-colored cherry blossoms, and then, at sunset, the illuminated Washington Monument bathed in the deep blue light of twilight framed in the columns of the Jefferson Memorial. And it is ONLY Washington Photo Safari clients who get an EXCLUSIVE peek at our secret spot: the Our Lady of the Blossoms Cherry Tree!

Offered October 31, November 1, 3, 5, and 8. Meet at visitor center entrance to FDR Memorial, on SW Basin Drive near Ohio Drive SW, Washington DC. Fee: Only $59/person.
Go to Registration

Sunday, September 6, 2009

PLAMP

When we were at Mohonk photographing flowers some of us hand plamps -- they are great!

One end of the Plamp clamps to your tripod while the other grasps the object. Use the Plamp to stabilize windblown subjects, adjust the position or angle of your subject, or move obstructing foliage. You can also use the Plamp to hold reflectors and lens shades. One day in the field with a Plamp and you will begin to realize its full potential.

Two Plamps are better than one...
It is often useful to have more than one Plamp. Use one Plamp to hold your subject while the other holds a reflector or holds back obstructing foliage.

Uses for the Plamp in the Field
1) Steady wind-blown plants for ambient light photography.
2) Steady wind-blown plants for focusing while doing flash photography.
3) Make small adjustments in your subject to align it with the film plane.
4) Move your subject into the desired angle for lighting (i.e. back lighting, side lighting, and front lighting)
5) Change the orientation of your subject to make an impossible camera angle into an easy one.
6) Move your subject to isolate it from distracting background or foreground elements.
7) Move your subject so that it is in front of the desired background.
8) Move distracting background or foreground elements out of the way.
9) Move desirable background or foreground elements into the picture.
10) To hold a small shade to block light from hitting your lens and causing flare.
11) To hold reflectors, diffusers or small flash units.*

*A large piece of crinkled aluminum foil can be folded into a small square and positioned close to your subject for dramatic spotlighting. Or, it can be unfolded and flattened to produce diffused fill light. Plain white paper can be used as an effective diffuser for harsh mid-day lighting conditions, and translucent colored paper can produce interesting and artistic results.

sold from Wimberley http://www.tripodhead.com/products/plamp-main.cfm and McPlamp http://www.fmphotography.us/html/mcclamp.html

Saturday, September 5, 2009

Free photo classes

Back to School

Summer has come to a close and it's time for the new school year to begin. Soon it will be time to think about first day of class photos, sports photos, yearbook pictures, and so much more. Be sure to watch for our upcoming specials.

We are also resuming our FREE photo classes beginning on September 17 at 6:30 p.m. Our September class will feature the wisdom of Mike Ross as he demonstrates Intro to Adobe Lightroom. He will be covering the basics of the Adobe Lightroom 2.0 software including importing, develop module, presets, exporting, and creating slideshows. As always, our classes are free of charge and open to the public. We recommend calling/emailing in advance to reserve your seat(s). Friends and family are welcome!

Ross Imaging Center 3000 Whitney Avenue Hamden, CT 06518203.281.6996 www.ctprints.com

Fast Track Roadshow Workshop

Fast Track Roadshow Workshop Oct 20-21, NYC
Get clear on who you are as a photographer &witness a world open up that you've never dreamed of! Join in for a day of training that will have more impact on your bottom line and professional satisfaction than any other investment you will make this year – facilitated by Dane Sanders!

BONUS: ALL PARTICIPANTS GET WELL OVER $2300 IN CRITICAL PRODUCTS AND SERVICES MAKING THE WORKSHOP BETTER THAN FREE*!
*To see for yourself all the incredible tools that are included FREE with the workshop, keep reading!
Let Dane help you....
> get clear on your critical competitive advantage.> unlock the mystery of real change in your life and business.> crystalize what you need to do to get your photo house in order.> help you build modular micro-systems to streamline your workflow.> give you personal coaching on how to get the most from your subjects.> catalyze your growth as a photographer.> empower you with a proven game plan for success.

The Workshop is designed around three keys elements that will propel you as a professional:
#1 - You'll get everything you need to personally own the Fast Track Philosophy.#2 - You'll discover the perfect Strategy & Tactics for you to truly lead.#3 - You'll be given the Tools & Best Practices necessary to win.

By investing in yourself in this way, you will establish an unstoppable trajectory and, more tangibly, the appropriate disciplines necessary to have the greatest impact on your bottom line. Give yourself the gift of jump starting your career that will save you years of trial and error!
This essential workshop is dedicated to one thing: empowering YOU to Fast Track your creativity as a photographer so that your business dreams become a reality.

If you are just making the transition into the profession or need to take your existing photo career to the next level, the Fast Track Workshop will prove to be one of the best investments you can make for your photography career! Fast Track is designed to comprehensively take you from start to stardom!

MAJOR TOPICS

Water Drops - Behind the Shot


Water Drops - Behind the Shot From digital photography school...

Water Drops - Behind the Shot

One of the things I love about what is happening over in our forum area is that we’ve got thousands of photographers (there are actually 55,000 registered members now) all experimenting with different styles of photography.

While some are Pros (we have a growing community of them) many are practicing their photography in their spare time using the resources available to them. As they learn they share what they discover and how they’re achieving their results.


One such example of that this one of our members Arlon who recently give us a glimpse behind some of his Water Drop photography (see his Water Drop Gallery here).

Arlon wrote: “Water drops have always been a fascination of mine. Awhile back I tried my luck at a few and settled on a way that worked pretty easily for me. Here are a few drops and a self explaining shot of my setup. Takes me about 10 shots for every keeper.” Arlon also went to the trouble of photographing the setup of these shots and annotating it as follows:


The full thread in our forums (others are sharing their setups too) on this topic is located here. Stop by to share your own experiences.

setup using a plastic bag instead and a paint tray like this...


1) Try taking a 9 x 13 Pyrex casserole dish and set it on a piece of cloth, blue in the example and add about 1 1/2 inches of water.


2) Take a 3' x 3' piece of colored Mylar and tack in on a piece of foam board (cringled is good). Prop the Mylar up behind the long side of the dish a couple of inches away from it.


3) Set up a pipette about 2 ft above the water, or hang a bottle with pinhole as shown in the previous post.


4) darken the room and hold a flash about 2 feet from a camera set to 1 second and practice manually firing the flash at different angles as you let a drop go and press the shutter. Think like you were shooting pool and trying to get the light to fall right at the top of the water.

Here is a link to a video tutorial (Strobist: How to Photograph Water Drops with One Speedlight) that I watch and help me get better result. I didn't use the black paint tray, just a shallow glass bowl with a black piece of cloth underneath. I used a white piece of bristle board paper with a colored gel taped to it (but you can use anything, you can get some cool refection in the waterdroplet so be creative) and that's it. Just follow the video and then make your own changes. Oh yeah, I read somewhere in this forum that it is important to have the room dark, this is true. It doesn't have to be completely dark but the darker the better.

Friday, September 4, 2009

A little bit of photoshop fun to share

fun! Thanks Wayne! (Nolting)

A little bit of photoshop fun to share (I am not promoting this product): http://shop.cafepress.com/design/19434884

Control Your Canon or Nikon DSLR With Your iPhone

NEW -- Nikon camera NOW supported

Control Your Canon or Nikon DSLR With Your iPhone

Remotely fire your Canon EOS or Nikon DSLR camerawith your iPhone or iPod Touch
Remotely control the camera settings likeshutter-speed, aperture, white-balance and more
View images saved on the camera from your iPhone or iPod Touch
Look through your camera's viewfinder remotely
Great for remote-firing at weddings, sporting events, for kids, and for self-portraits
A Must-Have iPhone Application for Canon & Nikon Digital Photographers

iPhone remotely controlling a Canon camera that's mounted on a basketball backboard
DSLR Camera Remote is the next-generation cable release for your Canon EOS DSLR or Nikon DSLR camera. Just connect your camera to a WiFi enabled computer and the DSLR Camera Remote software enables you to use your Apple iPhone or iPod touch to wirelessly adjust cameras settings, fire the shutter, review images, even get a live viewfinder preview. DSLR Camera Remote is a must-have for remote shooting applications like high or low angles, self portraits and children. With its advanced timers it makes remote monitoring a snap. No internet connection required!

Here's what you need:
Your Canon EOS DSLR or Nikon DSLR camera (view list of compatible cameras)
Your Apple iPhone or iPod Touch
A WiFi enabled computer (no active internet connection required)
DSLR Camera Remote Server software (free download)
DSLR Camera Remote Professional OR DSLR Camera Remote Lite software for iPhone/iPod Touch, available from the Apple iTunes Store.

Buy DSLR Camera Remote Professional ($19.99) Buy DSLR Camera Remote Lite ($1.99)

You get full control over common camera controls including white balance, image quality, shutter speed, aperture, intervalometer, and more.

Key Features

Remote Firing
DSLR Camera Remote's key feature is the ability to remotely trigger the shutter, or fire the camera. This seemingly basic feature is very powerful. You can now trigger a camera in a difficult position, such as in a church balcony or behind a basketball backboard. Or you can use it to give yourself another set of hands in the studio - to interact with your subject better or hold a reflector. There are all sorts of unique shooting situations where you would like to trigger your camera from a distance. With DSLR Camera Remote you can now do this with the equipment you already have, no need for expensive radio transmitters or open frequencies.

Remote Adjustments
DSLR Camera Remote Professional Edition gives you full control over common camera controls including shutter speed, aperture, ISO, white balance, and more.
Image Review
Better than a simple release, the DSLR Camera Remote lets you see the image you just photographed to confirm you got the shot you wanted. With the Professional Edition you can even zoom to 1:1 to check focus and important details.

Live View
When you combine the DSLR Camera Remote Professional Edition with a current generation Canon EOS DSLR or Nikon DSLR you can access the LiveView mode, which allows you to see through the camera's viewfinder in near real-time. This allows you to see your composition before you trigger the shutter. This feature is great for self-portraits or when you can't see your subject from your position. See a list of Canon & Nikon cameras that are known to be compatible with LiveView mode.

Intervalometer
The Professional Edition features an advanced intervalometer, or timer. The intervalometer can be used as a custom self-timer or can take a series of images at a given time interval. This is great for creating stop-action animation. You can take a picture anywhere from 1 second to 1 day apart and take up to 1,000 frames.

Zero Configuration
DSLR Camera Remote is a no-brainer to use with its zero-configuration Bonjour® networking. Just plug your camera into a network-capable host computer, launch the DSLR Camera Remote Server software, and bam! - your iPhone or iPod Touch will discover your camera automatically. Your host computer can be attached to a wired or wireless network, or it can be the host in an ad-hoc, or device-to-device network. No active internet connection is required!
See the User Guide for more information about these features

10 Questions to Ask When Taking a Digital Photo

taken from Digital Photography School - Photography Tips.

10 Questions to Ask When Taking a Digital Photo

What goes through your mind in the moments as you raise your camera up to take a shot and before you press the shutter? If you’re like many digital photographers you’re not thinking about too much - you just want to capture the moment and then move on.

However getting in the habit of asking some simple questions can help take your images to the next level. Here’s 10 questions to get in the habit of asking while framing your shots. I’ve included links in each one to further reading on the topics. I hope you find them helpful:

1. What story am I telling?
This is an important question and one that should help you to make any number of decisions in terms of composition, framing, exposure etc. In essence what you’re asking is ‘why am I taking this shot? What is it’s purpose and what am I trying to convey?’ Is it purely a way to keep a record of a moment, are you trying to capture the emotion of a moment, is it possibly a shot to give to someone, is it part of a larger series of shots or will it be the only shot to commemorate the moment etc. Read more on telling stories with photos

2. What is the visual focal point of this shot?
What will viewers of this picture naturally have their eye drawn to in this scene? Once you’ve identified this focal point you can think about where to place it in the frame (consider the rule of thirds for example). There are a variety of ways that you can enhance a focal point - some of which we explore here.

3. What competing focal points are there?
Once you’ve identified what you do want your viewers eyes to be drawn towards and have placed it in the frame - scan your eyes over the shot and see if there are any competing focal points and ask yourself whether they add to or take away from the image? Secondary focal points can add depth to shots but they can also be very distracting and so you might need to reposition yourself or adjust your focal length and/or depth of field to accommodate or remove them from your shots (read more on removing clutter from photography). Also keep in mind that if your shot has more than one focal point that it might be worth taking two shots, one of each focal point, in order to keep things simple.

4. What is in the background and foreground?
One of most common places for distractions in digital photography is the background of your shots. Run your eyes over the space behind your subject to see what else is in the image (do the same for the foreground). Consider whether you want the background in focus or nice and blurry. Read more on getting backgrounds right.

5. Am I close enough?
Another common mistake in digital photography is taking shots where your subject is too small in the frame. Shots that fill the frame with your subject tend to be much more dynamic and show a lot more detail of your subject. To get this effect you have the option of moving yourself closer, moving your subject closer or using a longer focal length to give the effect of closeness.
Read more on filling your frame.

6. What is the main source of light?
Always give consideration to how your subject is lit. Without light you’ll lose detail and clarity in your image and your camera will have to compensate by doing things like increasing ISO and lengthening shutter speeds (which could lead to noisy and blurred images). What is the main source of light, where is it coming from, is there enough light, do you need artificial light sources (flash etc), do you need to stabilize your camera on a tripod to stop camera shake due to low light etc. Read more on using artificial light here and here as well as photographing moving subjects in low light conditions.

7. Is my Framing Straight?
It’s amazing how many otherwise good photos are spoiled by framing that is slightly offline. Sloping horizons and slightly leaning people or buildings should always be in the back of your mind to check. Read more on getting horizons horizontal and getting other lines straight.
Also related to this question is that of ‘Am I holding my Camera correctly?‘ Many people don’t and as a result suffer from camera shake and framing mistakes.

8. What other perspectives could I capture this subject from?
Put 10 digital camera owners in front of a scene and most of them will take exactly the same shot from the same position. Make your images stand out from the crowd by challenging yourself to not only take the standard shots that everyone else will get but to find creative and fresh angles and perspectives to shoot from. Read more on adding variety to your Digital Photography.

9. How would holding the camera in the other format change this shot?
Many photographers get into the habit of always holding their camera the same way (horizontally/landscape or vertically/portrait). While it’s OK to have a preference one way or the other it’s also worth remembering that changing the format can drastically change the impact of the shot. Don’t forget you can also hold your camera at an angle for an effective result too.

10. How will the eye travel through this image?
This is related to asking about focal points but gets in touch with the fact that while you’re photographing a still image your viewers eyes don’t remain still as they look at an image. People tend to follow lines and are attracted to shapes and colors so considering all of these different visual elements and cues can help improve your shots considerably. Read more on horizontal, vertical and diagonal lines and how they impact a shot.

Of course you probably won’t remember all the questions and you’re unlikely to go through each of them with every shot you take - however next time you head out with your digital camera concentrate on asking yourself at least one or two of them as you take your shots. As you do you’ll find that they become more automatic and in time you’ll naturally take digital photography shots that take into account all of these elements.

Get more digital photography tips like this by subscribing to our free weekly digital photography schoool email newsletter.

Post from: Digital Photography School - Photography Tips.

Thursday, September 3, 2009

eBook: Ten Ways to Improve Your Craft. None of Them Involve Buying Gear

This is a new eBook. It’s called 10. The subtitle is “Ten Ways to Improve Your Craft. None of Them Involve Buying Gear.”

10 is David' 32 page answer to everyone that’s ever written in and asked him “So, what can I do to make better photographs now? I have the basics but want to take my images up to the next level. Where do I go from here?”

10 is not a bunch of cheezy tips cranked out to make a few bucks. It’s an effort to move us collectively towards better photography without feeling the need to contribute to the growing pile of Quick Tips to Shoot Like A Pro. Anyone who’s been at this long enough knows that “shooting like a pro” (whatever that means) takes time and effort and anyone that tells you otherwise is selling snake oil.

10 is being sold through Lulu.com and offered at half price as an introductory offer to my blog readers. At a whopping $5 it’s going to deprive a few of you of your latte for the day. But he is moving the price to $10 in the fall, so this is your chance to get in on it and my chance to say thank you for being so loyal. If you loved Within The Frame, you’ll love this one.

http://www.lulu.com/commerce/index.php?fBuyContent=7585759

Wednesday, September 2, 2009

PhotoSynthesis short workshops

PhotoSynthesis, LLC, is offering a series of short workshops for those new to the world of the Digital SLR.

Check out our website at http://photosynthesisct.com or call 860-783-5443 for more details.

Demystifying the Digital SLR Wednesday, September 9 6:30pm - 8:30pm
Understanding Light and Exposure Wednesday, September 16 6:30pm - 8:30pm
Elements of Composition Wednesday, September 23 6:30pm - 8:30pm

Mark Johnson

Don’t have time or the budget for a class right now?
Then be sure to check out Mark’s Bookstore for the latest release of Mark’s dynamic eBook, The Photographer’s Photoshop CS4 Companion.

Here’s what sets my site apart. Photoshop is an amazing tool, but it can be challenging to learn. Despite the program’s complexity, I believe that learning it can be enjoyable and inspiring. For this to happen, I recognize that the learning process isn’t about me. After all, you, the audience, are why I’m here in the first place. Thank you for allowing me to share with you.
When I teach, I try my hardest to use easy-to-understand language and a conversational tone. When I make mistakes––and I often do––I’m not afraid to laugh at myself and move on. Learning is an ongoing process. We all go through it. I vividly recall how much I struggled to understand the concept of layer masking, even though it seems simple enough now. Fortunately, my passion and persistence motivated me to continue learning, even when I felt frustrated. The important part is that I didn’t let hurdles shut me down.
Creativity is also a process––and an immensely rewarding one at that. For me, creativity does not come naturally. It blossoms from a willingness to explore techniques and concepts that excite, or sometimes frighten me. I simply can’t imagine a life without creativity. I experience such a charge when a tiny idea evolves into an experience that results in a photograph that I can’t wait to share. This sort of passion and energy is what I hope to convey through everything that you encounter on this site.
Here are a few of the key features that can benefit you.
The Photoshop Workbench – Imagine sitting beside me as I use Photoshop to edit one of your images. This describes the Photoshop Workbench experience. Each week, I take an audience-submitted image on a creative journey. One week, I may discuss color correction, the next I may cover retouching, and the week after I may explore compositing. Each Workbench is unique and searchable via both title and keyword. Best of all, each one is free. I look forward to seeing an image submission from you, and even if you don’t have an image to submit you can still suggest a topic that you’d like to see revealed.
Video Tutorials – Like the Photoshop Workbench, these tutorials are designed to help you learn Photoshop. Unlike the Workbench, these tutorials focus on very specific, high-demand subjects such as basic Photoshop 101, Color Management, and Sharpening. All video tutorials are free of charge.
Bookstore – If you’re seeking more comprehensive information about being creative with both Photoshop and your camera, take a look at the books and eBooks in my Bookstore. By purchasing these, you help me to keep the Photoshop Workbench and Video Tutorial content free.
Workshops – If you’re thirsting for the next level of knowledge and inspiration, I’d be honored to see you at a workshop or class. To receive email updates about new workshops, don’t forget to join my mailing list.

Boulder Digital Arts Workshops -- These exceptional workshops take place in the BDA Studio nestled at the foot of the Rocky Mountains in gorgeous Boulder, Colorado. To learn more and to register, please visit Boulder Digital Arts and look for Mark’s course listings. Mark adds to his BDA class schedule throughout the year, so please check back often.

November 20: Embracing Your Creative Side Hands-On Intensive (full day)

Rocky Mountain School of Photography Workshops -- Mark’s Digital Process and Print Workshops take place in the RMSP digital labs in the heart of downtown Missoula, Montana. The labs are equipped with Macintosh and PC computers and Epson and Canon printers. For more information, please visit RMSP Workshops and click on the course title that interests you.

November 1 - 6: The Next Step: Color Correction and Advanced Image Editing

Tuesday, September 1, 2009

Hudson River Ramble

Hudson River Ramble
100 guided walking, hiking, biking, canoeing, kayaking and equestrian events throughout the Hudson River Valley National Heritage Area from the Capital Region to Westchester County and Manhattan. Free program booklet or information: 800-453-6665, 845-334-9574 or www.hvnet.com

NEW Canon EOS 7D digital SLR

From dpreview http://www.dpreview.com/news/0909/09090105canoneos7d.asp

As anticipated Canon has today announced the EOS 7D digital SLR. It boasts a new 18MP CMOS sensor, Dual DIGIC 4 processors, ISO range expandable to 12800, continuous shooting at 8 fps and full HD video recording. It also incorporates a new viewfinder with 1.0x magnification and 100% coverage and a 3 inch LCD with 920k dot resolution.

Jump to:
Press Release
Specifications
Additional images
Technologies explained
Hands-on Preview

100mm F2.8 macro Hybrid IS technology

From dpreview

Hot on the heels of Canon's announcement of its Hybrid IS technology comes the first lens to sport this feature, and to no great surprise it's a 100mm F2.8 macro. The Hybrid IS system provides up to 2 stops stabilisation at 1.0x magnification, and up to 4 stops at longer shooting distances. Canon's third EF 100mm F2.8 macro lens is also the first to gain the flagship 'L' designation, and comes with such goodies as ultra-low dispersion glass elements, a nine blade circular aperture and weathersealing. The Canon EF 100mm F2.8L IS USM macro will supplement, rather than replace the existing 100mm F2.8 USM macro..

red the rest here: http://www.dpreview.com/news/0909/09090102canon100mmmacro.asp

Fabulous Fall Landscapes, Gardens and Structures - US National Arboretum

Fabulous Fall Landscapes, Gardens and Structures - US National Arboretum
Next Safari: 11/01/20098:30 am - 12:30 pm
Photograph the gorgeous autumnal colors of the US National Arboretum! Located in northeast DC, just 10 minutes from the Capitol Building, this 446-acre gem contains spectacular woodland trails, gardens, ponds, prairies, indoor plant exhibitions and nine miles of roadways that connect the numerous gardens and collections on the grounds. In addition, the Arboretum is home to a notable National Landmark, the National Capitol Columns. These majestic Corinthian columns, situated next to a reflecting pool, once supported the east portico of the US Capitol.Professional photographer Donna T. Jones will be highlighting all aspects of outdoor photography such as accurate camera exposure, lens choices, composition macro/close-up, landscape, and architecture. This is a well-rounded Safari and is open to photographers at any skill level with any kind of camera, film or digital.
United States National Arboretum, 3501 New York Avenue, NE, Washington, DC 20002-1958. Meet in front of the Administration Building. There are two entrances to the Arboretum. Enter the R. St gate at 24th & R Streets, NE, off of Bladensburg Road.
Fee: $99 per person.Photo: Donna Jones
Go to Registration