Saturday, August 30, 2008

Video on DSLRs? The Debate So Far

This is from http://digital-photography-school.com/blog

Earlier in the week I posted that Nikon have released their new Nikon D90 DSLR, a camera which they are proudly publicizing is the first DSLR to shoot with HD Video.

In the comments on that post the main theme being discussed is whether video belongs on a DSLR.

We’ve long seen video on point and shoot cameras (and I see a lot of people shooting video that way when I’m out and about) but does video belong on a DSLR?

Video on DSLRs? The Debate So Far

‘It just sounds weird to shoot videos with DSLR camera, don’t you think?’ - Robert

“Now this is just wrong I think. Why would you need video on a DSLR? I’m pretty disappointed about this. I was afraid that this would be the next step from Live View. I hope Canon will not include this video feature in their DSLR’s.” - Horia

“I’m conflicted about the video. Kinda like the pop up flash. Once you get into advanced amateur or pro, it’s just not a good feature. or is it?” - Rosh

“I believe the feeling is if my 100.00 10mp P&S can take movies than how come my 1300.00 dSLR can’t? Granted you don’t have to use it if you don’t want to. I think Nikon is just thinking ahead and trying to grab more marketshare.” - Pete Langlois

“The fact that they added video to this body caught my eye… It’d be sweet to utilize the different lenses to make videos. Wide apertures.. manual focus… different angles… man… it’d be much more dynamic than point & shoot recording.” - Andrionni

My Thoughts on Video on a DSLR

I’ll have to admit - that my first thought when I saw this being touted as a killer feature of the D90 was to giggle. The thought of whipping out a DSLR to shoot video feels weird (to me at least). I’ve done video on my point and shoot and mobile phone and even found the fact that they shoot video to be quite handy - but a DSLR?

However - my mind then started to take over some of my feelings. As Andrionni points out above - the possibilities of shooting video through a DSLR are interesting. It would not be limited to shooting through a tiny 3x optical zoom than most point and shoots come with - you could fit any lens you like. Wide angle, macro, fisheye, super telephoto zoom…. While the quality will be undoubtably lower than a purpose built HD video camera - I can actually see times where it could be fun and useful to have the ability to switch my trusty DSLR into video mode and start shooting.

Would I be tempted to trade in my video camera for a DSLR - not any time soon - but would I use video on a DSLR? Probably - but I’m sure it’d feel weird at first and will get a few odd looks from others.

Does Video Belong on a DSLR?
What do you think? Does video belong on DSLRs? Would you use it? Let us know what you think in comments below. Looking forward to some good discussion.

Lightroom 2 training

Now you can get all your Lightroom 2 training in one place! Each of these skill-targeted DVDs delivers exactly what you'll need to maximize your output and create gorgeous images like never before. Pre-order your copy today! Visit us online at http://tr.subscribermail.com/cc.cfm?sendto=http%3A%2F%2Fwww%2Ekelbytraining%2Ecom%2Fdvds%2F&tempid=c81262a26cac4bb68ac5e5ce4695fe78&mailid=dbdc1b64b82a4b7b9d07f53c33025f7a or call 800-201-7323.


NEW!!
Adobe® Photoshop® Lightroom 2 In Depth (2 disc set)
by Matt Kloskowski

Adobe® Photoshop® Lightroom™ is the key to what industry experts are calling the "new digital workflow". Now you can learn exactly how to get started, and see how Photoshop® Lightroom™ 2 can help you achieve the quickest, easiest workflow imaginable!


NEW!!
Adobe® Photoshop® Lightroom 2 Power Session
by Matt Kloskowski

If you've used Lightroom before but want a quick way to learn all of the new features in version 2, then this DVD is what you've been looking for. Matt's videos cut straight to the chase and show you the new features in Lightroom 2, and how photographers can put them to work in the real world today.

aircraft photography

Lisa - For anyone interested in aircraft photography, Candlelight Farms has a small, grass strip runway that gliders and tow planes fly out of, but most pack up their gliders around Labor Day and haul them back home from the airstrip. Gary

Friday, August 29, 2008

How to Shoot Light Trails


From the Digital Photography School...

One of the first subjects that I remember trying to capture as a teenager with my first SLR camera (film) was light trails created by cars on a busy road near my home. I’d seen this type of shot in a photography magazine and was impressed by the eye catching results.


Light Trails continue to be popular subject matter for many photographers and they can actually be a great training ground for those wanting to get their cameras out of manual mode and to experiment with shooting in low light at longer exposures.

Following area few examples of light trail shots as well as some practical starting point tips for those wanting to give it a go.
To get more tutorials like this subscribe to Digital Photography School.
Equipment:
There is not just one particular type of camera and kit that you’ll need to capture light trails - however it is important to have a camera that allows you to have some control over exposure settings - particularly those that allow you to choose longer shutter speeds. This means you need a camera that has the ability to shoot in either full manual mode and/or shutter priority mode (something that all DSLRs and manypoint and shoot cameras have).
You’ll also need a tripod (or some other way to making your camera completely still) as you’ll be shooting with long shutter speeds which will make shooting handheld pretty much impossible.
Not essential but helpful to have with you are lens hoods (to help block lens flare from ambient lights), remote shutter release cables or wireless remote controls, patience and some warm clothes if you’re going out on a chilly night.

The Basic Principle:
At the most general level photographing light trails involves finding a spot where you’ll see the light trails created by cars, securing your digital camera, setting a long exposure setting on your camera and shooting at a time when cars will be going by to create the trail of light. Of course it’s a little more complicated than this - but the general factor behind it is longer exposures that will enable the car/s that create the trails to move through your image.


Experiment:

While there are a lot of tips that could be shared on the topic of photographing light trails - the main thing I learned in my early days of attempting to create these types of images was to experiment extensively. The beauty of digital photography is that you can do this with no extra cost to yourself and can get instant results (unlike when I did it on film and had to fork out for film and processing - not to mention wait days to see my results).


Setting Up Your Shot:
Photographing light trails is not difficult - it’s as simple as finding virtually any road with cars going down it once the sun goes down. But getting a shot that grabs attention means putting a little more thought into choosing your location, thinking about timing and framing your image.
Here are a few tips on how to set your shot up:

Timing/Light - one might think that the middle of the night is the best time for light trail photography (and it can be) - however one very effective time to do it is just as the sun is going down (just before and after). If you shoot at this time you’ll not only capture light from cars, but ambient light in the sky which can add atmosphere to your shots. You also might find that earlier in the evening you get a little more ‘action’ in your shot with more cars and even the movement of people through your shot.

Creative Perspectives - some of the most effective light trail shots that I’ve taken and seen from others were taken from perspectives other than at the height of a normal person standing up. Get down low or find a place looking down on your scene that will create an unusual angle.

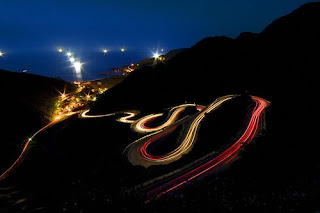
Location - the most obvious thing with location is that you’ll need it to be somewhere near a road - however there’s more to think about than that. Choose a location that adds interest to the shot in some way. This might be one where there are well lit buildings along the road, one where multiple roads merge together to create light trails in different directions, on the bend of a road so that the trails sweep through the image, near a roundabout so the trails create circular shapes, in the middle of dual carriageways (on a triaffic island) so that you get traffic coming in two directions etc.

Framing - the normal ‘rules’ of composition apply in this type of photography. Images need some sort of point/s of interest, the rule of thirds can be applied effectively, draw the eyes into your image using lines smartly, foregounds and backgrounds should add to and not distract from the image.


Settings:

Aperture and Shutter Speed - I wish I could give you shutter speeds and apertures that will work in every situation - but as the ambient light and speed of cars will differ in every situation there’s no one exposure combination that will work in every setting.
Having said this I’ve found that I usually shoot at shutter speeds between 10 and 20 seconds (which gives cars time to move through the frame) and with apertures in the mid range (start with something around f/8).

The key is to start with something in the range above and to take a few test shots to see how the exposure works. You’ll quickly realize whether your shots are under or overexposed and whether the length of the exposure is long enough to let cars travel through the frame in the way that you want.

If your shots are overexposed - close your aperture down (increase the f stop number) or if your shots are underexposed open it up (decrease the f stop numbers). If you want the car’s lights to go further through the frame go for a longer shutter speed and if you want it to travel less through the frame shorten it.

Keep in mind that aperture impacts depth of field. If you need to go with a larger aperture you decrease the depth of field and more of your shot will be out of focus.


Histogram - One thing to watch out for is letting any light source in your image (whether it be headlights, street lights etc) washing out your image. Lights that burn too bright can cause distractions and draw the eye of your viewer away from focal points - ruining your shot. One way to quickly check out if there’s any area in your shot that is overexposed to this degree is to view the histogram on your shot. If there are areas that are blown out you’ll have a graph with a right hand side that is too high on the graph. Learn more about histograms here.

Choose a low ISO setting - this will give you images with as little noise as possible.

Shoot in RAW if you have it - this will enable you to have more control in your post production work - particularly in getting white balance right (something that can be important as you’re shooting in a situation with lots of artificial light that can cause all kinds of color casts in your shot).

Manual Focus - In low light situations cameras can struggle to get focusing locked correctly. The last thing you want is for your camera to be in and out of focus just as you need to hit the shutter release. Switch to manual focus and make sure your focus is upon a part of your image that is visually strong.


Timing Your Shot:

There is no right or wrong way to time your shot. Hitting the shutter just before a car enters the frame and releasing it just after it leaves the frame can create a lovely unbroken line - but sometimes shooting with shorter exposure times while the camera is in the frame can be effective also. Once again it’s about experimenting with different timings and seeing what effects it has.


Using Bulb Mode:

Many digital cameras have a mode on them called ‘bulb’ mode that allows you as the photographer to keep the shutter open as long as you wish. This can be very handy in this type of photography to time your shots with precision. If you use this you’ll want to be using a remote shutter release to stop any camera movement while the shutter is open.


Got some good light trail shots? Head over to our forum and share them with the DPS community.

Thursday, August 28, 2008

Nikon GP-1 GPS

As you probably know by now, Nikon introduced the D90.

What you might not be aware of that it can do GeoTagging. Adding GPS to a camera is nothing new to the Mooster.

What you might not be aware of that Nikon is now in the GPS business. What you see above is the GP-1. It works on the D3, D700, D300, D200 and D90. I ain’t got one yet, but I’m going to real soon. When I do, I’ll let you know all about it.

For the Nikon landscape shooters in the club. Picked up by sharp-eyed Vic Krasenics. -----

Original Message ----- From: "Prestash, Gary"

11x14 $1.99 Adorama

Dear Customer:

We’re in the middle of a print explosion! Prices on our 11x14s have been leveled to $1.99 for ANY paper type. Every 11x14, from the Royal Glossy to the top–of–the–line Endura Metallic is just $1.99.

Two bucks is an awfully low price for prints this gorgeous. As always, you get more bang for your photo buck with AdoramaPix. Trust Adoramapix for the highest quality digital prints and fastest service. We give every print the white-glove treatment: top quality Kodak Royal and Endura Professional papers and attentive care by expert technicians.
$1.99 is a great price for 11x14 prints! Get it now, get it three months from now, get it a year from now with prepaid prints!
P.S. We’ve just been informed that Kodak will be raising their paper prices in the very near future due to increases in the cost of petroleum, silver and freight. In light of these increases, our prices are due to go up as well; we will not be able to repeat these sale prices. Ever. If you like 11x14 and want this lower price, lock in the price and order prepaid prints NOW.
* Cannot be combined with any other offer. Expires 8/31/08. Pick up fee may apply.

Cordially,Herman KleinDirector of MarketingAdoramaPix.com

Wednesday, August 27, 2008

Canon New EOS 50D DSLR

Canon Simulates Creativity of Experienced Photographers with New EOS 50D DSLR.

Offers the first in camera post-processing with peripheral illumination correction and Auto Lighting Optimizer .

For the full press release
http://www.imaginginfo.com/web/online/News/Canon-Simulates-Creativity-of-Experienced-Photographers-with-New-EOS-50D-DSLR/3$4117

New Canon 50D
- 15.1 mega-pixels
- 6.3 fps
- 920,000 dot/VGA resolution - four times the pixel count of the EOS 40D
- ISO's up to 12800!

Canon has built upon the success of the popular EOS 40D model -- which will remain in Canon's line -- with the EOS 50D Digital SLR camera. Expected to be the camera body of choice for advanced amateur photographers this holiday season, the Canon EOS 50D Digital SLR camera carries over the EOS 40D's 14-bit Analog-to-Digital conversion process for smooth tones, and also includes enhanced noise reduction, especially at higher ISO ranges which will help bring those romantic nighttime shots into greater focus and clarity. Capable of shooting 6.3 frames per second (fps), the EOS 50D Digital SLR camera is ideal for shooting everything from beautiful night landscapes to fast-action sports.

The Canon EOS 50D camera provides ISO speeds from ISO 100 up to ISO 3200 in 1/3-stop increments, along with two high-speed settings – H1 and H2 - of ISO 6400 and ISO 12800, respectively. Along with a wide ISO range, Canon gives shooters more tools to help maximize clarity and color. The EOS 50D Digital SLR camera offers multiple levels of noise reduction during high-speed shooting. Users can choose from one of four settings- Standard/Weak/Strong/None - to help reduce digital noise that can result from poor lighting conditions.

As part of the camera's internal image processing, the Canon EOS 50D Digital SLR camera conducts peripheral illumination correction, which automatically evens brightness across the image field, making an image of a blue sky even toned throughout, a function previously accomplished through post-processing software on a personal computer. Thanks largely to the DIGIC 4 processor, this automatic adjustment can be made in-camera during shooting with JPEG images or corrected in post-photoshoot processing with RAW images through Canon’s Digital Photo Professional (DPP) software, which is supplied at no extra charge.

Helping to ensure each picture's subject is clearly visible, Canon's enhanced Auto Lighting Optimizer analyzes the brightness of subjects and automatically adjusts dark images so that they appear brighter, perfect for subjects in shade or in backlit situations. The Auto Lighting Optimizer on the EOS 50D Digital SLR camera has been updated not only to optimize images while they are being taken, but can also optimize images post-capture, during playback, to help ensure the subject of each image does not appear too dark. This is especially helpful when an amateur photographer uses the camera, because post-capture enhancement can help maximize image quality without the need of a computer.

The Canon EOS 50D Digital SLR camera is scheduled for October delivery and will be sold in a body-only configuration at an estimated selling price of $1,399.00*.

Wheels & Wings 2008!

Get ready for Wheels & Wings 2008!

We're back for another exciting show at Candlelight Farms in New Milford September 7, from 10am to 4pm. And this year, with the Housatonic Region of the American Antique Club of America on board to help organize the show, it will be better than ever.

On Sept 7th in New Milford there's going to be the 2nd Annual Wheels 'n Wings show at Candlelight Farms Airport, its at the junction of Rts 7 & 37, gates opens at 10am. They feature Vintage Cars, Hot Rods & Vintage Airplanes. (rain date is Sept 14th). For more info go to: blackhorsegarage.com or call 203-330-9604

Last year's 1,000 attendants saw over 250 pristine sports cars, exotics, muscle cars and antiques. And while the weather kept some planes away, we're hoping for blue skies come September 7 (but hey, we still have a rain date set -- September 14 just in case).
Highlights from last year included a wonderful SS100, dozens of Ferraris, an incredibly rare Frazer Nash, beautiful Cadillacs, Packards, and more.

Love old cars and planes? You won't want to miss Wheels & Wings.
Have an old car? Bring it!

Directions-->
Call for more info -- 203-330-9604

Create the look of infrared film digitally

Digital Darkroom Questions (DDQ)August 4, 2008

by Tim Grey http://www.timgrey.com/tim@timgrey.com
Books: www.timgrey.com/books/index.htm Blog: www.timgrey.com/blog

I'd like to create the look of infrared film in some of my digital captures. Can you recommend an approach for this?

There are a variety of approaches you could take for creating a simulated infrared look in a digital capture.

Here's the method I use most often:

Start by creating a new Black & White adjustment layer by clicking on the Create New Adjustment Layer (half black/half white circle button at the bottom of the Layers palette) and choosing Black & White. Increase the value for Greens significantly, to somewhere between 200% and 300%. You might also want to increase the value for Yellows, since many green areas in a photographic image contain considerable amounts of yellow. The goal is to brighten all green areas of the image (or at least the greens that are foliage) to nearly white.

If the sky is visible in the image, reduce the value for Blues to darken the sky. Infrared is generally exhibited by a near-black sky, so you’ll want to darken significantly. If reducing the Blues slider doesn’t produce the desired effect, you’ll probably need to make a targeted adjustment to darken the sky separately. Resist the urge to darken the Cyans in order to affect the sky, as that will tend to reduce the brightening you already applied to the Greens.

To create the halo effect commonly found with infrared images, create a duplicate of the Background image layer by dragging it to the Create a New Layer button at the bottom of the Layers palette. Reduce the opacity for this layer to about 50% using the control at the top-right of the Layers palette, and then apply a slight (around 10 pixels) Gaussian Blur by selecting Filter > Blur > Gaussian Blur.

If you want to produce an effect that more closely matches what you would achieve with infrared film, hold the Alt/Option key and click the Create a New Layer button at the bottom of the Layers palette. In the New Layer dialog box, set the Mode to Hard Light and check the box to fill with 50% gray (I also recommend giving this new layer a meaningful name, such as Add Noise). Click OK, and then select Filter > Noise > Add Noise (you could use the Film Grain filter on the Artistic submenu for this as well, but I find I prefer the look I achieve with Add Noise). Set the Distribution to Gaussian and then adjust the Amount setting to apply noise to taste. I find that values of between about 2% and 6% work well for most images. Click OK when you’re satisfied with the result. You can also reduce the opacity of this layer to mitigate the effect if necessary.

Support the DDQ E-mail Service
Contributions from readers like you are the only compensation for the time and effort that goes into producing this email service. You can help support this effort by becoming a contributor. Besides helping to ensure this service remains viable, you'll gain access to a searchable archive of all prior questions and have the opportunity to have your own questions considered for inclusion in the DDQ email. Details can be found here:
www.timgrey.com/ddq/
The Fine Print
Please feel free to forward this e-mail message to any friends that may be interested, and recommend that they subscribe to the free service. All I ask is that you forward the message in its entirety.
Details on adding or removing an e-mail address can be found here:
www.timgrey.com/ddq/
Contents of this e-mail are copyright by Tim Grey. All Rights Reserved.

Tuesday, August 26, 2008

NHCC Day Trip to New York City: Sept 6th

Day Trip to New York City:

Saturday, September 6th, and the rain date is Sunday, September 7

We will be leaving the Milford Train Station on the 8:42 express train to NYC. We will purchase a $20 all day pass for unlimited use of the water taxis which stop at 10 key locations from 11AM to 7PM. Bring jackets…it is a very breezy ride.

Contact Art Yost at 203-931-9943, AYost4@aol.com or Arty43@comcast.net before September 1st if you are interested.

Monday, August 25, 2008

NHCC specials at Hunts

100 Main Street Melrose, Ma 02176
Contacts: Gary Farber Tel 800-221-1830 or 800-924-8682 ext. 2332
John Duggan ext. 2314
Fax 800-336-3841 Email digitalguygary@wbhunt.com


NEW PRODUCT offer to New Haven Camera Club

Currently in stock (is a limited quantity) of -
Adobe Light Room Upgrade $ 99.99
Adobe Light Room Full Version $ 299.99
When placing an order for the Full Version, mention “Adobe” to receive a $10.00 discount.

Photo Shop CS3 Upgrade, Windows and/or Mac $ 189.99

Nikon NX2 Upgrade A limited quantity is in stock. $ 109.99
When placing your order, mention “Software” to receive a $10.00 discount.
Nikon NX2 Full Version A limited quantity is in stock $ 179.99
When placing your order, mention “Software” to receive a $10.00 discount.

Nikon D700 (currently in stock) $2999.95

NIK Silver Efex Pro $ 169.95
When placing your order, mention “NIK” to receive a $10.00 discount.

Note: When placing an order including the above products, free shipping is being offered.

Later this year, Adobe will be announcing the CS4. Those interested in placing an order, please submit your full name, address, and telephone number/email. You will be notified when it is available to place an order.

The Epson P6000 and P7000 Storage Devices will soon be shipping. Those interested in pricing and availability, please submit your full name, address, and telephone number/email address.

Canon is soon to announce their new products. The G9 is likely to be replaced with the G10. Word is buzzing regarding a Canon 5D replacement. If you’d like more specifics, please submit your full name, address, telephone number/email address.
To place your order for any of the above, please contact Gary Farber or John Duggan.

Hi Lisa,
Here are some other sources for lower prices on the products mentioned in tonight’s blog (some are just for NAPP members). Rick

Commercial photographer Will Crockett in his newsletter (he spoke at NECCC) mentioned:
Nikon D700
$2950 (limited time & qty.)
Includes free Sandisk Extreme Ducati Edition 4GB CF card
$159.98 savings
Use discount code buysmarter at checkout
Memory card will not show in cart but will ship with camera.
www.drurys.com (the sale is not mentioned on Drury’s site – use the discount code)
*****************************


Lightroom 2 (Full product)
Hunt’s = 299.99 – 10 = $289.99
Amazon.com (as of 8/26/08) = $274.99 w/free S&H
Adobe.com for NAPP members with code of napp07 = $254.15 (no tax or S&H if downloaded)*****************************


Photoshop CS3 UpgradeHunt’s = $189.99Adobe.com for NAPP members with code of napp07 = $169.15 + 5.95 S&H(no S&H if downloaded but file is way too big)Note: Adobe offers package deals with purchase of multiple products *****************************

Nikon Capture NX2 (Full product)
Hunt’s = 179.99 – 10 = $169.99
Amazon.com (as of 8/26/08) = $149.95 w/free S&H*****************************


Silver Efex Pro
Hunt’s = 169.95 – 10 = $159.95
NAPP members at
www.niksoftware.com/napp50sep thru 9/15/08 = $149.95 w/free S&H

Air Force Thunder Birds

Hi Friends, Charles Stacey would like to lead a group to the air show at Westover AFB on Sept 7. The Air Force Thunder Birds will be featured. He plans to leave by 7 AM from exit 13 of I 91. Please contact Charles at (203) 269-4368 or email: c.stacey8391@sbcglobal.net if you are interested. Joe Hamed
Thanks Gary for p[assing this along!

There is nearly a full page, color article in Thursday's New Haven Register on a display of Frans Lanting's nature images coming to the Peabody Museum. I believe the article said the display starts in Sunday and runs through Feb '09. If you don't get the New Haven Register, I cut the article out.

A few more pieces of information on the display....it starts this Saturdayand it runs through February 22, 2009.

The Peabody does charge an admission fee of between $5.00 - $7.00 (no explanation in paper - perhaps seniors or students/children are charged less?) but there is NO admission fee charged for anyone from 2:00 - 5:00 PM on Thursdays. Overall hours of the museum are 10:00 AM until 5:00 PM, Monday through Saturday, and noon until 5:00 PM on Sundays.

The display consists of 45 images from Lanting's "Jungle", which took Lanting 20 years and numerous trips to various jungles to capature the images for the book.

For additional info, call (203) 432-5050.

Sunday, August 24, 2008

What is acceptable with digital techniques?

What is acceptable with digital techniques?

July 15th, 2008 Rob Sheppard

I just had one of my BetterPhoto.com publication photography students ask me about digital techniques — what do publications find acceptable or not acceptable. This is not a simple question and I could spend a lot of time on the answer.

I have talked a bit about this in my columns for Outdoor Photographer (Digital Horizons), which are available on the OP website (www.outdoorphotographer.com). Also, I have talked about this issue and HDR in this blog.

First off, you will find a lot of folks in the business (like me) separate enhancement from manipulation. The distinction is important.

Enhancement optimizes or brings out the best from a photograph.

Manipulation changes it from the original scene.

Most publications are fine with some sort of enhancement. Some publications will use manipulated images, too, though they will often call these “photo illustrations.”

Publications really vary as to what they will or won’t accept. Partly this is due to digital being so new. This is also due to the fact that many editors and art directors are baby boomers (my generation) who were never comfortable with computers, never got into the business to deal with digital stuff, and still don’t completely like it. Not knowing better, or even fearful of the technologies, they will often put arbitrary restrictions on digital photography that have no basis in reality. But these become rules that a photographer has to pay attention to if he or she wants to work for individual publications.

I think photo enhancement techniques including photo-stitching, multiple exposure blending techniques and HDR are not only acceptable, but actually allow us to show reality. They offer us the possibility of truly capturing images from the world as we see the world, not simply limited by camera technology. This has the potential of really helping us as photographers better communicate about the way the world really is, as compared to the limited world that is captured by traditional photographic techniques. Still, there are a lot of fears by the above-mentioned baby boomers, and therefore, added restrictions.

There is the question, should a photographer “disclose” these things at the time of submission? I think if you are doing severe manipulation of the image, yes, that should be disclosed. However, if you are bringing a photo closer to the real world, I don’t see the point. There are those who disagree with that, but I believe if we are to always disclose techniques just because they are techniques, then all photographers must disclose any artificial techniques, which would include flash and graduated neutral density filters (have you ever seen flash in nature? or graduated neutral density filters?).

We will be dealing with these issues for years as digital technology gradually becomes more a part of photography … and frankly, when baby boomers retire!

Saturday, August 23, 2008

The Art in Nature Contest

The Art in Nature

Deadline September 16, 2008

Theme: Nature is beauty, majestic and inspiring.

The Art in Nature will illustrate all aspects of nature in its many tableaus: landscape, seascape, wildlife, floral, water, environment, and weather.

Eligibility: The exhibition is open to all domestic and international, professional and amateur, photographers working with digital or traditional photography or combinations of both. The Center for Fine Art Photography invites photographers working in all mediums, styles and schools of thought to participate in its exhibitions. Traditional, contemporary, avant-garde, creative and experimental and mixed techniques are welcome.

Juror: George LeppGeorge D. Lepp is one of North America's best-known contemporary outdoor and nature photographers. His passions for natural beauty, technical precision, cutting-edge technology, and environmental responsibility are revealed in his beautiful and compelling photographic images. Lepp's images have appeared in some of the world's most widely viewed venues, including National Wildlife, Time, Newsweek, and The New Yorker. Exhibition and

Awards:

With selection for this exhibition, artists and their work will be seen by an international audience of collectors, curators, art consultants and others who appreciate the fine art of photography.

Juror’s Selection award: $300
Director's Selection award: $200
Gallery Visitor’s Choice Award: $100
Two Artists’ ShowCase Online subscriptions – the Center’s new online image marketing website (preview at www.artists-showcase.org)
All exhibitors are included in the Center's online gallery
Inclusion in the Center's 2008 Exhibition Collection CD which is distributed to selected galleries, collectors, design houses and corporations world wide

Important Dates
Entries due: September 16, 2008
Notice of acceptance: September 26, 2008
Exhibition dates: December 5, 2008 – January 3, 2009 Public and Artists’ Reception during the Fort Collins Gallery Walk: December 5, 2008

Download instructions for submitting your work online in Adobe PDF Format (64 KB), click here

<<>>

Friday, August 22, 2008

Master Photographers 1840–1940

Metropolitan Museum exhibition

Framing a Century: Master Photographers, 1840–1940

Through September 1

This exhibition tells the story of photography's first hundred years through the work of key figures who helped shape the aesthetic and expressive course of the medium: Gustave Le Gray, Roger Fenton, Carleton Watkins, William Henry Fox Talbot, Julia Margaret Cameron, Nadar, Édouard Baldus, Charles Marville, Eugène Atget, Walker Evans, Man Ray, Henri Cartier-Bresson, and Brassaï. Many of the works on view are drawn from the Museum's 2005 acquisition of the Gilman Collection.

See the exhibition preview for more information.

View Images

FREE Gallery Talk

Read a Review in The New York Times

See the CBS2 Feature Video

Met Podcast episode about photography: Impressed by Light: British Photographs from Paper Negatives, 1840–1860

Polaroid PoGo Instant Mobile Printer


Reinventing Instant Photography for the Digital Age™

The Polaroid PoGo™ Instant Mobile Printer lets you share photos whether you are on vacation or just hanging out with your friends. Bring Polaroid magic from your camera cell phone or digital camera with ZINK™ Zero Ink™ Printing Technology from ZINK Imaging. Mobile and easy-to-use, the Polaroid PoGo™ Instant Mobile Printer provides a new, innovative way to share digital photos directly from your camera cell phone or digital camera, instantly. The Polaroid Way.

A new way to share
Print and share.
2x3" borderless color images in under a minute
As mobile as you are.
Pocket-size, sleek, stylish design
Instant magic.
Prints without ink using ZINK™ Zero Ink™ Printing Technology from ZINK Imaging

Camera Phone
The Polaroid PoGo™ Digital Instant Mobile Photo Printer is the easiest way to print photos from a camera phone. Wirelessly transfer images from a Bluetooth-enabled camera phone to the Mobile Printer and print instantly. Using the built-in OBEX (object exchange profile) Bluetooth in the phone and the printer, connecting and printing becomes instant.


Digital Camera
Instantly printing images from a digital camera is as easy as connecting the USB cable to the PictBridge-enabled camera and printer. Once connected, follow the PictBridge screen on the camera display. Simply select what image to send to the printer and within 60 seconds, the print is ready to be shared.


What You Get
• 2” x 3” borderless, sticky-back prints

• Bluetooth, PictBridge compatible

• Smudge-proof, water-resistant, tear-proof photos

• Fade-resistant, long-lasting images

• No waste – no ink cartridges

• Prints in about 60 seconds

• Rechargeable lithium-ion battery

ZINK™ stands for Zero Ink™ - a new and simpler approach to printing where high quality, colorful, durable and affordable prints are magically created – all without a drop of ink. The ZINK Technology, invented by ZINK Imaging, encompasses both the ZINK Paper™ and the intelligence embedded in every ZINK-enabled device. Over 100 patents and patents pending were generated in the development of this breakthrough technology.

The heart of this new "ZINK" category of printing is the ZINK Paper™. The patented ZINK Paper is an advanced composite material with embedded yellow, magenta and cyan dye crystals, activated with 200 million heat pulses, in 30 seconds, in a single pass. With 100 billion crystals in a 2x3" print, the paper is 100% inkless. A ZINK-enabled printer uses heat to activate and colorize these crystals. Because there is no ink, every ZINK-enabled device has the unique benefits of being small, simple, elegant, and eco-friendly.

Polaroid is leveraging the ZINK Technology to bring a new family of digital instant products to the marketplace. The Polaroid Digital Instant Mobile Photo Printer is the first ZINK-enabled device available. For more information on ZINK Technology, visit http://www.zink.com/

Where to buy:

Best BuyAvailable NowBestBuy.com >>

TargetAvailable NowTarget.com >>

Urban OutfittersAvailable Now (On-Line Only)urbanoutfitters.com >>

Extreme Photoshop


Create a Garden on the Human Head


Posted: 19 Aug 2008 03:01 AM CDT
In this tutorial, it will basically take you through the process of converting a man’s head into a garden. The first part will be showing you how to prepare the image then add a waterfall coming out of his head with a pool at the bottom, as shown on the thumbnail. Have a go!


Tamron’s Lens with Vibration Compensation

Thanks Wayne for letting us kno about this!

This latest lens with Tamron’s proprietary tri-axial Vibration Compensation system is a welcome response to feedback about of the 28-300mm VC lens which did not cover as good of a wide-angle range.

It will come with Canon and Nikon mounts. Delivery date and price to be announced.

http://www.tamron.com/news/35mm/18270vc.asp : “Designed exclusively for digital SLR cameras with APS-C sized image sensors, the new lens delivers outstanding image quality over its entire zoom range and its exclusive VC anti-shake system facilitates sharp handheld photography even at the longest telephoto settings. With its vast zoom-range, the Tamron AF18-270mm F/3.5-6.3 Di II VC lens enables the user to cover virtually any photographic subject from wide angle to ultra telephoto simply by turning the zoom control. It covers angles of view equivalent to 28mm to 419mm for APSC Sized sensors when converted to the 35mm format.”

Wayne Nolting – iMix Studio
Interactive Streaming Audio Visual Media Production
Newington, CT
Producer@imixstudio.com

The Projector: a newsletter for PSA Member Organizations

Summer 2008
The Projector: a newsletter for PSA Member Organizations

Sharp’s Word
by Sharp Todd

Greetings to all PSA member camera clubs, councils, and camera club associations. I would like to take this opportunity to introduce myself. I am Sharp Todd, APSA, PPSA, the PSA Vice President of Chapters, Clubs, and Councils. I also want to introduce you to the first edition of the new camera club newsletter. We are calling it "the Projector." Peter Manzelli will be the Editor and Publisher of "the Projector." He came up with the name and designed and created the logotype in a matter of a few days after accepting the job, and said we are ready to fly. I want to thank Pete for accepting the job. We plan on publishing three or four newsletters each year. I hope you share this with your club and council members and especially your board members. If you would forward this newsletter to them, it would be much appreciated.

I want to invite those who are planning to attend the PSA Conference in Portland, Oregon, to attend some of the meetings and activities for clubs and councils. The first item that most would be interested in is the results of the Councils Challenge. It will be Wednesday morning, 8:30—9:30. The second item is a meeting for the PSA camera club representatives. This meeting is Thursday at 12:45—1:30 pm. We will be discussing some of the benefits of being a PSA member organization. We will also hear any issues that your organizations are having and open a forum to try to address them. If your club or organization’s representative is not attending, anyone is welcome to attend to represent your club. Also on Thursday at 1:30—2:30 pm is the Camera Club Newsletter & Web Editors meeting. Winding up Thursday will be the Council Representatives Meeting at 5:15—6:00. This will have the same format as the Camera Club Representatives Meeting. Anyone can represent your council and take the information back to the council board.

For those who have not ventured to the PSA website, or have not been to it lately, I would like to invite you visit the site. It has a wealth of information about PSA, it’s activities, and photography in general, Click here: Photographic Society of America. http://www.psa-photo.org/

I especially invite you to go to the PSA Camera Club Committee page, Click here: PSA Camera Club Committee. http://www.psa-photo.org/resourcePageDisplay.asp?DivID=8&menuID=6&pageID=385

It has information pertaining to camera clubs and councils. In later issues of "the Projector," we will be investigating in detail the information on the Camera Club Committee page. On this page you can see who the members of the Camera Club Committee are and what they do. Take a look at it!

Thursday, August 21, 2008

Lessons in DSLR Workflow with Lightroom & Photoshop

You've captured great images with your DSLR, now what?

Jerry Courvoisier, Director of Digital Programs, is pleased to announce his new book entitled "Lessons in DSLR Workflow with Lightroom and Photoshop"

This book provides an easy-to-follow roadmap for importing, organizing, and editing your images using the best features of Adobe Photoshop Lightroom and Adobe Photoshop. The combined power of using both programs—automation with Lightroom and specialized processing in Photoshop—offers a complete and flexible solution for both serious hobbyists and professional photographers.Loaded with tips and techniques from a seasoned photographer, including a pre-shoot checklist for camera settings, Jerry delivers a digital workflow system that allows you to spend less time at your computer and more time behind the camera capturing great images.

The book is available from Peachpit Press and you can receive a 35% discount by entering code SANTAFE during checkout. Plus, U.S. customers get free shipping!

Wednesday, August 20, 2008

NEW HAVEN CAMERA CLUB 2008-09

The 08-09 NHCC season is almost upon us and I am looking forward to seeing all of you on Sept 8th for our first program.

The New Haven Camera Club website has been updated:

The membership form is available. In order to compete, join us on field trips, attend workshops, etc. you must be a paid member. Guests are always welcome to attend meetings.

Please fill out the membership form and send Harold your membership dues: http://www.newhavencameraclub.org/membership.htm

The assigned subjects were posted back in June: http://www.newhavencameraclub.org/assigned_subjects.htm

The programs are now listed: http://www.newhavencameraclub.org/NHCC%20files/NEW_HAVEN_CAMERA_CLUB_PROGRAMS_08-09.pdf

Please review the NHCC handbook for competition rules (and changes for the 08-09 season)http://www.newhavencameraclub.org/images/NHCC_HandBook_8-08.pdf

The most dramatic changes that will take place this season:

(1) a new email adress for competitions NHCCwin@comcast.net Deadline midnight Sept 19th for our first competition and

(2) the changes to the assigned subject competition (blogged here in July)
http://nhccphotoblog.blogspot.com/2008/07/nhcc-changes-to-category-competition.html


NEW HAVEN CAMERA CLUB PROGRAMS -- 2008-09

September 8, 2008
"Waterways of the Czars"
by Kathy Katz and Sandy Sanderson
A photo journey from St. Petersburg to Moscow

September 22, 2008
Open Competition, plus a Special Category "Children"

October 13, 2008
"Magic Moments at Mohonk" & "Quabbin - For the Joy of It"
by Les Campbell
Two of Les' favorite places to capture beautiful pictures

October 27, 2008
Open Competition, plus a Special Category "Railroads"

November 10, 2008
New England Camera Club Council Interclub Color Print Competition 2008-09
Judging of color prints from clubs in New England

November 24, 2008
Open Competition, plus a Special Category "Sunset/Sunrise"

December 8, 2008 Annual Holiday Party and Mini Digital Shows by Members

January 12, 2009
"What You See is What You Get!"
by Victor Krasenics
Exploring how to get your film & digital photos to look the way you saw the scene

January 26, 2009
Open Competition, plus a Special Category "Boats/Ships"

February 9, 2009
"Image Enhancement & Optimization: Photoshop CS3 Workflow"
by George Fellner
A power point presentation as well as a demonstration using Photoshop CS3 focusing on basis adjustments made to all images to enhance the quality of the photo

February 23, 2009
Open Competition, Special Category "Abstracts"

March 9, 2009
"New Haven Camera Club Goes Out West"
by NHCC members
A show combining the work of NHCC members who traveled to Death Valley, Zion, Bryce, Grand Canyon and Sedona.

March 23, 2009
Open Competition, plus a Special Category "Motion/Blur"

April 13, 2009
"White Reveals, Black Conceals: Masking Your Way to a Better Photograph"
by Lisa and Tom Cuchara
Learn how to use layers & masks in Photoshop to enhance your images (exposure, dodging & burning, blurring the background, selective coloring & selective focus)

April 27, 2009
Open Competition, plus a Special Category "Patterns/Textures"

May 11, 2009
Open Competition, plus a Special Category "Architecture"

June 8, 2009
End of the Year Competition; Annual Year End Awards Banquet

Tuesday, August 19, 2008

NY magazine creates one woman from 4 stars


This image may represent the best Photoshop work I've seen for a long time.

It's from the new issue of New York magazine, which has a feature on plastic surgery.

As an illustration the magazine constructed an original face by combining the faces of four different famous entertainers.

Can you guess who they were? For the answer, go here.--David Schonauer

.
.
.
.
.
.
.
in case you don't want to read the whole article...


How We Made The Above Woman
• Michelle Pfeiffer’s unfurrowed brow.
• Madonna’s plumped-up cheeks and wide eyes.
• Angelina Jolie’s super-straight nose and lush lips.
• Demi Moore’s angular jawline.

Best Results for Magic Wand selection tool needs Eyedropper tool settings

Digital Darkroom Questions (DDQ)July 29, 2008

by Tim Grey www.timgrey.comtim@timgrey.com
Books: www.timgrey.com/books/index.htmBlog: www.timgrey.com/blog

Question: Is it true that you need to change settings for the Eyedropper tool in order to get the best results for the Magic Wand selection tool? A friend of mine told me this, but it doesn't make sense to me.

Yes, it is indeed true.

Specifically, the Sample Size setting on the Options bar for the Eyedropper tool affects the behavior of the Magic Wand tool. I'm not sure why Adobe has never just put the same control (or a different control with the same option) on the Options bar for the Magic Wand tool, but they haven't.

The Sample Size setting determines how large an area will be averaged together when taking a measurement with the Eyedropper tool, or when sampling an area to define a selection with the Magic Wand tool. The default is Point Sample, which can be a problem for the Magic Wand tool because you might inadvertently click on a pixel with a random value that doesn't really match the surroundings (such as a dust spot in the sky that is too small to see). I generally use the "3 by 3 Average" or "5 by 5 Average" setting, because it helps to average out any random pixel variations, producing more accurate results.

In some cases you might even want to increase the value significantly, perhaps even up to the maximum setting of "101 by 101 Average". This will obviously average a relatively large area of the image compared to the single pixel you actually clicked on, but this can be a great solution when trying to create a selection with the Magic Wand tool in an area that has a somewhat significant amount of variation in terms of tonality, but still has good separation from the area you're trying to avoid selecting.

Support the DDQ E-mail Service
Contributions from readers like you are the only compensation for the time and effort that goes into producing this email service. You can help support this effort by becoming a contributor. Besides helping to ensure this service remains viable, you'll gain access to a searchable archive of all prior questions and have the opportunity to have your own questions considered for inclusion in the DDQ email. Details can be found here:
www.timgrey.com/ddq/
The Fine Print
Please feel free to forward this e-mail message to any friends that may be interested, and recommend that they subscribe to the free service. All I ask is that you forward the message in its entirety.
Details on adding or removing an e-mail address can be found here:
www.timgrey.com/ddq/
Contents of this e-mail are copyright by Tim Grey. All Rights Reserved.

Monday, August 18, 2008

star trails


Location: Quaker Meadow Christian Camp, 7200' in the Sequoia Ntl Monument in California.
A total of 431 shots, 20 seconds long, 21 seconds appart, were used to make this image. Photos were stacked in After Effects, but Photoshop was key to updating some photos due to people walking through and cars coming by. A single photo was also shot in the evening so that the horizon with the trees could be outlined. I also shot a daytime image the following morning while the camera was locked on the tripod to do a roll-over of a daytime/night time image (http://tinyurl.com/6gjzud). There are a couple of movies on there also that shows how the image was created.

By: Tom Calderwood

Sunday, August 17, 2008

Photos from Dragging the shutter workshop

On July 18th I blogged about a photo op -- a workshop on dragging the shutter and taking sunset (at Stony Creek). http://nhccphotoblog.blogspot.com/2008/07/tuesday-sunset-photographic-shoot.html

Well, we had a great time (thank you Richard!) despite the fact that there was no sunset. I finally go around to posting some of the photos from that night. They look better when you click on them to see them larger.


Anyone else who was there (or at the second attempt 8/14) please feel free to send me a photo and I will post it here.

I will also post some photos from using this same technique (and the great "sophisticated" stray light preventor provided to each of us that night by Richard) that Tom & I took in the Adirondacks around the campfire. We had fun with it!

wedding first dance...

We have had some special first dances but this one is unique...


wedding first dance...

http://www.youtube.com/watch?v=7mAI7lsEfug

Landscapes of the Spirit


Bill Neill, recently completely rejuvenated his wonderful book of landscape photography, Landscapes of the Spirit, as an e-book. Landscapes of the Spirit — Digital Edition has been created as a high quality PDF from the original book. This beautiful book first came out in 1997, but now Bill has revitalized it, getting even better renditions of the original images because of new, high res scans and optimization work in Photoshop.

The book is available for $15 from Bill’s website, www.williamneill.com/books/spirit3.html. This is really a bargain for seeing some wonderful nature photography that will inspire you both in terms of the photography and Bill’s sensitivity to the natural world.

Saturday, August 16, 2008

Nature Photographers Network

Nature Photography Articles and Reviews: http://www.naturephotographers.net/farchives.html An index of all nature photography articles and reviews found on Nature Photographers Online Magazine.

Join the Nature Photographers Network™ today and begin enjoying the benefits of NPN membership! New Member Referral - Did a NPN member refer you? If so, please enter their full name; Lisa Cuchara
http://www.naturephotographers.net/member1year.html

Check out our (Lisa and Tom Cuchara) NATURE portfolio at: http://members.photoportfolios.net/TLC

NHCC member Vic Krasenics' NATURE portfolio: http://www.photoportfolios.net/portfolio/pf.cgi?a=up&ns=1&pi=VICKRASENICS&CGISESSID=cec1a261fa7a0e291157adfa3294b5d9&u=27537

NHCC member Pat Brundage's NATURE portfolio: http://www.photoportfolios.net/portfolio/pf.cgi?a=up&ns=1&pi=LIGHTRAY&CGISESSID=cec1a261fa7a0e291157adfa3294b5d9&u=26821

Do you have a passion for nature photography?

Do you enjoy sharing your photos and field experience with others?

Do you wish to become a better nature photographer?

Do you want to join in a collective effort to use nature photography as a tool for habitat conservation?

The Nature Photographers Network™ is an international cooperative network of amateur and professional photographers dedicated to the art and technique of nature photography, and the use of nature photography as a means for generating interest in habitat conservation.

More Testimonials
href="http://www.naturephotographers.net/imagecritique/bbs.cgi?a=vm&mr=24811&ns=1">Membership Benefits Discussion Thread
More Membership Accolades

Enhance your photography skills - Learn from some of the most talented photographers in the field today while sharing your own skills and passion with fellow nature photography enthusiasts, both in the field and on the Nature Photographers website.

Membership in the Nature Photographers Network entitles you to all of the following benefits;
A 120-image portfolio on PhotoPortfolios.net. PhotoPortfolios.net is an online resource for stock photography buyers, and for both amateur and professional photographers specializing in nature, wildlife, adventure, travel and sports photography. Its mission is two-fold; to provide a means for photographers to showcase and share their work with others in an elegant and professional fashion, and to serve as a conduit between photographer and photo buyer.PhotoPortfolios.net is a unique blend of online photographer portfolio and online image catalog that currently receives over a quarter-million page views per month. Photo-buying clients who have come to PhotoPortfolios.net looking for outstanding nature imagery includes National Geographic Magazine, Hewlett-Packard, Canadian Geographic, Ducks Unlimited, HarperCollins, Chesapeake Bay Foundation, Wild River Press as well as numerous requests from individual buyers. Read our members' PhotoPortfolios success stories!

Image hosting service for our photo critique galleries and regional group forums.

Eligibility for publication of articles and reviews on the NPN website (contingent on acceptance of article). If the article is selected for publication, the member receives a complimentary one-year extension of their NPN membership.

Eligibility to be sponsored in the ICF Pro Tour. Each year, a NPN member will be selected to represent the Nature Photographers Network™ in this event, entry fee paid.

Eligibility for the Weekly Picks and the yearly Editor's Pick Awards.

Eligibility for the Photo of the Month recognition. Each month a photo is selected from the Weekly Picks gallery and used as the Cover Shot on the NPN website. Additonally, the member receives a complimentary one-year extension of their NPN membership.

Special membership privileges on the Nature Photographers Online Magazine web site, including;

Greater photo posting privileges in the NPN photo critique galleries

Special member-only forums and galleries, including our Member Photo, Environmental Photojournalism and Off Topic Photo galleries and the Workshops and Exhibitions forum.
Listing of your personal web site on the NPN Links page

Member referral program - Refer a new member to the Nature Photographers Network™ and receive a $10.00 referral fee, paid to your PayPal account! A field is provided in the new member PayPal links below and a space on the Nature Photographers Network™ Membership Application/Renewal Form for the new member to note referrer’s name.

Tips on how to get the most out of your NPN membership.

Join the Nature Photographers Network™ today!

Four membership options to choose from;

Free 30-day trial membership - details

Standard 1-year membership - details

Standard 3-year membership - details

Membership Renewal Options and Information - details

Questions about NPN membership? Contact us!

New Member Referral - Did a NPN member refer you? If so, please enter their full name; Lisa Cuchara
http://www.naturephotographers.net/member1year.html

Fall Colors in Shenandoah National Park

Fall Colors in Shenandoah National Park
http://www.washingtonphotosafari.com/index.htm

Safari: 10/19/2008
8:00 am - 8:30 pm

This Safari is timed for the peak fall colors in Shenandoah National Park. With elevations ranging from just 1,000 to nearly 4,000 feet, we're guaranteed to find great colors. We'll also have great opportunities for landscape and macro photography, and we'll be on the lookout through sunset for wildlife, including whitetail deer bucks sporting their fall antlers and -- if we're very lucky -- a black bear or two. This popular Safari is led by nature photographers Judy Reisman and John Witschey.

We will travel as a group from the Vienna Metro Station; price for this Safari includes transportation from the station.

Fee: $159 per person. Maximum 12.

Go to Registration

Fred Drury 5 full day Photoshop workshop

Hi All ...

Thanks to so many of you for responding to my email requesting a critique on my NECCC Workshop. Your comments were positive, helpful, and very much appreciated.

During our workshop, I mentioned that I've got an upcoming 5 full day workshop scheduled for the Santa Fe School the week of November 10-14. I'm enclosing a promotional on that workshop. A primary focus of this workshop is to have the participants leave with a thorough understanding of the color correction process. One components is: undertanding color 'by the numbers' (which means being able to examine an image with the eyedropper tool and draw useful conclusions as to which colors are believable, and more importantly, which colors are unbelievable). Another important component: while we shoot in RGB, color correction and image optimization can ofter be more quickly accomplished in the LAB color space, and even sometimes in CMYK: I want workshop participants to leave knowing when and how to use these alternate color spaces. Other topics, in addition to those mentioned on the attached, will include Advanced Sharpening and High Dynamic Range Imaging (we'll work with several of the more popular tone mapping tools including both Photoshop and Photomatrix).

The Santa Fe School Digital Lab is very much up-to-date. Each workstation has a Mac and is linked to HP Printers.

You can learn more about the Santa Fe School and this workshop at: http://www.santafeworkshops.com/workshops/digitallabcal.php

If you have a basic understanting of Photoshop and would like to 'move to the next higher level', I believe this workshop will enable you to make that jump. Drop me an email if you have any questions.

All best,
Fred Drury
Markland Imaging.

4th Annual Ocean State International Exhibition

Howdy,

I’d like to ask a favor of you to help me as a new Co-Chair of the 4th Annual Ocean State International Exhibition. Please inform your New Haven CC members about this event to help make this event bigger, better and more successful than last year.

This Exhibition is recognized by PSA which allows accepted images to count toward PSA star ratings. A total of 15 medals will be awarded. We are a DUAL PROJECTION exhibition and we welcome film photographers to enter slides and digital photographers to enter electronic files. We accept entries from both individuals and clubs. Individuals can enter slides or digital, but not both. Club entries may be a mixture of individuals with slides and individuals with digital and receive a discount on the entry fee, and clubs will receive a DVD of the multi-media show of the final accepted images. Time is of the essence, the deadline for entries this year coming up soon, Sept. 27th.

One of the three judges this year is; Wade Clutton, FPSA, EPSA (Chairman of the PSA International Exhibition). Information and entry form can be found at: http://www.psri.us/. Check out last years winning images too. We have an easy web-site entry page for digital files to be up-loaded to, utilizing PayPal for payment.

Thank you for spreading the word to your fellow photography organization members about our 2008 Exhibition. We hope to see your beautiful photography in this year’s event.
Please feel free to contact me for more information or questions.

Co-Chairs Ocean State International Exhibition
Michael Di Stefano
Holly Trahan

Friday, August 15, 2008

So What is a Blog?

The New Haven Camera Club Photo Blog address is: http://NHCCphotoblog.blogspot.com/

Feedburner is a service that allows you to "subscribe" to a Blog and get updates (via email) when the Blog has been updated. For most of you I actually subscribed you to the Blog (and then you verified that you actually wanted the subscription). You can tell other people to go to the Blog and they can subscribe themselves. We had a dozen or so people subscribe to our NHCC Photo Blog after we presented at the NECCC conference in July.

Feedburner sends you an email when something new is posted. If nothing new is posted you do not get an email. If multiple posts are blogged for one day you only get ONE email (in contrast to the multiple emails that you used to receive sometimes).

Perhaps some people are confused because they do not know that the Blog is an actual website (they only know it by the emails that they receive). This is the real advantage of a blog over all those emails that I have been sending -- all this information is now ARCHIVED and EASILY SEARCHABLE -- try it...really...go to the actual Blog: http://NHCCphotoblog.blogspot.com/

So say that you get a Blog post today -- you read it and then you archive it or delete it. Then two months later you have need of that information but don't remember where you saved it or that you deleted it. Go to the Blog -- and they are all there -- searchable and categorized (click on workshops and see everything blogged about workshops), search for photoshop and see everything blogged about photoshop, etc.

The NHCC Photo Blog is different than our own personal Blog (I also create Blogs for clients).
Our own personal Blog is http://TLCphoto.blogspot.com/ -- This is where Tom and I post our own photos, both our own personal photos and the ones that we take for clients. You can subscribe to our Blog if you like (we do not post as often, only 1-3 times a week) but our photos are pretty good (shameless plug) ;-)

So...what is a Blog ???

Blog = Web Log

A weblog is a hierarchy of text, images, media objects and data, arranged chronologically, that can be viewed in an HTML browser.

From “Web log.” A blog is basically a journal that is available on the web. The activity of updating a blog is “blogging” and someone who keeps a blog is a “blogger.”‘

To put it as simply as possible - a blog is a type of website that is usually arranged in chronological order from the most recent ‘post’ (or entry) at the top of the main page to the older entries towards the bottom.

A blog is a personal diary. A daily pulpit. A collaborative space. A political soapbox. A breaking-news outlet. A collection of links. Your own private thoughts. Memos to the world.

Your blog is whatever you want it to be. There are millions of them, in all shapes and sizes, and there are no real rules.

In simple terms, a blog is a web site, where you write stuff on an ongoing basis. New stuff shows up at the top, so your visitors can read what's new. Then they comment on it or link to it or email you. Or not.

Since Blogger was launched in 1999, blogs have reshaped the web, impacted politics, shaken up journalism, and enabled millions of people to have a voice and connect with others.
And it is just getting started.

In 1998 there were just a handful of sites of the type that are now identified as weblogs (so named by Jorn Barger in December 1997). Jesse James Garrett, editor of Infosift, began compiling a list of "other sites like his" as he found them in his travels around the web. In November of that year, he sent that list to Cameron Barrett. Cameron published the list on Camworld, and others maintaining similar sites began sending their URLs to him for inclusion on the list. Jesse's 'page of only weblogs' lists the 23 known to be in existence at the beginning of 1999.

Suddenly a community sprang up. It was easy to read all of the weblogs on Cameron's list, and most interested people did. Peter Merholz announced in early 1999 that he was going to pronounce it 'wee-blog' and inevitably this was shortened to 'blog' with the weblog editor referred to as a 'blogger.'

Blogs are usually (but not always) written by one person and are updated pretty regularly. Blogs are often (but not always) written on a particular topic - there are blogs on virtually any topic you can think of. From photography, to spirituality, to recipes, to personal diaries to hobbies - blogging has as many applications and varieties as you can imagine. Whole blog communities have sprung up around some of these topics putting people into contact with each other in relationships where they can learn, share ideas, make friends with and even do business with people with similar interests from around the world.

Blogs usually have a few features that are useful to know about if you want to get the most out of them as a reader. Lets examine a couple briefly.

Archives - You might look at the front page of a blog and think that there is not much to them. A few recent entries, some links to other sites and not much else. However its worth knowing that there is a lot more going on under the surface that might initially meet the eye. For example in addition to the main page of this blog there are other pages, some of the posts below the surface that I’ve written over the past few months.

When I write a post like this one it goes to the top of the front page. As it gets older and as I add more current posts it begins its journey down the page until it disappears from it.

This is not the end of its life however, because it goes into the ‘Archives’ of my blog. It sounds like a dusty dark place but its really just like a filing cabinet that is easily accessible in a couple of ways. You can read my ‘archives’ simply by looking on the ’sidebar’ (over on the side of this blog) at the ‘archives’ or ‘labels' section. There you will see links to all my old posts which you can access either by category. You’ll see a category for ‘photoshop’ - click that link and you’ll see all my old posts on that topic with the most recent at the top and the oldest at the bottom.

Comments - Not all blogs use comments - but most do. This blog is not a monologue but a conversation. You can give me feedback on almost everything I write simply by clicking the ‘comments’ link at the bottom of each one of the posts. This will take you to a little form where you leave your name (and a link to your own blog if you have one) as well as your feedback, comment, critique, question, essay on why you love my blog, promise me money…. etc).

Are you still confused? Would you like more information? Below are a few helpful articles on the topic - there are many more on the web - just do a search on your favourite search engine.

Rebecca Blood has written a helpful history of blogging for those who are interested in learning more about the blogging evolution over the past few years.

Harvard Law has a helpful article titled What makes a Weblog a Weblog

Trudy Schuett writes a good article title What is a blog and why do we need one?
WordPress: Introduction to Blogging