Wednesday, December 31, 2008

New ProShow Tool for Adobe Lightroom Users

New ProShow Tool for Adobe Lightroom Users

Streamline your workflow and experience integrated solutions with the ProShow Plug-in for Lightroom. Now you can create professional ProShow slideshows in Lightroom in a few simple steps. What's better? The ProShow plug-in is 100% free so download a copy today.

How it WorksThe ProShow Plug-in allows you to quickly and easily set-up slideshows in Lightroom and export directly to ProShow Gold or Producer. Inside Lightroom, you can create a customized slideshow from a group of images complete with motion effects, transitions, photo captions and more. Once created, slideshows can be further enhanced and output in ProShow.
Download the ProShow Plug-in for Lightroom today.

Tuesday, December 30, 2008

canon rebates

You've finally received that Canon EOS 5D Mark II, 50D, or 1Ds Mark III, and you're ready to push your photography to the next level. So reach that potential with a lens that will take you there.

Through January 17, Canon is running instant rebates on a selection of its finest pieces of glass.

http://news.calumetphoto.com/a/hBJWlOhBSY4otB7bVtgB8eslevi/cal32

Instantly Save Up to $125 on Canon

Data Robotics $75

Act now to get a 2TB or 4TB Bundle of Joy (Drobo+2TB or Drobo+4TB) for $75 off!

Give yourself the gift of peace of mind. With zero management and dynamic capacity expansion, the award-winning Drobo allows you to spend more time enjoying your holiday and less time becoming a storage expert! Learn how Drobo is changing the way the world protects and stores its data by visiting http://www.drobo.com/.

Monday, December 29, 2008

Official Photodex Guide to ProShow

The Official Photodex Guide to ProShow

New ProShow Book Now Available and In Stock

New! ProShow BookMaster the art of making great slide shows using ProShow Gold and ProShow Producer.

By James KarneyPublished by Cengage LearningPaperback, 300+ pagesBonus CD Included
Book DescriptionDo you want to learn how to make great slide shows with ProShow Gold or ProShow Producer? Have you ever watched a slide show and wondered how certain special effects were achieved?

The Official Photodex Guide to ProShow is the solution. It serves as a comprehensive guide to ProShow for everyone from graphics professionals and photographers to educators and business professionals. You'll learn how to create multimedia productions that can be seen using everything from digital picture frames, iPods, and DVD players to HDTV and the World Wide Web. Perfect your presentation skills as you cover the basics of design, the fundamentals of ProShow production techniques, and advanced tools.

More InformationFollow the links below to learn more about the new ProShow book. You can download a sample chapter, view the table of contents and easily purchase the book online.

ProShow Book Overview

Download Sample Chapter

View Table of Contents

Purchase Online

All New ProShow Gold & Producer 4.0

All New ProShow Gold & Producer 4.0
ProShow 4.0 is the all-new generation of slideshow software from Photodex Corporation. A redesigned users interface and loads of new creative features make creating slideshows easier, faster and more fun.

BUY NOW
Purchase Upgrade Online >
ProShow Gold Upgrade - $44.95
Producer Upgrade - $89.95

FREE TRIAL
Download a Free Trial >
Download ProShow Gold or ProShow Producer 4.0 to test out all the new features for your self.

Sunday, December 28, 2008

Filter Forge

The beta version of Filter Forge for Mac OS X has been released.

You can download and use it until the commercial version is released.
http://www.filterforge.com/download/?mac

For more information about the beta, visit http://www.filterforge.com/download/mac-version.html

Boosting ISO pros and cons

Thanks Wayne for passing this along!

From the Adorama News Desk:

...... boosting your ISO is an effective way to capture images in low light, but the tradeoff may be digital noise that compromises overall image quality. Fortunately, the photography community now has a tool online that helps us determine how high we can go, ISO-wise .....

http://www.adorama.com/catalog.tpl?op=NewsDesk_Home

Happy New Year.
Wayne Nolting - iMix Studio
Interactive, Flash, & Streaming Audio Visual Designer/ProducerNewington, CT - (860) 930-6113Producer@iMixStudio.com

Saturday, December 27, 2008

Amtrak photo contestant arrested

Amtrak photo contestant arrested by Amtrak police in NYC’s Penn Station

"Armed with his Canon 5D and his new lensbaby lens, photographer Duane Kerzic set out to win Amtrak’s annual photo contest this week, hoping to win $1,000 in travel vouchers and have his photo published in Amtrak’s annual calendar. He ended up getting arrested by Amtrak police; handcuffed to a wall in a holding cell inside New York City’s Penn Station, accused of criminal trespass."

Read the rest of the story here: http://carlosmiller.com/2008/12/27/amtrak-police-arrest-photographer-participating-in-amtrak-photo-contest/

A Flash Card Primer

Thanks Wayne for passing this along!

Flash (memory) cards come in many formats and capacities and are great convenience for many applications but are still confusing to the "digital device novice".

Here is a nice article from Tiger Direct demystifying some of the differences.

Be aware of the fact that they do mention to always verify the compatibility with the manufacturer's device.

Not all flash card devices types are covered like USB dongles and other external digital storage devices, only the ones that you insert into digital devices.

http://static.tigerdirect.com/html/about_flash3.html

Wayne Nolting - iMix Studio
Interactive, Flash, & Streaming Audio Visual Designer/ProducerNewington, CT - (860) 930-6113Producer@iMixStudio.com

"We will be known by the tracks we leave."

Tuesday, December 23, 2008

Your Trade-In Equipment

Cleaning Out Your Closets?

Do you have old gear collecting dust? Do you plan to upgrade equipment soon?

Tallyn's is Accepting Your Trade-In Equipment!

We are always interested in used digital cameras, film bodies both 35mm and medium format, lenses, lighting gear, studio equipment, backgrounds, stands, bags, cases and any other equipment you have to offer. We can give cash or credit towards new gear!

Call (800) 433-8685 or email Ted@tallyns.com with a listof your equipment and it's conditionsand we'll give you a custom quote.

Monday, December 22, 2008

Frost brushes for photoshop

Here is a FREE set of Photoshop brushes composed of frost shapes (many different types).

http://www.obsidiandawn.com/frost-photoshop-gimp-brushes

FREE Photoshop Sharpening Actions

I use a lot of Jodi's actions here at MCP Actions. http://mcpactions.com/main.html. Jodi is offering two sharpening Photoshop (7, CS, CS2, CS3 & CS4) actions, one for use on printed images and one for use on web images (both of which are customizable). “MCP High Definition Sharpening” is for use on print images and “MCP Crystal Clear Web Resizing & Sharpening” is for 900px wide web images.

Sunday, December 21, 2008

8 tips for winter photography

Winter is a wonderful time for photography. Here is a site with a few tips to make photography in the cold more successful.

http://www.my-photo-blog.com/winter-photography-8-great-tips

This site has 8 tips with a paragraph explaining each one...
1. Keep your camera cold.
2. Keep your batteries warm.
3. Warm your camera slowly when you return home or in your car.
4. Keep your car cold.
5. Watch your breath (it's talking about exhalation, not bad breath)
6. Keep your tripod legs together in snow.
7. Use chemical hand warmers.
8. Wrap you tripod legs with pipe insulation.

The Ins and Outs of ISO

For many photographic techniques, the proper ISO is key to good results. Find out how far you can go with ISO and where you shouldn't tread.
http://www.creativepro.com/article/ins-and-outs-iso
This article explores the many ways in which ISO--your camera's sensor's sensitivity to light--affects your images.

Here's why you shouldn't be seduced by High ISO's.

restoration work from 16x20 prints- scanner needed

Could you please put this out to the photo community?

I will be doing some restoration work from old 16x20 prints. I need to have them scanned locally. Can anyone recommend someone?

Thanks

From: Michael R Amodeo
Phone: 203-723-1214
E-mail: mamodeo@yahoo.com

Wayne replied with this information! Thanks Wayne!


I know a Professional photographer in Wethersfield, who owns a very high end scanner with a large bed that can probably do that for you. His name is Phil Kennedy and he can be reached at (860) 571-0280, web site http://www.gographicimages.com

Saturday, December 20, 2008

Create Powerful Backgrounds in Photoshop

Don't let the wrong background ruin an otherwise fine photo. Here's how to remove the original background and create a new one that looks like it came out of a photographer's studio.


Written by Chad Neuman on December 1, 2008

Professional portrait photographers often use muslin or other textured fabric as a background in portraits. But if you don't have these fabrics when you shoot your subject, or if someone else gives you a photo with a background you don't like, you're not out of luck. Instead, you can create many different backgrounds in Adobe Photoshop CS3 and CS4.
Chad's tutorial shows you how to go from here...

to here...

Chad Neuman is an internationally published freelance magazine writer, graphic designer, photographer, and educator from Florida. Subscribers to his mailing list receive very occasional updates and free vector art/graphics. Subscribe through his Web site at http://www.chadneuman.com/

Thursday, December 18, 2008

Kodak Announces no more photofinishing labs

Thanks Rick Sereque for passing this along!

Kodak Announces Closure of All Qualex Photofinishing Labs

ROCHESTER, N.Y., Dec. 16 -- In response to consumer trends, Eastman Kodak Company has announced that it will discontinue wholesale photofinishing, and close three remaining photofinishing laboratories in the U.S. and Canada operated by subsidiary Qualex, Inc. The labs will end pickup and delivery to retail locations by the end of March 2009, while the majority of digital fulfillment operations will end at that time, too.

For Sale: Epson 7600 with stuff

For Sale: Epson 7600 with stand and paper catcher and two spools and manual.

I'm including what's left of a roll of 20" paper.I also have 6 of the large sized ink cartridges, unopened, in matte black, photo black, cyan, magenta, yellow, and light cyan.

Printer: $600 Ink Cartridges: $30 each.

Would love it to be picked up before Christmas.

Reason for selling: infrequent use.

As Is.

If interested please contact Julia Gerace gerace@charter.net

free magazine subscriptions

Who doesn't like something for free?

I already get all three of these, but MCP Actions's post today listed three magazines that offer free subscriptions (click here to read full post).

Rangefinder Magazine
Professional Photographer
After Capture

If you remember I introduced you to MCP Actions at NECCC this past July and I have blogged about these great actions.

Wednesday, December 17, 2008

Comparison of HDR Techniques

From Camera DojoTake better pictures! DSLR, Canon, Nikon, Lighting, Tutorials, Reviews

Comparison of HDR Techniques

HDR Photography is a method of combining multiple exposures into a single image in order to achieve a greater dynamic range in an image.

FYI, Vic's program at the NHCC in January will be on HDR

Tuesday, December 16, 2008

Barefoot Contessa Photo Adventures

Upcoming workshops:

2009 Workshops:
Savannah, Grand Lady of the South
Springtime on the Outer Banks
Cascades & Wildflowers of Virginia
Maine Coast & Lighthouses
French Wine Country
Canyon de Chelly & Navajoland
Arches, Canyonlands & Moab
Fall Aspens & Ghost Towns of Colorado
New England Fall Foliage
Lighthouses of the Outer Banks

For more information, go to our Barefoot Contessa Photo Adventures website, and if you are considering joining us, do as others have already done, made their room reservations for 2009!

Monday, December 15, 2008

Karen Sperling the original Painter expert

If you've ever had questions while working in Corel Painter, or if you've ever wanted feedback about your images, this offer is for you! For a small monthly fee, you can ask unlimited questions of Karen Sperling, the original Painter expert, by purchasing Artistry Painter Insurance. Have questions about how Painter's tools work? Need some help deciding which brushes to use? Want to know which photos are good candidates to be turned into paintings? By having an Artistry Painter Insurance plan, you now can get the answers to your questions directly from Karen Sperling for a fraction of the cost of personal training and quicker than having to research the answers on your own.

Visit this page for more info: http://www.artistrymag.com/docs/insurance.html

Happy painting! Karen _______________________________

Karen Sperling the original Painter expert

New Painter and Photoshop book: http://www.artistrymag.com/docs/sperlingbook.html

Painter and Photoshop tutorials: http://www.artistrymag.com/docs/tipsall.html

Painter and Photoshop classes: http://www.artistrymag.com/docs/retreats.html

Sunday, December 14, 2008

Photo Challenge: Ceiling

While we all appreciate a roof over our heads, it can be easy to forget our ceiling! For this photo challenge, we want a neck-crick-inducing view of the ceiling, just aim your camera up to gain a new perspective of your domicile. This photo challenge will be open for one week and will close December 17.

http://jpgmag.com/themes/177

More ice please...

From Weekly Photography Tips

Here in New England there are 1.2 million folks still waiting for power after yesterdays storm. The temps are not supposed to get out of the teens for the next couple days, so the ice isn't going anywhere soon.

Here are a few shots from Scott (click on any image to view larger a larger version):
http://weeklyphototips.blogspot.com/2008/12/more-ice-please.html
and here:
http://weeklyphototips.blogspot.com/2008/12/would-you-like-ice-with-your-winter.html

Saturday, December 13, 2008

BBC Bird videos

The BBC youtube site won’t let you embed their videos, but here are two links...

The first shows the amazing speed of the Peregrine.

The second the rather more refined hunting skills that make the Great Grey Owl such a perfectly adapted predator.

Friday, December 12, 2008

Thursday, December 11, 2008

Nikon unveils 24.5MP D3X digital SLR

Nikon has announced the D3X, its latest high-resultion professional DSLR. Sporting an imaging sensor with double the number of photosites of the popular D3, the 24.5 megapixel D3x includes similar features such as a 3.0", 920,000 dot LCD monitor with Live View, 51-point autofocus, EXPEED image processing and HDMI output. To keep up with the demands of stock photography the camera produces 50MB 14-bit RAW files that can be processed to produce 140MB TIFFs. It also supports Nikon’s wireless system and is compatible with Nikon’s new GP-1 GPS unit.
Read the rest here: http://www.dpreview.com/news/0812/081201nikond3x.asp

Wednesday, December 10, 2008

Eco-friendly (reusable) hand warmer

Those of you on the DelMarVa trip know that I have one non-environmentally sound habit -- I use hot hands to keep warm and while they keep me warm they are disposable.

Here is a reusable handwarmer: http://www.youtube.com/watch?v=IjaN39Cv1eE

You can buy them here: http://hotsnapz.com/

portfolio of foodscape photographer Carl Warner

Thank you Bill Hoikila for sending this most unusual link...

Everything you see in these pictures is food:

http://www.dailymail.co.uk/news/article-1089160/A-feast-eyes-The-artist-turn-market-stall-masterpiece.html

But these particular artworks are more vegetable than Constable, more turnip than Turner, because the raw ingredient for all of them is food.

This is the latest portfolio of foodscape photographer Carl Warner, 45, who dreams up the landscapes and commits his ideas to a sketch before buying the ingredients.

Were it not for the fact most of them took days to create, using pins and superglue, they'd be good enough to eat.

Tuesday, December 9, 2008

Join NAPP or give it as a gift

NAPP = National Association of Photoshop Professionals

They offer lots for photogshop users, including many discounts, tutorials and even freebies.

http://www.photoshopuser.com/register.html&aid=wjqany&code=friend

Even if you don't have the latest version of Adobe Photoshop doesn't mean you can't create outstanding work. NAPP Can Help 
Through the years, the National Association of Photoshop Professionals has helped thousands of people master every version of Photoshop there is; and although the entire community is a buzz with the new CS4, that doesn't mean you have to own it to benefit from us. 


Special Offer - Become a NAPP member now and get THREE bonus gifts!

For about 25-cents a day, your membership gets you:


  • Eight issues of Photoshop User magazine
  • Instant access to thousands of Photoshop tutorials
  • Free online Help Desk support
  • Exclusive discounts from Adobe, Apple, B&H, and MORE!
  • For me the free shipping at B&H alone is enough to pay for the membership

    Where everyone learns Photoshop - National Association of Photoshop Professionals

MARK BOWIE's In Stoddard's Footsteps Book

MARK BOWIE ~ OUTDOOR IMAGES

In Stoddard's Footsteps Book Has Arrived!

I'm pleased to announce that I can ship signed, personalized copies of my new book, In Stoddard's Footsteps: The Adirondacks Then & Now, to arrive in time for Christmas. Limited edition hardcover - $35.95 ea.Softcover - $24.95 ea.Shipping - $3.50 for the 1st book, $0.50 ea. for additional copies NY and MA residents please add applicable sales tax (doesn't apply to shipping fees). To order, please mail a check to: Mark Bowie61 Howe Rd. Pittsfield, MA 01201 or call me at (413) 442-9125. If you'll be giving the book as a gift, please indicate how you'd like it personalized.

Also... I'm scheduling public presentations on the Stoddard project and invite you to visit my website, www.markbowie.com, for locations and dates.

Best wishes & Happy Holidays! Mark

Monday, December 8, 2008

Snowy Owls

I follow a few bird lists and there have been reports of snowy owls in CT.

Directly from Luke's Blog:

Another couple of birders and I were wondering whether the Snowy Owl reported in Stratford at the same time as the Norwalk Snowy Owl might have possibly been the one that arrived in Westport (as found by Tina Green). Well thanks to Charlie Barnard reading the post and sending me a great snap of the Stratford Owl I think we can safely rule out the Westport bird being the relocated Stratford bird. That means we can now tally 3 seperate Snowies in Fairfield County over the last couple of weeks. I note that a Snowy Owl was reported from Bridgeport today by Charlie (the same bird that disappeared from Stratford 10 or so days ago?) It is certainly turning into a banner year for these beautiful and much sought after owls down on the Fairfield County coast!

DPreview -- Cameras receiving the most clicks

From http://www.dpreview.com/ Cameras receiving the most clicks in the last five days.

Canon Powershot G10 4.9 %
Nikon D90 4.1 %
Panasonic Lumix DMC-LX3 3.4 %
Canon PowerShot SD790 IS 3.2 %
Canon EOS 50D 3.0 %
Canon EOS 5D Mark II 2.8 %
Panasonic Lumix DMC-FX37 2.2 %
Canon EOS 1000D / Digital Rebel XS 2.1 %
Nikon D700 2.1 %
Canon EOS 450D / Digital Rebel XSi 2.0 %

Detail & brand share...

New ProShow Tool for Adobe Lightroom Users

Streamline your workflow and experience integrated solutions with the ProShow Plug-in for Lightroom. Now you can create professional ProShow slideshows in Lightroom in a few simple steps. What's better?

The ProShow plug-in is 100% free so download a copy today.

How it WorksThe ProShow Plug-in allows you to quickly and easily set-up slideshows in Lightroom and export directly to ProShow Gold or Producer. Inside Lightroom, you can create a customized slideshow from a group of images complete with motion effects, transitions, photo captions and more. Once created, slideshows can be further enhanced and output in ProShow.
Download the ProShow Plug-in for Lightroom today.

Features and Functions of Plug-in

Add Captions & Copyrights from Metadata

Add a copyright, title and description to photos in your slide show from metadata. Further refine by adding caption effects and adjust caption size and placement on slides.

Create Slideshow PresetsIn Lightroom, create a show and add it as a user preset. You can apply the preset to any number of images at a later time to quickly create a custom slideshow.

Transitions, Borders & Motion Effects

Choose from 280 transition effects and 20 photo borders for your slideshow. Add a pan, zoom or rotate to your photos and control the speed of the motion and timing for slides.

Create Proofing Shows

Use proofing captions to display information about your slides that can be used by viewer’s to identify photos. Include the slide number or photo file name.
More Products from Photodex

ProShow MediaSource

Enhance your slideshows with add-ons from the ProShow MediaSource line. Add borders to photos, use professional background images on slides, use royalty-free music for your soundtrack and more. Multiple themes & titles available. More Info

ProShow WorkshopLearn to create better shows in less time with Proshow Workshop Training DVDs. Each title comes with over 70 minutes of instructor led training and practice files so you can follow along with each lesson. More Info

ProShow BookMaster everything from creating your first show to using Producer's advanced effects. The ProShow Guide is a comprehensive resource for all ProShow users. It's over 300 pages and comes with a bonus CD filled with demo shows and content files you can use to follow along with. More Info

Are You Running the Latest Version of ProShow?

Just released, ProShow 3.5 outputs directly to Blu-ray for true high-definition slideshows. Download a free trial of 3.5 or upgrade today.

Official Photodex Guide to ProShow

New ProShow Book Now Available and In Stock

The Official Photodex Guide to ProShow

New! ProShow BookMaster the art of making great slide shows using ProShow Gold and ProShow Producer.

By James Karney

Published by Cengage LearningPaperback, 300+ pages, Bonus CD Included

Book Description

Do you want to learn how to make great slide shows with ProShow Gold or ProShow Producer? Have you ever watched a slide show and wondered how certain special effects were achieved?
The Official Photodex Guide to ProShow is the solution. It serves as a comprehensive guide to ProShow for everyone from graphics professionals and photographers to educators and business professionals. You'll learn how to create multimedia productions that can be seen using everything from digital picture frames, iPods, and DVD players to HDTV and the World Wide Web. Perfect your presentation skills as you cover the basics of design, the fundamentals of ProShow production techniques, and advanced tools.

More Information

Follow the links below to learn more about the new ProShow book. You can download a sample chapter, view the table of contents and easily purchase the book online.
·
ProShow Book Overview
·
Download Sample Chapter
·
View Table of Contents
·
Purchase Online

What You'll Learn
· Master the ProShow interface and basic workflow.
· Learn to use ProShow's professional tools to enhance productions.
· Explore layers, transitions, mastering keyframes, and motion.
· Craft production skills with templates, menus, branding, and stock footage.
· Incorporate soundtracks and captions to create interactive presentations.

Purchase
Buy Now - $34.95Purchase online or call 1-800-37-PHOTO to purchase by phone.

Bonus CD IncludedFeatures practice content that corresponds with lessons in the book.

Sunday, December 7, 2008

38th annual National Wildlife Photo Contest

Photo Contest Winners

By Hannah Schardt


FROM A CARDINAL splashing in a Florida birdbath to a leopard lurking in Botswana’s Okavango Delta, the winning images of the 38th annual National Wildlife Photo Contest are as varied as the species that populate this planet. This year’s winners were drawn from our largest-ever pool of entries—more than 55,000 in six categories: Mammals, Birds, Other Wildlife, Landscapes and Plant Life, Backyard Habitats and Connecting People and Nature. Along with selecting the $5,000 grand prize winner, judges awarded cash and other prizes for the first- and second-place winners in every category in each of two divisions, amateur and professional. One youth winner was also chosen.


To see all of the winning images, along with this year’s honorable mentions and instructions on how to enter next year’s contest, visit www.nwf.org/photozone.

Saturday, December 6, 2008

Portraits Unplugged with Bobbi Lane

http://www.ppsop.net/port.aspx

Portraits Unplugged

Instructors: Bobbi Lane
Duration: 4 Weeks
Cost:$175
Starts: Jan 9, 2009

Natural light portraits can be the most evocative and meaningful images that a photographer can create. However, understanding and mastering the basic qualities of light can be challenging. The beauty of available light is that it's everywhere. Any time of day and any situation can be turned into a great opportunity for environmental portraits. This class will help develop your ability to 'see' the quality of light and apply it to 'real' people. We don't scout locations, we scout light and make the location work. We put our people in the light, critically aware of the direction as well as the quality, to create our interpretive portraits. The most important part of our picture is not the subject, but how we choose to define our subject. The emphasis is on utilizing all our tools: light, tonality, composition and color, to get our ideas stated visually.

Many photographers get 'lucky' when working with light and realize that early morning and late afternoon are flattering times to do portraits. The truth is that learning to control the light gives you the freedom to photograph any time of day with outstanding results. The class will cover all kinds of existing light: hard, soft, bounced, reflected, diffused, etc. The only tools we use are reflectors and diffusers. No flash! We will work in both black and white and color depending upon the mood you want to create. There are many facets that go into creating an effective portrait and we cover those various aspects and work with posing and expression for a variety of personalities.

This is not a technical course, but a working knowledge of photography is necessary.

This class covers following topics:
Types of portraits
Lens choice, depth of field, framing, posing, expressions and background
The Big Three: Direction, Quality and Depth of Light
Direction of light: Lighting Patterns, describing the form and setting the mood with Split, Rembrandt, Loop and Butterfly
Depth of Light: Lighting Ratios determine the drama
Quality of light: How the quality directly sets the overall feeling and texture of the portrait. Working with direct sun, backlighting, shade, overcast, window light, bounced and diffused
Diffusers: Altering the direct sunlight with round diffuser, panels or sheets
Reflectors: Using white cards, pop up reflectors with white, gold, silver, soft gold and black. Reflectors for fill or for main light
Finding the light, looking for the scene that will give you the best light for your subject
Approach, are you lighting for flattering or effective portraits?
The relationship between the photographer and subject
Multiple reflectors
Color-making correct skin tones or warming them for effect

Course Requirement:A camera with medium telephoto lens (anything 100mm and higher), reflector (either a white card like foamcore board or pop up reflectors-preferable white/soft gold 32'), a stand with clamps or a friend to hold the reflector.

Instructor: Bobbi LaneBobbi Lane is an award-winning commercial photographer specializing in creative portraits on location and in the studio. Lane's multi-faceted approach to photography incorporates over 30 years of technical experience with innovative artistic interpretation. Lane shoots primarily people on location for editorial, corporate, and advertising accounts as well as photographing "real people" and travel for stock. Her stock photography has sold worldwide for ads, posters, and billboards.Bobbi's clients include: Warner Bros., PricewaterhouseCoopers, Samsung, Bose Corp., Neutrogena, Ricon, Mattel, Maui Music Festival, Charles Schwab, McDonnell/Douglas, Sears' Tower Skydeck, and the Morro Bay Natural History Museum.As a dedicated photo educator, she brings insight and enthusiasm to her hundreds of students every year. Bobbi's excellent rapport and communication with her students inspires and motivates, while her straight-forward teaching style reaches students of many different skill levels. Bobbi teaches her own weekend workshops in CT, the Bobbi Lane Workshops and at the Santa Fe Workshops, the Maine Workshops, the Julia Dean Workshops, and the International Center for Photography in New York City. She is the Chair of the Education Committee for Advertising Photographers of America, and the creator of their Successful Emerging Photographer’s program. In October 2007, at APA National’s 25th Anniversary, they honored Bobbi with a Special Recognition Award for Education.

What is this aperture thingy anyway?

From Cameradojo

Inside each lens is a diaphragm that can open and close, the size of the opening at any given setting is what we refer to as the aperture setting. On our cameras we refer to specific size settings as f-stops such as f/2.8, f/5.6, f/11, etc. While the obvious value of adjusting the aperture is to control how much light enters the camera, there is a secret hidden world beneath the hood that we will need to get a grasp of as well, but let’s start at the basics first.


Read the rest here...

Hazel Meredith's photographs on display at Bethel Library

Hazel Meredith has a display of her photographs at the Bethel Library

189 Greenwood Ave., Bethel (Off Black Rock Tpke.)
Dec. 5-31

Stop by for some visual treats!

Friday, December 5, 2008

Pat Brundage for a "Meet the Artist" reception

Join Pat Brundage for a "Meet the Artist" reception at the Monroe Library on Saturday, December 13th from 10:00 - 12:30.

Pat has 43 images on display!

They will have refreshments, music, companionship and snacks to share with everyone before we all go out to finish our Christmas Shopping.

The library is approximately 1/2 mile north of the intersection of Rts. 111 and 110 in Monroe, on Rt. 111.

Thanks. Hope to see you there. Pat Brundage

for sale Epson R1800 Photo printer

I have for sale my Epson R1800 Photo printer. This is the printer that I have been making my competition prints on for the last several years. It has 8 inks, and will print 13" wide. It comes with the original box and all original accessories including manuals and CD with software and drivers. Add a USB2 cable and you're good to go.

Reason for selling, upgrading.

Price is $200 firm, local pick-up only, I'm not shipping due to size, weight and damage factors.

E-mail: Baywing56@netzero.net or call home phone; 860-632-2463.
Thanks, Warren Disbrow

Add Falling Snow To A Winter Photo

Learn Photoshop with Photoshop Effects Tutorials at Photoshop Essentials.com

http://www.photoshopessentials.com/photo-effects/photoshop-snow/

Photoshop Snow Effect - Add Falling Snow To A Winter Photo

Written By Steve Patterson

In this Photoshop photo effects tutorial, we'll learn how to easily add realistic falling snow to a winter photo.

Call me crazy, but I love winter. Sure, it's not always easy to drive in, and scrapping ice off the car windshield is never fun. But to me, there's nothing better than waking up to a fresh blanket of snow covering the city, or hearing that crunching sound the snow makes under my boots, or watching the snowflakes glisten and sparkle under the street lights as I take my dog for a walk in the quiet calm of a cold winter night. Or maybe it's all just a shameful excuse to drink too much hot chocolate. Who knows.

Of course, as with any season of the year, getting Mother Nature to pose for our photos isn't always easy. You may have found the perfect winter landscape scene or snapped a great photo of your kids building their very first snowman, and the only thing that would have made the photo even better is if it had been snowing at the time, which of course, it wasn't. Fortunately, when the weather forecast fails us, Photoshop can still save the day. In fact, one of the great things about Photoshop is that if you focus on learning techniques rather than on memorizing steps, you'll soon discover that the same techniques can be used to create entirely different effects! In this tutorial, we're going to be adding falling snow to our photo, but if you've been following along with some of our other tutorials, you may recognize the technique we'll be using here, since we've used to same basic technique to add rain to a photo and to create a starry night sky. Memorizing steps can give you a serious case of tunnel vision in Photoshop, where all you ever see is what's directly in front of you. But when you focus on the techniques themselves, not the actual steps or the final results, and begin to understand the "why" behind what you're doing, you may just find yourself staring at something one day and thinking "You know, I bet I know how to do that in Photoshop!". Life after that will never be the same.

read the rest here: http://www.photoshopessentials.com/photo-effects/photoshop-snow/

Thursday, December 4, 2008

DataRescue's DD

DataRescue's DD (in short DrDD) - is a graphical disk imager intended for data recovery and backup of partially corrupted storage devices. DrDD creates complete or partial images of disks or memory cards to files on another storage device, allowing multiple data recovery attempts on the raw data, thereby minimizing the risk of damaging the corrupted media further. DrDD is available for Windows PC and Mac OS X machines. DrDD is freeware.

DataRescue has recently released DrDD, a freeware program for making disc images from corrupted memory cards and other storage devices.

DD is similar to the Backup Card feature of PhotoRescue 3.x, but differs in one significant way: DD can be configured to image only selected portions of a device, in the event that it's not possible to image the entire device (as can be the case with a damaged card or hard drive that becomes unresponsive every time a particular corrupted area is accessed).

Download Windows PC Version - Mac OS X Version

A typical use example
A 40GB hard drive suffers of physically bad sectors in the system area that cause the drive to lock up when the damaged area is hit by a conventional disk duplication program or a data recovery program. DrDD is first used to attempt an image of the drive. DrDD locks up as well, the error is completely irrecoverable. The system is reset. Through the last log, the problematic area seems to be sector 1.000.000. DrDD is used to first create an image of the hard drive up to sector 999.999. Knowing that hardware errors are often contiguous, a second image is created, backwards, from the end of the drive (for example 40000MBs) back to sector 1.000.001. The backward copy proceeds and finally locks up at sector 1.004.000. If the data hasn't been saved, a new forward copy starting at sector 1.004.001 and going up to the end of the drive is done. The user now has saved most of the raw content of its hard drive and has saved the multiple trial and error read attempts he would have gone through if he had restarted the copy forward at sector 1.000.001 - with most of the data in a safe place, the user is now able to try as many data-recovery utilities as he wishes, for example our own PhotoRescue application.

DD can also be set to read backwards which, says DataRescue's Vandevenne, can help avoid certain types of lockups.

Wednesday, December 3, 2008

PhotoRescue updated

I have preached this before, kind of life firedrills, try a practice run and rescue your photos. Do this to learn how to rescue your images when your adrenaline isn't running and you are freaked out because you formated your memory card before you downloaded or your get an error message from your memory card.

It's simple to try -- Format your memory card and then run the software and rescue your images.

http://www.datarescue.com/photorescue/v3/try.htm

PhotoRescue updated to v3.1.7 Build 11394
Wednesday, November 12, 2008 by Rob Galbraith

A new license is US$29; that sum nets you a bundle of both the Mac and Windows versions.

http://www.robgalbraith.com/bins/content_page.asp?cid=7-9318-9737

DataRescue has recently released a new version of PhotoRescue, its venerable photo recovery and memory card maintenance application for Mac and Windows. Version 3.1.7 Build 11394 improves recovery of Nikon D700 and Canon EOS Rebel XS/1000D RAW files, movies and, in the Windows version, corrects a caching problem when the program is run in 64-bit Vista.


PhotoRescue is the best and fairest picture and data recovery solution for digital film - sd cards, compact flash, memory sticks, microdrive, etc... Featuring innovative recovery algorithms, PhotoRescue displays reliable previews of the recoverable pictures. What you see is what you recover, both on the Windows and on the Apple Mac OS X platforms. PhotoRescue has been awarded 4.5 stars by PCMagazine. PhotoRescue is available in three different versions.

Tuesday, December 2, 2008

Introduction to ICC profiles

Thanks Wayne for passing this along!

Introduction to ICC profiles: http://www.drycreekphoto.com/Learn/profiles.htm

Check out some strange and offbeat photos.

Weird, Wild, and Wacky
Check out some strange and offbeat photos.
http://www.washingtonpost.com/wp-dyn/content/gallery/2008/11/19/GA2008111903078.html

Enable control of Canon EOS Utility by voice

ShutterVoice to enable control of Canon EOS Utility by voice

Tuesday, November 25, 2008 by Rob Galbraith

Read the full story here:

http://www.robgalbraith.com/bins/content_page.asp?cid=7-9318-9769

Developer Scott Forman is nearing completion of ShutterVoice, a Windows-only application that enables many of the functions of Canon's EOS Utility to be controlled with spoken commands. Originally created to ease the process of shooting lighting tests with himself as the subject, Forman has decided to commercialize his efforts into a US$30 program, which is projected to emerge next month.

You can sign up to be notified when ShutterVoice is ready to go.

Monday, December 1, 2008

White Reveals, Black Conceals: Masking Your Way to Better Photography

Dec. 3rd 2008 at the Great Bridgeport Camera Club. http://www.geocities.com/gbcclub/


White Reveals, Black Conceals: Masking Your Way to Better Photography
by Lisa and Tom Cuchara (CT)

Masking is extremely simple; this one mantra “white reveals, black hides” will work for almost all of your Photoshop editing. From exposure to contrast, dodging and burning, blurring the background, selective coloring, selective focus, etc., Lisa and Tom will demonstrate “non-destructive” editing in Photoshop.


They will show you how to use layers and masks to enhance your images. Adjustment layers and filters can be applied to an entire image, but sometimes you just want to tweak part of an image, which is where masks come in. The advantage of using layer masks is that you can refine both the effect and the area being changed at any point, even after you save and re-open an image. White reveals, black hides and shades of gray provide a variety of opacities – this one simple concept is essential for anyone using the digital darkroom to enhance their images.

OUR NOTES
These notes are protected by the U.S. copyright Law. No reproduction of notes are permitted unless granted by the author. Please email us if you would like to use these notes.

“White Reveals, Black Conceals: Masking Your Way to a Better Photograph”
by Lisa and Tom Cuchara

Introduction

Masking is extremely simple; this one mantra “white reveals, black conceals” will work for almost all of your Photoshop editing. From exposure to contrast, dodging & burning, blurring the background, selective coloring, selective focus (even creating a Lensbaby effect in Photoshop), etc. “Non-destructive” editing in Photoshop is a critical component to the digital darkroom; this includes the use of layers and masks to enhance your images. Adjustment layers and filters can be applied to an entire image, but sometimes you just want to tweak part of an image, which is where masks come in. The advantage of using layer masks is that you can refine both the effect and the area being changed at any point, even after you save and re-open an image. White reveals, black conceals and shades of gray provide a variety of opacities -- this one simple concept is essential for anyone using the digital darkroom to enhance their images!


Layers, Adjustment layers, Masks – these are simpler then they sound. You may have even used masks and didn’t know it. If you have ever selected part of an image and then performed Levels (or any other adjustment) you actually created a mask without even attempting to do so. Adjustment layers are superior to working on the “background layer” which is often equated to the “negative”. Adjustment layers are more powerful because you can go back and change then at any time – masks too! They are not “permanent” in the sense that you can change them or even delete them at any time.

What are layers?

Layers allow you to work on parts of your photo without affecting other areas. Think of layers as a stack of transparencies, where each sheet is a different layer and the layers can appear in different orders with varying opacities. Plus using layers means that you can edit or adjust each sheet individually. You can edit a particular feature of your photograph (saturation, levels, etc.) using Adjustment layers. All of these are examples of non-destructive editing.

Worthwhile Shortcuts -- there are lots of references about Photoshop shortcuts (and you can even create your own for commonly used tasks)


http://www.creativetechs.com/iq/photoshop_cs3_shortcuts_cheatsheet.html

http://morris-photographics.com/photoshop/shortcuts/

http://digital-photography-school.com/blog/photoshop-shortcut-commands/

http://digital-photography-school.com/blog/28-more-exceptionally-useful-photoshop-shortcuts/


For MAC users please note that the equivalent modifier keys: the Option Key is the Mac equivalent to the PC (Alt) key and the Command Key (also called the Apple key; with its either cloverleaf symbol, the Apple symbol or both). is, more or less, the equivalent of the PC user's Control Key. Cmd = Ctrl and Opt = Alt.

Ctrl Z = UNDO (a VERY good shortcut to learn)
Ctrl 0 (zero) --> maximize the photo
Ctrl J à -->Create a new layer
Ctrl Shift R -->Add layer mask: Reveal all (White)
Ctrl Shift H -->Add layer mask: Hide all (Black)
M --> Marquee
W --> Magic Wand
Ctrl + Alt + Shift + E --> Stamp Visible

One of our favorites. First, create a new empty layer (Ctrl Shift N) on the top layer. Then select that new layer and use this command (Ctrl + Alt + Shift + E); we use this for editing that can’t be done non-destructively (USM, etc). We actually have an action that does this for us in one step because we use it so often.

Ctrl D --> deselectAlt [ --> move down a layer

Alt , (comma) --> move to bottom layer
Alt . (period) --> move to top layer

The use of Layers and MasksThe “eyeball” is used to turn on/off the visibility of any layer in the stack (you may have lots of layers).


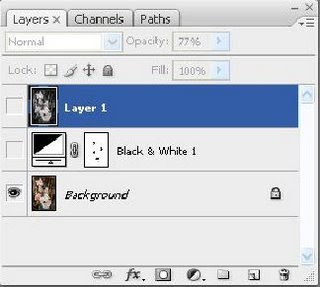
Fig. 1 Confirm that the layers palette is visible (If not, Windows --> layers)

The CS3 screenshot (fig 2) shows the types of adjustment layers that you can create.

One of the advantages of adjustment layers is that you can re-open and re-adjust them at any time. They help assure that you are performing non-destructive editing of your photographs.
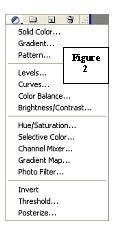


Figure 2

As soon as you open an image maximize it (Ctrl ZERO) and then make a copy of the layer (Ctrl J). Some editing will be performed on Adjustment layers. Adjustment layers do the same thing as normal color & exposure adjustments except that they are “non-destructive” in that they do not alter the original image information and they can be edited at any time. Some editing, like levels, saturation, etc. can be performed via adjustment layers (Fig 2) while other editing (like watercolor filters, etc.) need to be performed on copy layers (created by Ctrl J or by Ctrl N followed by Ctrl + Alt + Shift + E --> Stamp Visible).

http://photoshoptips.net/2005/09/16/adjustment-layers/ explains layers and adjustment layers and their transparent nature very well.

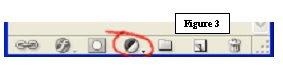
Create an adjustment layer click on the half white/half black circle at the bottom of the layers palette (Fig. 3). Adjustment layers automatically are created with a mask in place (a white, reveal all, mask, See Fig 1 middle layer).

Therefore selective coloring is EASY, just paint back in your color with a Black brush. In contrast, “copy layers” need to have a mask created/applied. You decide to apply a white OR a black mask depending upon if you have a lot to reveal (use a white mask and paint with black) OR a lot to conceal (use a black mask and paint with white).Ctrl Shift R --> Add layer mask: Reveal all (White)Ctrl Shift H --> Add layer mask: Hide all (Black)After your editing/effect has been created (either on an adjustment later or on a copy layer with a mask applied) then you can start to paint in (reveal) or paint out (conceal) you editing. You can also change the opacity of the brush (white or black) to “choose a shade of gray” to give you a semi-transparent adjustment layer.

The keyboard numbers affect the opacity of the brush (to get shades of gray) i.e. 5 = 50% opacity.

Remember white reveals, Black concealsB --> selects the Brush tool (this is what you will paint with)

D --> sets the color palette back to Black and White

X --> switches between Black and White

Numbers on the keyboard --> affects the opacity of the brush (to get shades of gray) i.e. 5 = 50% opacity

The "[" left square-bracket key will decrease brush size

The "]" right square-bracket key will increase brush size

Holding down the shift key while pressing on these same keys will soften and harden the brush edges.The brush tool is the main tool used to “paint” with white, black and shades of gray (via changing the opacity of the Black and white, easily via the keyboard numbers) as you go along).
Like Adjustment layers, masks never actually affect your image. The simple beauty of using layer masks is that you are in effect “painting” with whatever filter/edit/affect that you want to use. You can also change the opacity of the layer itself when you are done editing the layer to further refine the effect. If you make a mistake or color “outside the lines” you can easily fix it by painting back over with the opposite color. This is part of the power of masks, unlike editing after you have made a selection where you cannot undo and redo.Non-destructive Dodging and

Burning:
Create a new layer (Shift Ctrl N), name it dodge&burn and change the mode of the new layer to Overlay (make sure that Fill with Overlay-neutral color is checked). In overlay mode 50% gray has no effect. Set your foreground color to black, use a soft-edged brush (opacity in the 5-50% range) and paint to burn the areas that need darkening (don’t forget the edges, lots of photographers vignette or burn the edges to keep your eye on your subject). Press X to change the foreground color to white and paint to dodge the areas of the image that need to be dodged (lightened). There is a lot of control when dodging/burning this way and it is completely re-editable too!

Smart Objects:
Masks also work very well with smart filters and with opening an image in CS3 using two different RAW settings. For example, you want to optimize the sky in ACR (Adobe Camera RAW) but when you do the foreground suffers and vice versa.

Open your image in ACR, optimize the sky and hold Shift when you click open, opening it (as a smart object) in such a way that ACR is still accessible. Now copy that layer (right click “new smart object via copy”), now double click on that new layer smart object and re-adjust your image in ACR. Apply a layer mask to that newly edited layer [Ctrl Shift R à Add layer mask: Reveal all (White)]. Paint with Black to reveal the sky underneath. You now have a perfect exposed image optimized in ACR for the sky (highlights) and for the foreground.

Where to Find more information:

Rule of Thirds and Golden Mean Actions

Rule of Thirds and Golden Mean Actions
http://www.shutterfreaks.com/Actions/RuleOfThirds.php#Download
by your Shutterfreaks Team

As you are learning composition, the so-called "Rule" of Thirds can be helpful. I prefer to use it as a guideline, rather than a rule, but I do find it useful when making compositional decisions. To use the rule of thirds when shooting, visualize a 3 x 3 grid overlaying the scene you see in your viewfinder or LCD. When composing your shot, try to locate the main objects in your photo at the intersection of these grid lines. In other words, place your main objects 1/3 up from the bottom and 1/3 over from the left, or 1/3 down from the top and 1/3 over from the right, etc. Some folks think the Golden Mean is a better compositional guideline.
Downloads

Our Image
As an example, let's see how this photo measures up to the Rule of Thirds.

With the Rule of Thirds Grid
Here's what we see after we run the Rule of Thirds Action. We see that several of our main compositional elements fall on the lines or the intersection of two lines. Would the image be improved if the vertical line at the right went through the middle of the walkway, instead of the left post? Or does the current composition provide more "tension?" This is the kind of analysis you can do on your images.

Another example
Let's see how this photo measures up to the Golden Mean. Does that tree appear to be in the "right" place?

With the Golden Mean Grid
Here's what we see after we run the Golden Mean Action. It appears that we can be pretty happy about where we put that tree :)

One More Example, Using both the Rule of Thirds and The Golden Mean
The red lines represent the Rule of Thirds grid, and the golden lines represent the Golden Mean Grid.

Free Actions
If you'd like to see how your photos "measure up" against the Rule of Thirds or the Golden
Mean, we have some FREE actions that can help:

Download the appropriate file below and save it to your hard disk.
Unzip it.

Follow the instructions in the ReadMe file to install the actions.

for Photoshop
for Photoshop Elements 1-5
for Photoshop Elements 6
for Photoshop Elements 7

More Advanced Actions
If you'd like a more advanced action that will help you crop your images to conform to the Rule of Thirds and the Golden Mean, check out our Rule of Thirds Pro Actions:
for Photoshop
for Photoshop Elements 1-5
for Photoshop Elements 6